

Added scripts to download.
I will show you how to create an installation ISO file for all versions of macOS (OS X) after 10.7 Lion.
Here, I will explain in detail the procedure using the “Terminal” of the Mac genuine application using illustrations.
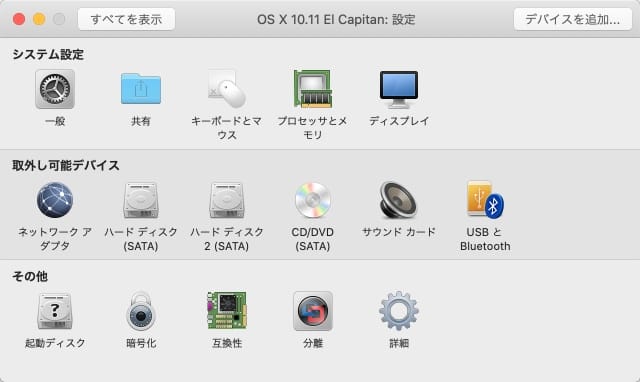
Overview
I think that the ISO file for macOS installation is often used with virtual environment software such as VMware and VirtualBox.
On this page, instead of executing multiple commands in “Terminal” to create an ISO file, you can easily create an ISO file by copying and executing a “shell script”.
Also, I actually checked the operation of the created all ISO files with VMware and VirtualBox.
By the way, what the “shell script” does is roughly as follows.
- Temporarily create a working image file
- Restore the disk image loaded from the macOS installer into your working image file
- Convert working disc image to ISO file
The spelling of the command changes depending on the OS version, making it difficult to understand, but what you are doing is simple.
However, since the folder structure from OS X 10.7 Lion to OS X 10.12 Sierra is different from 10.13 High Sierra or later, the commands are slightly different, but if you use the script on this page, that will also be supported. I don’t think I have any particular problems.
Operation verification result of the created ISO files
Mac
On Mac, you can install VMware and VirtualBox from almost any version of the created ISO file.
However, be careful when installing 10.12 Sierra and 10.11 El Capitan as shown in the table below.
The Mac version of VMware Fusion Player 12 can be installed from the OS installer without using any ISO files.
Verified environment
- MacBook Pro(Retina, 15-inch, Late 2013)
- macOS 10.15.7 Catalina
| OS version | VMware Fusion Player 12.0.0 |
VirtualBox 6.1.14 |
| 12 Monterey | ○ | ○ |
| 11 Big Sur | ○ | ○ |
| 10.15 Catalina | ◯ | ◯ |
| 10.14 Mojave | ◯ | ◯ |
| 10.13 High Sierra | ◯ | ◯ |
| 10.12 Sierra | ◯ | × Hung up during boot |
| 10.11 El Capitan | △ Keyboard / mouse not connected error There is a workaround below |
◯ |
| 10.10 Yosemite | ◯ | ◯ |
| 10.9 Mavericks | ◯ | ◯ |
| 10.8 Mountain Lion | ◯ | ◯ |
| 10.7 Lion | ◯ | ◯ |
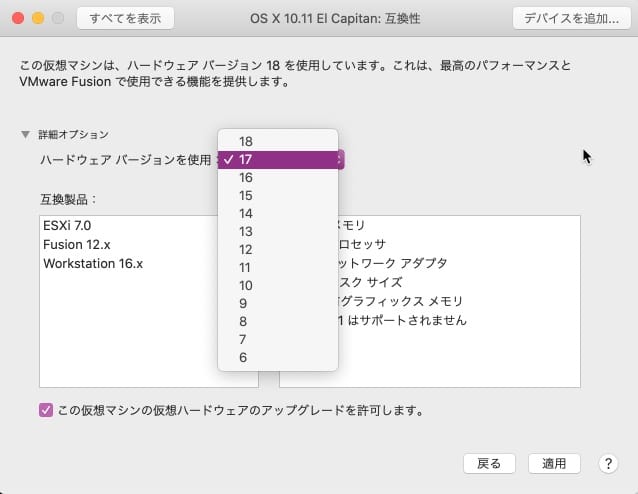
10.11 El Capitan VMware Fusion Workaround
After opening “Settings”-“Compatibility” of the virtual machine and changing “Hardware version” to 17 in “Advanced options”, it was installed normally.
Windows
On Windows, neither VMware nor VirtualBox can install macOS by default.
However, VMware can be installed without difficulty by installing an application called “unlocker” introduced in the following GitHub page.
On the other hand, I couldn’t find an easy solution with VirtualBox.
By the way, if you search the net, you will find a solution for VirtualBox, but I think that it is difficult to deal with it unless you are an advanced user because the information is old and the work is complicated.
So it’s safe to use VMware on Windows.
Verified environment
- ThinkPad X1 Carbon 6th(2018)
- Windows 10 Home 2004
| OS version | VMware Workstation 16 Player 16.0.0 |
VirtualBox 6.1.14 |
| 12 Monterey | ○ | × Booting loop |
| 11 Big Sur | ○ | × Booting loop |
| 10.15 Catalina | ◯ | × Booting loop |
| 10.14 Mojave | ◯ | × Booting loop |
| 10.13 High Sierra | ◯ | × Booting loop |
| 10.12 Sierra | ◯ | × Hung up during boot |
| 10.11 El Capitan | △ Keyboard / mouse not connected error There is a workaround below |
× Serious error |
| 10.10 Yosemite | ◯ | × Serious error |
| 10.9 Mavericks | ◯ | × Hung up during boot |
| 10.8 Mountain Lion | ◯ | × Hung up during boot |
| 10.7 Lion | ◯ | × Not start |
10.11 El Capitan VMware Workstation workaround
It may seem a bit tricky, but for VMware for Mac and VMware for Windows, I’ll show you how to use the compatibility of virtual machine files.
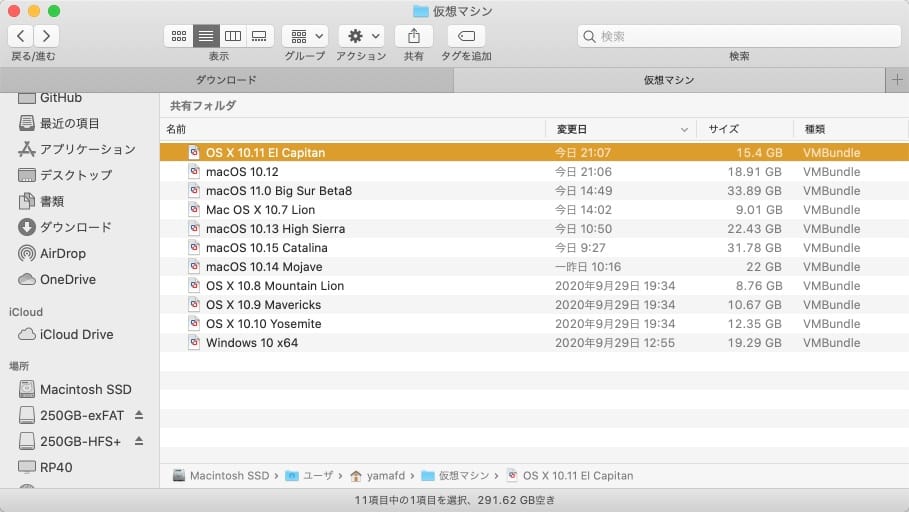
As many of you may already know, I would like to create a 10.11 El Capitan virtual machine on a Mac in advance and load it on VMware for Windows.
The caveat is that virtual machines must be in a “shut down” state rather than a “resume (suspend)” or they may fail.
To copy the virtual machine file, use an external HDD / USB memory in “exFAT format” that can be read and written via LAN or both Windows / Mac.
The procedure is briefly introduced below.
- ①
Copy the Mac version of the VMware Fusion Player virtual machine file to an external HDD / USB memory in exFAT format.
- ②
Copy the file ① to the virtual machine folder of VMware Workstation for Windows, usually “Documents”-“Virtual Machines”.

- ③
In the Windows version of VMware Workstation, click Open Virtual Machine.

- ④
Open the file with the extension “vmx” in the virtual machine folder you want to open.
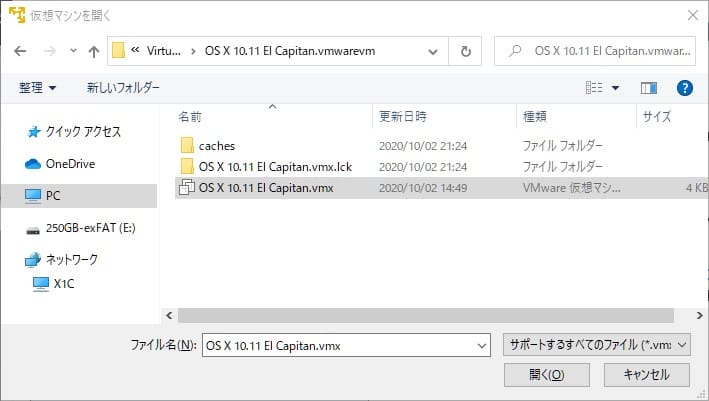
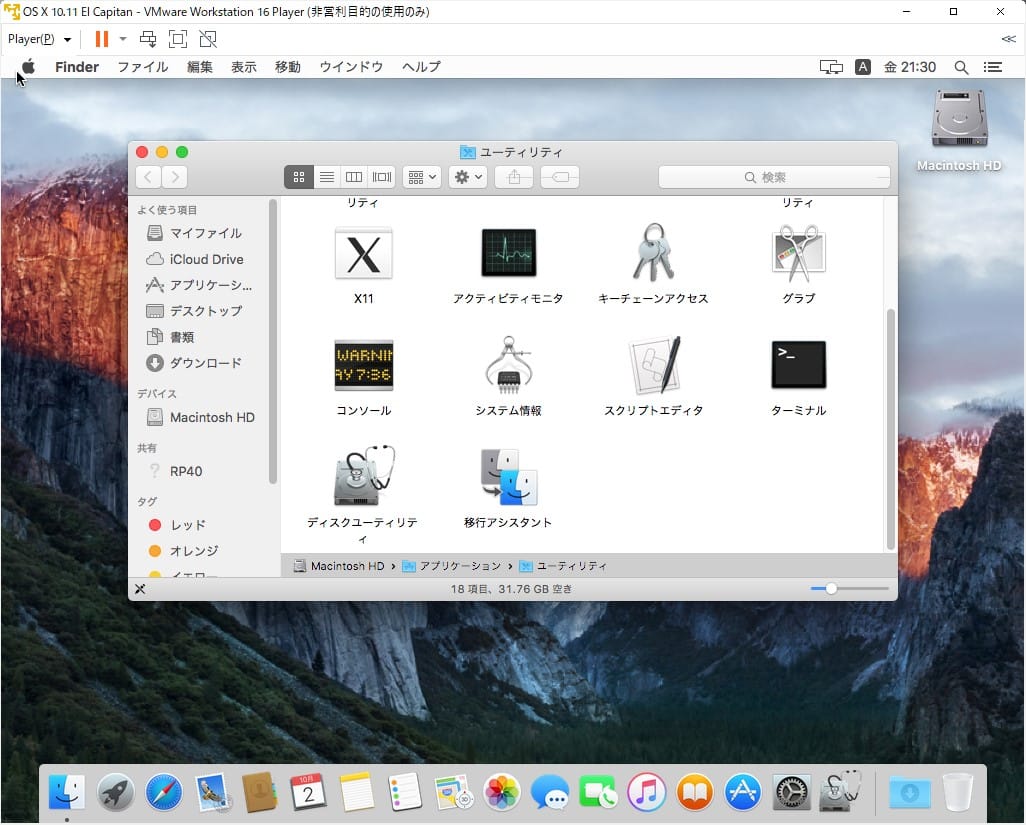
- ⑤
The virtual machine has opened as shown below.
What to prepare
Mac
The ISO files are created using the “Terminal” of the Mac itself, so the Mac itself is required.
However, the created ISO files can also be used on Windows.
macOS(OS X) installer
Please see the following article for instruction on how to get each version of the OS installer.

Editor for scripting
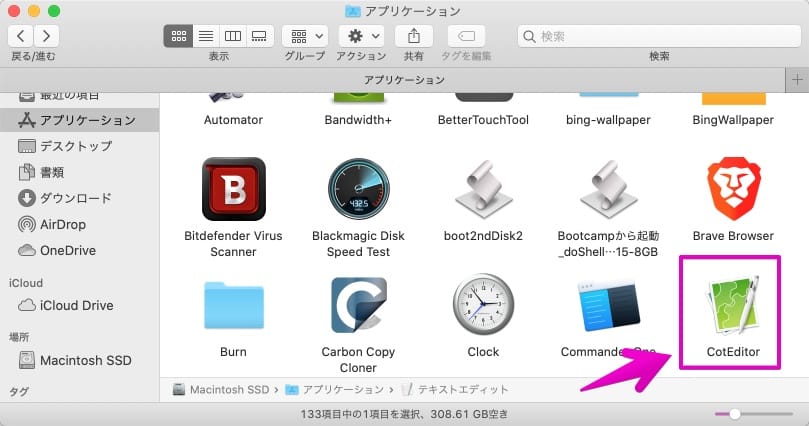
Mac standard “TextEdit” is fine, but here we recommend the free app “CotEditor” available from the App Store.

The reason for the recommendation is that you can create a script file that can be executed from the terminal as it is by setting “Grant execution right” when saving the file as shown in the screen below.
Even if you do not use “CotEditor”, you can grant the execution right by specifying “chmod +x script file name” from the command line of “Terminal”.
Example: A command that grants execution rights to the script file "make_iso.sh" from "Terminal"
chmod +x make_iso.sh
Procedure explanation
Shell script creation
- ①
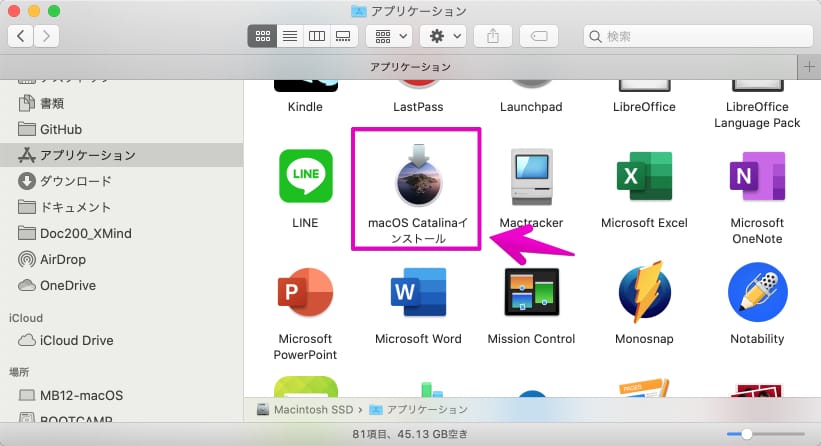
In the Finder, make sure the macOS (OS X) installer is in the Applications folder.
If it is in another folder or external HDD, move it.
In the figure below, “macOS Catalina Installation” is the installer.
- ②Launch the “CotEditor” introduced earlier, the “TextEdit”, or another editor app.
-

- CotEditor
-

- テキストエディット
Here, the explanation is based on the assumption that “CotEditror” is used.
-
- ③
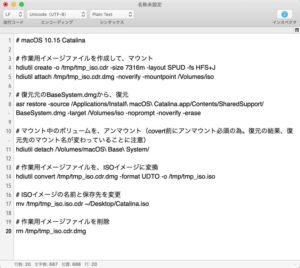
When an editor application such as “CotEditor” starts, copy and paste the script file for each version that creates the installation ISO from the script file list below.
As a sample, in the screen below, I copied and pasted the script file for 10.15 Catalina into CotEditor.
 Alternatively, you can download the script by clicking the floppy disk icon.
OS version Script 12 Monterey Download
# macOS 12 Monterey

# Create and mount a working image file

hdiutil create -o /tmp/tmp_iso.cdr -size 15GB -layout SPUD -fs HFS+J
hdiutil attach /tmp/tmp_iso.cdr.dmg -noverify -mountpoint /Volumes/iso

# Execute Create install media of the restore source to restore

sudo /Applications/Install\ macOS\ Monterey.app/Contents/Resources/createinstallmedia --volume /Volumes/iso --nointeraction

# Unmount the mounted volume (because unmounting is required before covert. Note that the mount name of the restore destination has changed as a result of restoration)

hdiutil eject -force /Volumes/Install\ macOS\ Monterey

# Convert working image file to ISO image

hdiutil convert /tmp/tmp_iso.cdr.dmg -format UDTO -o /tmp/tmp_iso.iso

# Rename and save the ISO image

mv /tmp/tmp_iso.iso.cdr ~/Desktop/Monterey.iso

# Delete working image file

rm /tmp/tmp_iso.cdr.dmg
11 Big Sur Download
# macOS 11.0 Big Sur

# Create and mount a working image file
hdiutil create -o /tmp/tmp_iso.cdr -size 13GB -layout SPUD -fs HFS+J
hdiutil attach /tmp/tmp_iso.cdr.dmg -noverify -mountpoint /Volumes/iso

# Execute Create install media of the restore source to restore
sudo /Applications/Install\ macOS\ Big\ Sur.app/Contents/Resources/createinstallmedia --volume /Volumes/iso --nointeraction

# Unmount the mounted volume (because unmounting is required before covert. Note that the mount name of the restore destination has changed as a result of restoration)
hdiutil eject -force /Volumes/Install\ macOS\ Big\ Sur

# Convert working image file to ISO image
hdiutil convert /tmp/tmp_iso.cdr.dmg -format UDTO -o /tmp/tmp_iso.iso

# Rename and save the ISO image
mv /tmp/tmp_iso.iso.cdr ~/Desktop/BigSur.iso

# Delete working image file
rm /tmp/tmp_iso.cdr.dmg
10.15 Catalina Download
# macOS 10.15 Catalina

# Create and mount a working image file
hdiutil create -o /tmp/tmp_iso.cdr -size 7316m -layout SPUD -fs HFS+J
hdiutil attach /tmp/tmp_iso.cdr.dmg -noverify -mountpoint /Volumes/iso

#Restore from the original BaseSystem.dmg
asr restore -source /Applications/Install\ macOS\ Catalina.app/Contents/SharedSupport/BaseSystem.dmg -target /Volumes/iso -noprompt -noverify -erase

# Unmount the mounted volume (because unmounting is required before covert. Note that the mount name of the restore destination has changed as a result of restoration)
hdiutil detach /Volumes/macOS\ Base\ System/

# Convert working image file to ISO image
hdiutil convert /tmp/tmp_iso.cdr.dmg -format UDTO -o /tmp/tmp_iso.iso

# Rename and save the ISO image
mv /tmp/tmp_iso.iso.cdr ~/Desktop/Catalina.iso

# Delete working image file
rm /tmp/tmp_iso.cdr.dmg
10.14 Mojave Download
# macOS 10.14 Mojave

# 作業用イメージファイルを作成して、マウント
hdiutil create -o /tmp/tmp_iso.cdr -size 7316m -layout SPUD -fs HFS+J
hdiutil attach /tmp/tmp_iso.cdr.dmg -noverify -mountpoint /Volumes/iso

# 復元元のBaseSystem.dmgから、復元
asr restore -source /Applications/Install\ macOS\ Mojave.app/Contents/SharedSupport/BaseSystem.dmg -target /Volumes/iso -noprompt -noverify -erase

# マウント中のボリュームを、アンマウント(covert前にアンマウント必須の為。復元の結果、復元先のマウント名が変わっていることに注意)
hdiutil detach /Volumes/macOS\ Base\ System/

# 作業用イメージファイルを、ISOイメージに変換
hdiutil convert /tmp/tmp_iso.cdr.dmg -format UDTO -o /tmp/tmp_iso.iso

# ISOイメージの名前と保存先を変更
mv /tmp/tmp_iso.iso.cdr ~/Desktop/Mojave.iso

# 作業用イメージファイルを削除
rm /tmp/tmp_iso.cdr.dmg
10.13 High Sierra Download
# macOS 10.13 High Sierra

# 作業用イメージファイルを作成して、マウント
hdiutil create -o /tmp/tmp_iso.cdr -size 7316m -layout SPUD -fs HFS+J
hdiutil attach /tmp/tmp_iso.cdr.dmg -noverify -mountpoint /Volumes/iso

# 復元元のBaseSystem.dmgから、復元
asr restore -source /Applications/Install\ macOS\ High\ Sierra.app/Contents/SharedSupport/BaseSystem.dmg -target /Volumes/iso -noprompt -noverify -erase

# マウント中のボリュームを、アンマウント(covert前にアンマウント必須の為。復元の結果、復元先のマウント名が変わっていることに注意)
hdiutil detach /Volumes/OS\ X\ Base\ System/

# 作業用イメージファイルを、ISOイメージに変換
hdiutil convert /tmp/tmp_iso.cdr.dmg -format UDTO -o /tmp/tmp_iso.iso

# ISOイメージの名前と保存先を変更
mv /tmp/tmp_iso.iso.cdr ~/Desktop/HighSierra.iso

# 作業用イメージファイルを削除
rm /tmp/tmp_iso.cdr.dmg
10.12 Sierra Download
# macOS 10.12 Sierra

# 作業用イメージファイルを作成して、マウント
hdiutil create -o /tmp/tmp_iso.cdr -size 7316m -layout SPUD -fs HFS+J
hdiutil attach /tmp/tmp_iso.cdr.dmg -noverify -nobrowse -mountpoint /Volumes/iso

# 復元元のBaseSystem.dmgをマウントして、復元
hdiutil attach /Applications/Install\ macOS\ Sierra.app/Contents/SharedSupport/InstallESD.dmg -noverify -nobrowse -mountpoint /Volumes/esd
asr restore -source /Volumes/esd/BaseSystem.dmg -target /Volumes/iso -noprompt -noverify -erase

# シンボリックリンクを削除して、実ファイルをコピー(復元の結果、復元先のマウント名が変わっていることに注意)
rm /Volumes/OS\ X\ Base\ System/System/Installation/Packages
cp -rp /Volumes/esd/Packages /Volumes/OS\ X\ Base\ System/System/Installation

# BaseSystem関連2ファイルを、ルートディレクトリにコピー
cp -rp /Volumes/esd/BaseSystem.chunklist /Volumes/OS\ X\ Base\ System/
cp -rp /Volumes/esd/BaseSystem.dmg /Volumes/OS\ X\ Base\ System/

# マウント中のボリュームを、アンマウント
hdiutil detach /Volumes/esd
hdiutil detach /Volumes/OS\ X\ Base\ System

# 作業用イメージファイルを、ISOイメージに変換
hdiutil convert /tmp/tmp_iso.cdr.dmg -format UDTO -o /tmp/tmp_iso.iso

# ISOイメージの名前と保存先を変更
mv /tmp/tmp_iso.iso.cdr ~/Desktop/Sierra.iso

# 作業用イメージファイルを削除
rm /tmp/tmp_iso.cdr.dmg
10.11 El Capitan Download
# OS X 10.11 El Capitan

# 作業用イメージファイルを作成して、マウント
hdiutil create -o /tmp/tmp_iso.cdr -size 7316m -layout SPUD -fs HFS+J
hdiutil attach /tmp/tmp_iso.cdr.dmg -noverify -nobrowse -mountpoint /Volumes/iso

# 復元元のBaseSystem.dmgをマウントして、復元
hdiutil attach /Applications/Install\ OS\ X\ El\ Capitan.app/Contents/SharedSupport/InstallESD.dmg -noverify -nobrowse -mountpoint /Volumes/esd
asr restore -source /Volumes/esd/BaseSystem.dmg -target /Volumes/iso -noprompt -noverify -erase

# シンボリックリンクを削除して、実ファイルをコピー(復元の結果、復元先のマウント名が変わっていることに注意)
rm /Volumes/OS\ X\ Base\ System/System/Installation/Packages
cp -rp /Volumes/esd/Packages /Volumes/OS\ X\ Base\ System/System/Installation

# BaseSystem関連2ファイルを、ルートディレクトリにコピー
cp -rp /Volumes/esd/BaseSystem.chunklist /Volumes/OS\ X\ Base\ System/
cp -rp /Volumes/esd/BaseSystem.dmg /Volumes/OS\ X\ Base\ System/

# マウント中のボリュームを、アンマウント
hdiutil detach /Volumes/esd
hdiutil detach /Volumes/OS\ X\ Base\ System

# 作業用イメージファイルを、ISOイメージに変換
hdiutil convert /tmp/tmp_iso.cdr.dmg -format UDTO -o /tmp/tmp_iso.iso

# ISOイメージの名前と保存先を変更
mv /tmp/tmp_iso.iso.cdr ~/Desktop/ElCapitan.iso

# 作業用イメージファイルを削除
rm /tmp/tmp_iso.cdr.dmg
10.10 Yosemite Download
# OS X 10.10 Yosemite

# 作業用イメージファイルを作成して、マウント
hdiutil create -o /tmp/tmp_iso.cdr -size 7316m -layout SPUD -fs HFS+J
hdiutil attach /tmp/tmp_iso.cdr.dmg -noverify -nobrowse -mountpoint /Volumes/iso

# 復元元のBaseSystem.dmgをマウントして、復元
hdiutil attach /Applications/Install\ OS\ X\ Yosemite.app/Contents/SharedSupport/InstallESD.dmg -noverify -nobrowse -mountpoint /Volumes/esd
asr restore -source /Volumes/esd/BaseSystem.dmg -target /Volumes/iso -noprompt -noverify -erase

# シンボリックリンクを削除して、実ファイルをコピー(復元の結果、復元先のマウント名が変わっていることに注意)
rm /Volumes/OS X Base System/System/Installation/Packages
cp -rp /Volumes/esd/Packages /Volumes/OS\ X\ Base\ System/System/Installation

# BaseSystem関連2ファイルを、ルートディレクトリにコピー
cp -rp /Volumes/esd/BaseSystem.chunklist /Volumes/OS\ X\ Base\ System/
cp -rp /Volumes/esd/BaseSystem.dmg /Volumes/OS\ X\ Base\ System/

# マウント中のボリュームを、アンマウント
hdiutil detach /Volumes/esd
hdiutil detach /Volumes/OS\ X\ Base\ System

# 作業用イメージファイルを、ISOイメージに変換
hdiutil convert /tmp/tmp_iso.cdr.dmg -format UDTO -o /tmp/tmp_iso.iso

# ISOイメージの名前と保存先を変更
mv /tmp/tmp_iso.iso.cdr ~/Desktop/Yosemite.iso

# 作業用イメージファイルを削除
rm /tmp/tmp_iso.cdr.dmg
10.9 Mavericks Download
# OS X 10.9 Mavericks

# 作業用イメージファイルを作成して、マウント
hdiutil create -o /tmp/tmp_iso.cdr -size 7316m -layout SPUD -fs HFS+J
hdiutil attach /tmp/tmp_iso.cdr.dmg -noverify -nobrowse -mountpoint /Volumes/iso

# 復元元のBaseSystem.dmgをマウントして、復元
hdiutil attach /Applications/Install\ OS\ X\ Mavericks.app/Contents/SharedSupport/InstallESD.dmg -noverify -nobrowse -mountpoint /Volumes/esd
asr restore -source /Volumes/esd/BaseSystem.dmg -target /Volumes/iso -noprompt -noverify -erase

# シンボリックリンクを削除して、実ファイルをコピー(復元の結果、復元先のマウント名が変わっていることに注意)
rm /Volumes/OS X Base System/System/Installation/Packages
cp -rp /Volumes/esd/Packages /Volumes/OS\ X\ Base\ System/System/Installation

# BaseSystem関連2ファイルを、ルートディレクトリにコピー
cp -rp /Volumes/esd/BaseSystem.chunklist /Volumes/OS\ X\ Base\ System/
cp -rp /Volumes/esd/BaseSystem.dmg /Volumes/OS\ X\ Base\ System/

# マウント中のボリュームを、アンマウント
hdiutil detach /Volumes/esd
hdiutil detach /Volumes/OS\ X\ Base\ System

# 作業用イメージファイルを、ISOイメージに変換
hdiutil convert /tmp/tmp_iso.cdr.dmg -format UDTO -o /tmp/tmp_iso.iso

# ISOイメージの名前と保存先を変更
mv /tmp/tmp_iso.iso.cdr ~/Desktop/Mavericks.iso

# 作業用イメージファイルを削除
rm /tmp/tmp_iso.cdr.dmg
10.8 Mountain Lion Download
# OS X 10.8 Mountain Lion

# 作業用イメージファイルを作成して、マウント
hdiutil create -o /tmp/tmp_iso.cdr -size 7316m -layout SPUD -fs HFS+J
hdiutil attach /tmp/tmp_iso.cdr.dmg -noverify -nobrowse -mountpoint /Volumes/iso

# 復元元のBaseSystem.dmgをマウントして、復元
hdiutil attach /Applications/Install\ OS\ X\ Mountain\ Lion.app/Contents/SharedSupport/InstallESD.dmg -noverify -nobrowse -mountpoint /Volumes/esd
asr restore -source /Volumes/esd/BaseSystem.dmg -target /Volumes/iso -noprompt -noverify -erase

# シンボリックリンクを削除して、実ファイルをコピー(復元の結果、復元先のマウント名が変わっていることに注意)
rm /Volumes/Mac\ OS\ X\ Base\ System/System/Installation/Packages
cp -rp /Volumes/esd/Packages /Volumes/Mac\ OS\ X\ Base\ System/System/Installation

# BaseSystem関連2ファイルを、ルートディレクトリにコピー
cp -rp /Volumes/esd/BaseSystem.chunklist /Volumes/Mac\ OS\ X\ Base\ System/
cp -rp /Volumes/esd/BaseSystem.dmg /Volumes/Mac\ OS\ X\ Base\ System/

# マウント中のボリュームを、アンマウント
hdiutil detach /Volumes/esd
hdiutil detach /Volumes/Mac\ OS\ X\ Base\ System

# 作業用イメージファイルを、ISOイメージに変換
hdiutil convert /tmp/tmp_iso.cdr.dmg -format UDTO -o /tmp/tmp_iso.iso

# ISOイメージの名前と保存先を変更
mv /tmp/tmp_iso.iso.cdr ~/Desktop/MountainLion.iso

# 作業用イメージファイルを削除
rm /tmp/tmp_iso.cdr.dmg
10.7 Lion Download
# Mac OS X 10.7 Lion

# 作業用イメージファイルを作成して、マウント
hdiutil create -o /tmp/tmp_iso.cdr -size 7316m -layout SPUD -fs HFS+J
hdiutil attach /tmp/tmp_iso.cdr.dmg -noverify -nobrowse -mountpoint /Volumes/iso

# 復元元のBaseSystem.dmgをマウントして、復元
hdiutil attach /Applications/Install\ Mac\ OS\ X\ Lion.app/Contents/SharedSupport/InstallESD.dmg -noverify -nobrowse -mountpoint /Volumes/esd
asr restore -source /Volumes/esd/BaseSystem.dmg -target /Volumes/iso -noprompt -noverify -erase

# シンボリックリンクを削除して、実ファイルをコピー(復元の結果、復元先のマウント名が変わっていることに注意)
rm /Volumes/Mac\ OS\ X\ Base\ System/System/Installation/Packages
cp -rp /Volumes/esd/Packages /Volumes/Mac\ OS\ X\ Base\ System/System/Installation

# BaseSystem関連2ファイルを、ルートディレクトリにコピー
cp -rp /Volumes/esd/BaseSystem.chunklist /Volumes/Mac OS X Base System/
cp -rp /Volumes/esd/BaseSystem.dmg /Volumes/Mac\ OS\ X\ Base\ System/

# マウント中のボリュームを、アンマウント
hdiutil detach /Volumes/esd
hdiutil detach /Volumes/Mac\ OS\ X\ Base\ System

# 作業用イメージファイルを、ISOイメージに変換
hdiutil convert /tmp/tmp_iso.cdr.dmg -format UDTO -o /tmp/tmp_iso.iso

# ISOイメージの名前と保存先を変更
mv /tmp/tmp_iso.iso.cdr ~/Desktop/Lion.iso

# 作業用イメージファイルを削除
rm /tmp/tmp_iso.cdr.dmg
- ④
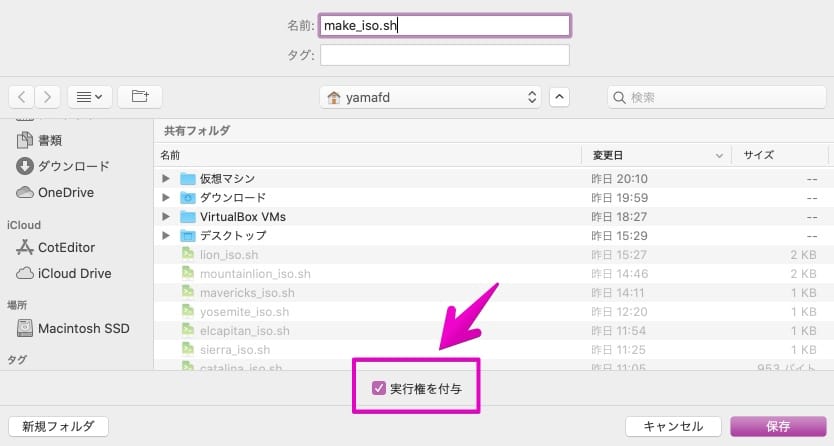
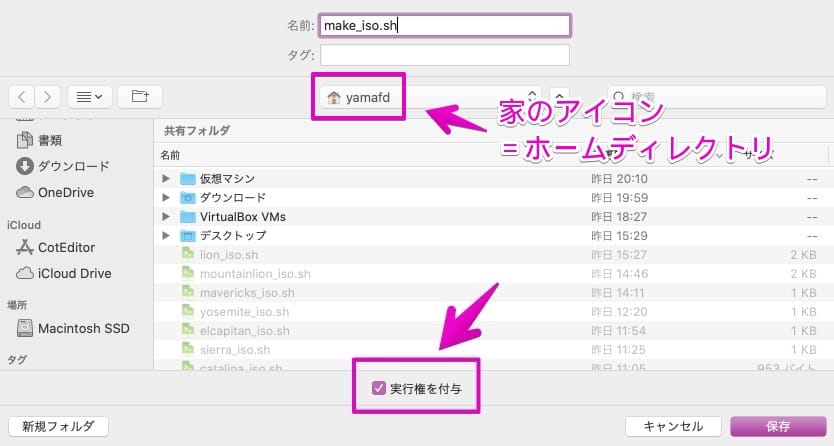
After copying and pasting the script file to an editor application such as “CotEditor”, save the file with the following contents.
- Extension: sh (must be this)
- File name: Any name, but a descriptive name (eg make_iso)
- Storage location: Any suitable, but home directory is safe
- For CotEditor: Check “Grant Execution Right”
In the screen below, it is saved in the home directory with the file name “make_iso.sh”.
Continue to “Run Shell Script (Create ISO File)”.
Run Shell Script (Create ISO File)
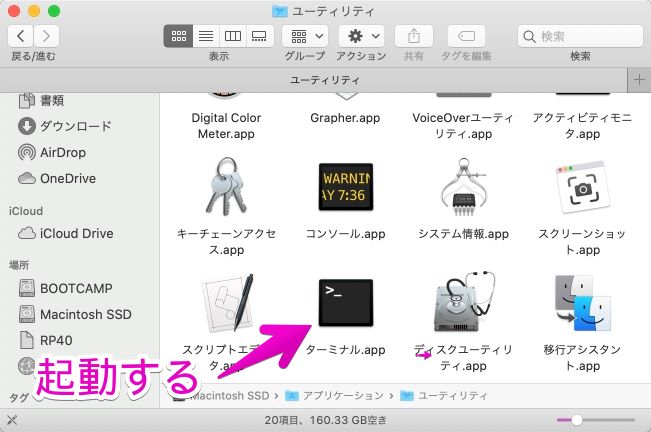
- ①
From here, it’s finally time to run the shell script to create the ISO file.
In Finder, start “Terminal” in the “Applications”-“Utilities” folder.
- ②
When “Terminal” starts, create a shell script using an editor application other than “CotEditor”, and if you have not “Granted execution rights”, execute the following command.
If you have already “granted execution rights” in “CotEditor”, proceed to the next step.
The “make_iso.sh” part is the file name of the shell script, so change it if necessary.
chmod +x make_iso.sh

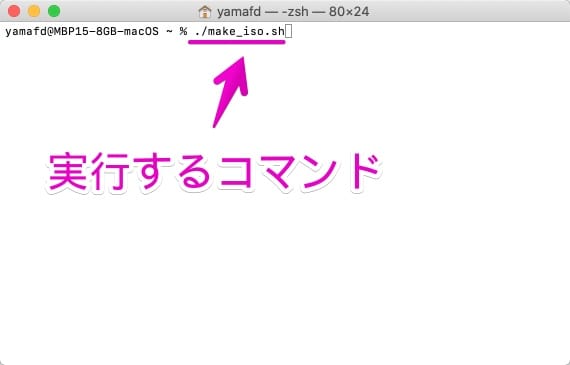
- ③
Execute the following command in “Terminal” to create an ISO file.
The “make_iso.sh” part is the file name of the shell script, so change it if necessary.
Note that beginners who are new to the command line tend to forget the first “./” part.
./make_iso.sh
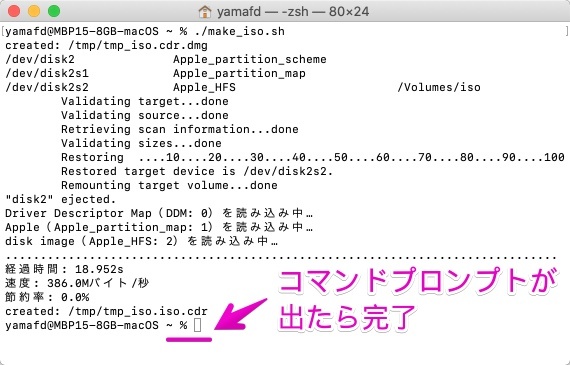
- ④
The process itself will be completed in about 1 to 2 minutes.
When the command prompt is displayed as shown in the screen below, it is complete.
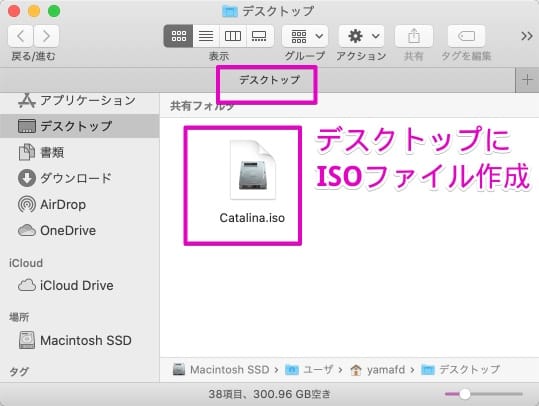
- ⑤
Check that the ISO file has been created on the desktop.
Reference information
Links to get virtual environment software
VMware
For Mac
VMware Fusion

For Windows
VMware Workstation Player
unlocker official GitHub site(An app that enables macOS installation on VMware on Windows)
VirtualBox
For Mac/Windows


コメント