
Here are three ways to edit after taking a screenshot on your Mac.
Normally, you save the file and then edit it, but you can also edit it suddenly without saving the file.
- Comparison of three methods and advantages / disadvantages
- Difference between “Preview.app” and “Markup” function
- ① How to edit a screenshot with “Preview.app” after saving the image file
- ② How to edit a screenshot with “Preview.app” immediately after capturing
- ③ How to edit a screenshot with “Markup” function immediately after capturing
- Unable to lauch “Preview.app”?
- Conclusion
- Reference information
Comparison of three methods and advantages / disadvantages

Here, I will introduce three methods, but let’s compare them together with their advantages and disadvantages.
| Method | Advantages | Disadvantages |
|---|---|---|
| ① How to edit a screenshot with “Preview.app” after saving the image file | ・Possible on all macOS versions ・More editing functions can be used than ③ | ・Need to save screenshot images once |
| ② How to edit a screenshot with “Preview.app” immediately after capturing | ・No need to save screenshot images once ・More editing functions can be used than ③ | ・Possible on macOS 10.14 Mojave or later |
| ③ How to edit a screenshot with “Markup” function immediately after capturing | ・No need to save screenshot images once | ・Possible on macOS 10.14 Mojave or later ・There are fewer editing functions than ①② |
I’m confused and can’t tell the difference between ①, ② and ③!
It may be so if you read only the text.
First of all, ① and ② are the same where they are edited in the “preview.app” of the genuine Mac application.
Then, the difference between ① and ② is that ① saves the screenshot image once and double-clicks it to start “Preview.app”.
On the other hand, ② can launch “preview.app” directly immediately after taking a screenshot.
I understand a little!
① is the old way, and ② is the new way since macOS 10.14 Mojave or later!
Oh yeah.
Then, in ③, you can call a function called “markup” immediately after taking a screenshot, just like in ②.
I’ve generally understood, but what’s the difference between “Preview.app” and “Markup”?
Is it the same that both can edit images?
Yes, it’s the same in the sense that you can edit the image.
But you can think of “Markup” as a reduced version of “Preview.app”.
The specific differences are explained in the next section.
Difference between “Preview.app” and “Markup” function
“Preview.app” and “Markup” function are the same in the sense of editing an image.
So what’s the difference?
I made a comparison table.
| Item | Preview.app | Markup function |
|---|---|---|
| Insert letters | OK | OK |
| Insert shapes | OK | OK |
| Crop | OK | OK |
| Rotate | OK | OK |
| Resize | OK | NG |
| Combine with other images | OK | NG |
| Instant alpha | OK | NG |
| Transfer to iPhone / iPad for editing | NG | OK |
| OK | NG | |
| Convert to PDF or JPEG | OK | NG |
Looking at this table, the only thing we can’t do with “Preview” is “Transfer to iPhone / iPad for editing”.
That’s right.
So if you want to take screenshots on your Mac and write better with the Apple Pencil on your iPad, use “Markup” function.
Also, for those who only insert letters, insert shapes, and crop, “Markup” function may be sufficient.
Resizing and printing aren’t supported by “Markup” function for the features we use often.
Even if you just say the words, it may not come to you, so I think you should gradually get used to it while using it and decide when and which one to use.
Let’s be used to them!
I’ll be used to them!
One last question, what is “Instant Alpha” that can only be used for “Preview.app”?
It is a function to exclude the background of the image, maybe.
Even if you don’t use it forcibly, you can do the following web services these days, which is easier.

I see!
① How to edit a screenshot with “Preview.app” after saving the image file
▶ After taking a screenshot, open the saved screenshot image file with the genuine Mac app “Preview.app”.
Normally, double-clicking a screenshot image will launch “Previewq.app”.
If “Previrew.app” isn’t launched, please see the link below.
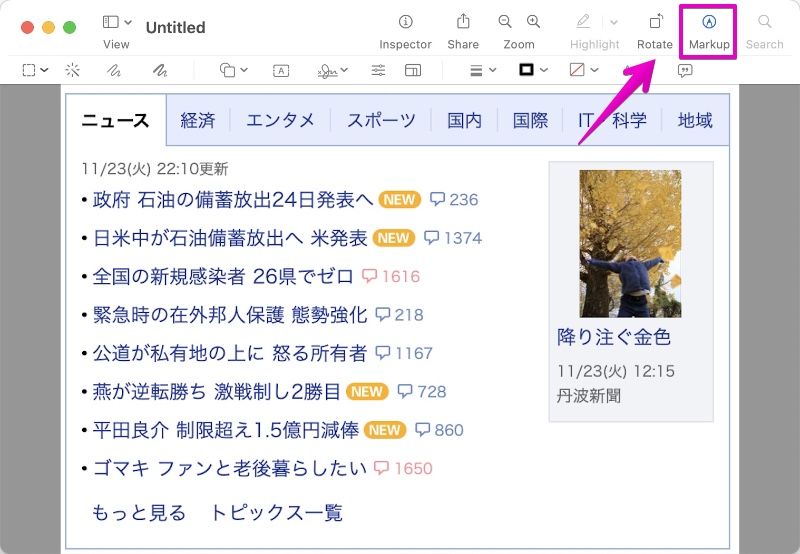
▶ When “Preview.app” is launched, click the icon “Markup” at the top of the screen to change to edit mode.
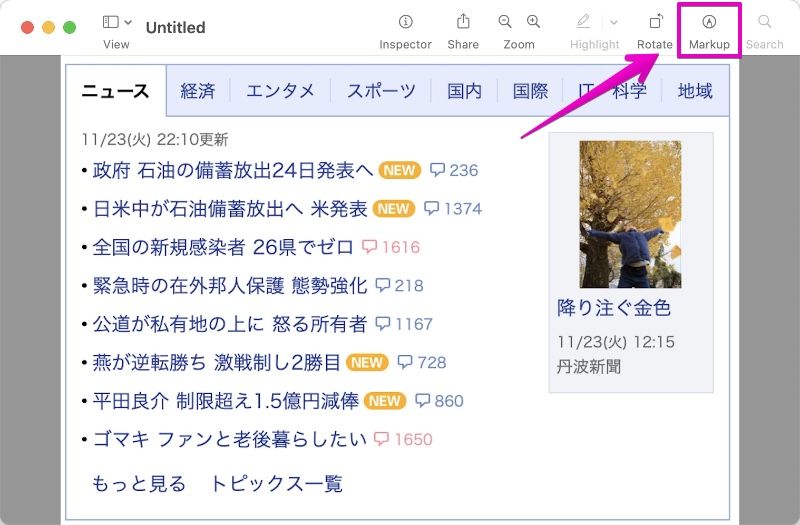
▶ After switching to edit mode, make the necessary edits.
When you’re done editing, click the icon “Markup” again to exit edit mode.
This is the end of the explanation, “① How to edit a screenshot with “Preview.app” after saving the image file”.
② How to edit a screenshot with “Preview.app” immediately after capturing
This method is only valid on macOS 10.14 Mojave or later.
Below are the steps to edit in “Preview.app” without saving the image.
▶ On macOS 10.14 Mojave or later, a thumbnail of the screenshot image is displayed in the lower right corner of the screen for about 5 seconds immediately after taking a screenshot.
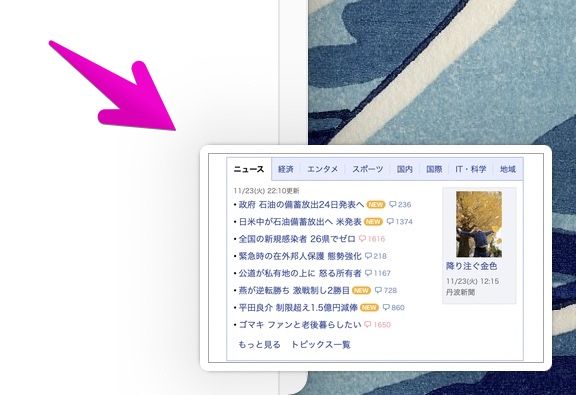
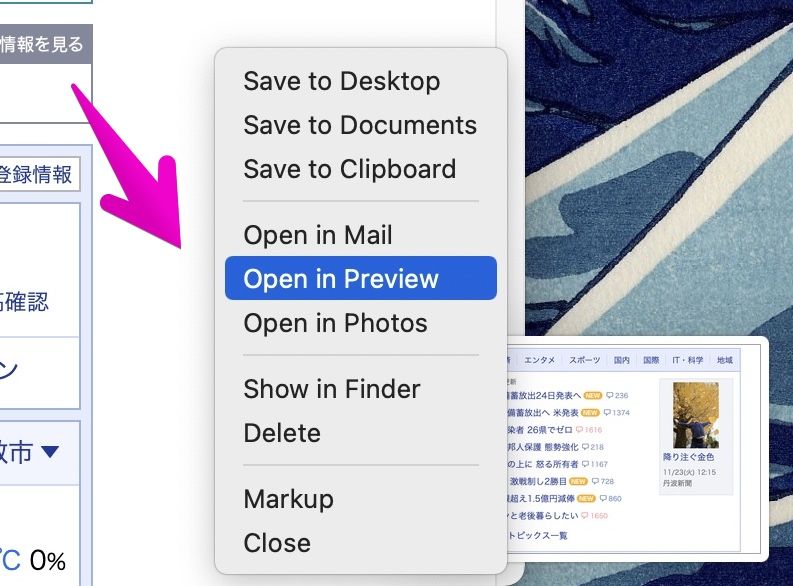
▶ Right-click on this thumbnail image to display menu items.
If you select “Open in Preview” in this, the screenshot image will open with the genuine Mac application “Preview”.
If “Previrew.app” isn’t launched, please see the link below.
▶ When “Preview.app” is launched, click the icon “Markup” at the top of the screen to change to edit mode.
▶ After switching to edit mode, make the necessary edits.
When you’re done editing, click the icon “Markup” again to exit edit mode.
If you want to save the edited result, give it a suitable name and save it.
This is the end of the explanation, “”.
③ How to edit a screenshot with “Markup” function immediately after capturing
This method is only valid on macOS 10.14 Mojave or later.
Below are the steps to edit with the “Markup” function without saving the image.
▶ On macOS 10.14 Mojave or later, a thumbnail of the screenshot image is displayed in the lower right corner of the screen for about 5 seconds immediately after taking a screenshot.
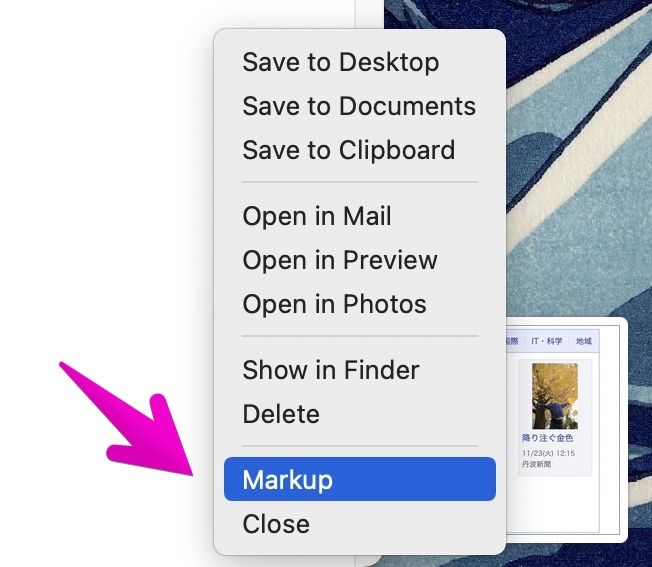
▶ Right-click on this thumbnail image to display menu items.
If you select “Markup” in this, the screenshot image will open in the “Markup” screen.
▶ When the Markup screen opens, make the necessary edits.
When you have finished editing, click the “Done” button to save the edited file and exit.
This is the end of the explanation, “”.
Unable to lauch “Preview.app”?
Screenshot images are saved in PNG format, but apps that open PNG files are assigned to “Preview” by default on the Mac.
However, it may be assigned to another app when you manually change the settings or install some app.
In this case, in order to open with the “preview” introduced on this page, change the settings by the following method.
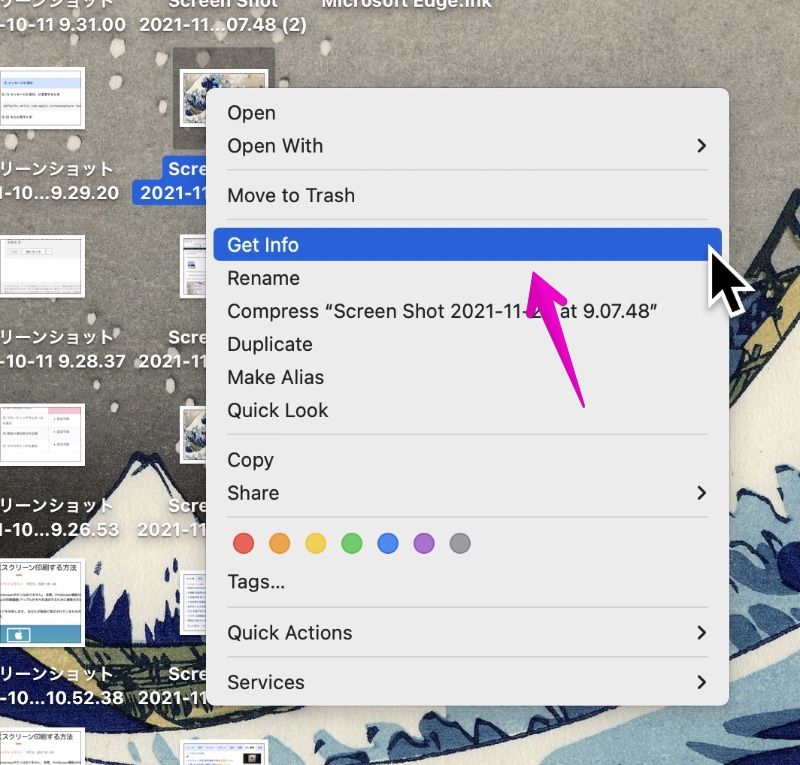
▶ Find the file with the extension PNG, right-click to display the menu, and select “Get Info”.
The file can be anything, but I think the screenshot image stored on the desktop is just right.
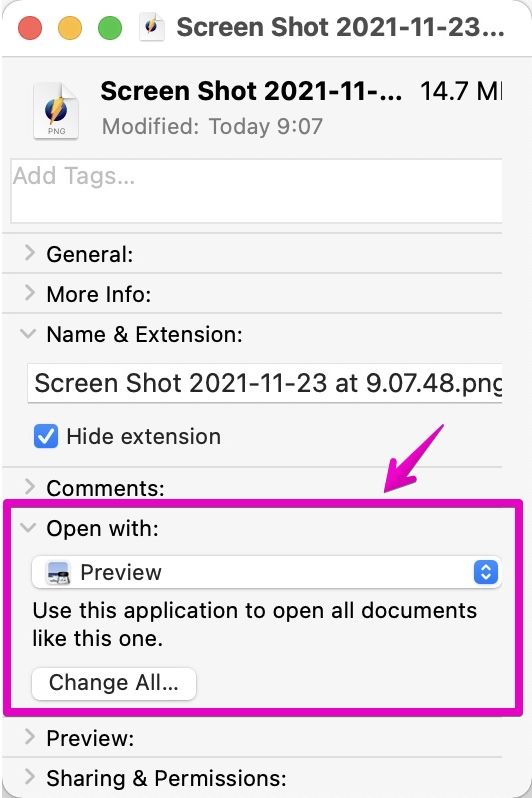
▶ When the file details screen is displayed as shown, change the “Open with this application” app pointed to by the arrow to “Preview”, and then click the “Change everything …” button. increase.
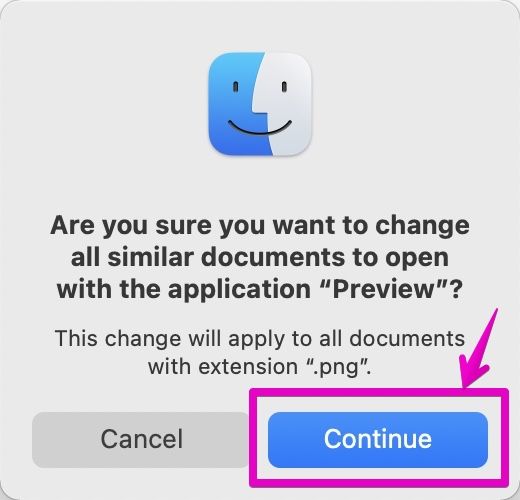
▶ When the confirmation screen for changing the settings is displayed as shown in the figure, click the “Continue” button to confirm.
Are you sure you want to change all similar documents to open with the application “~”?
This change will apply to all documents with extension “.png”.
▶ After changing the settings, you can close the open detailed information screen.
This is the end of the explanation, “Unable to launch Preview.app?”.
Conclusion
I have introduced 3 ways to edit Mac screenshots.
Screenshots are often used on Mac, so try each one and find the one that suits you best.
Reference information


This is the end of this article.
コメント