

There are many things you can do with the screenshot function of the Mac, and I think it’s hard to understand at first glance.
Therefore, it is recommended that you first grasp the basic flow and learn the detailed functions as needed.
So, this page explains the basics of Mac screenshots in an easy-to-understand manner using flowcharts and illustrations.
5 basic keyboard shortcuts for Mac screenshots
The screenshot feature on Mac has five basic keyboard shortcuts:
It’s the same up to the first shift + command ⌘ , but the numbers and space that follow are different!
Macs with a touch bar are limited to some MacBook Pros.
Moreover, the touch bar is being abolished from Apple Silicon Mac.
Therefore, if you know only the four items ① to ④, there is no problem.
| Content | Operation |
|---|---|
| ① Capture full screen | shift + command ⌘ + 3 |
| ② Capture in any area | shift + command ⌘ + 4 |
| ③ Capture a windows or menu | shift + command ⌘ + 4 and space |
| ④ Launch “Screenshot.app” (macOS 10.14 Mojave or later) | shift + command ⌘ + 5 |
| ⑤ Capture touch bar (Only touch bar models) | shift + command ⌘ + 6 |
If you operate 5 basic keyboard shortcuts, the flow will be as shown in the flowchart below.
You don’t have to force yourself to read this flowchart.
As you get used to using screenshots, you can take a look at them for a review.
Due to the screen layout, it is displayed in a reduced size, so click it to enlarge it.
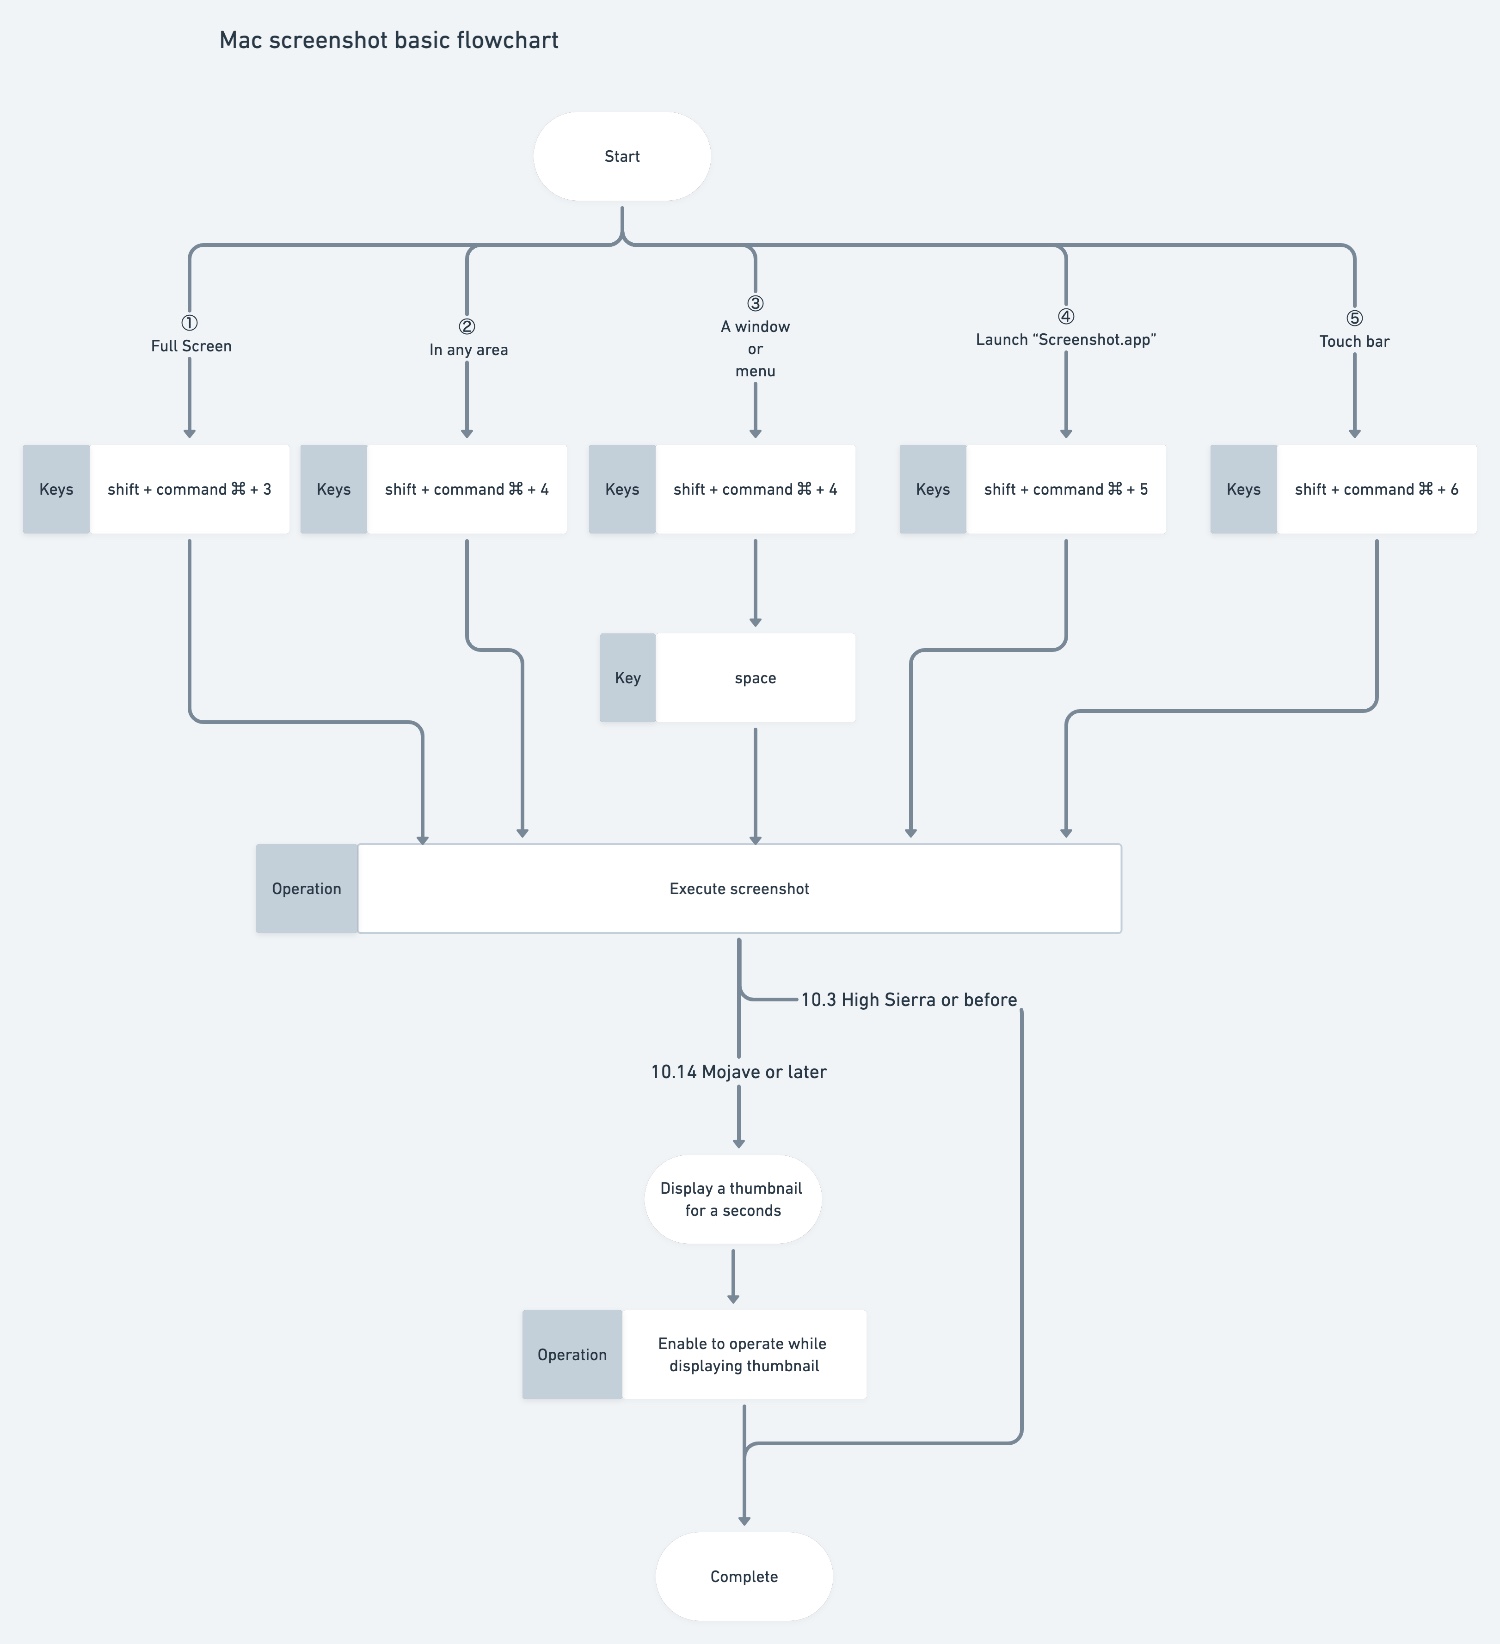
After “Execution of screenshot”, you can do various operations on macOS 10.14 Mojave or later.
So, from here on, I will explain the operation contents from ① to ⑤.
- ① Capture full screen
- ② Capture in any area
- ③ Capture a windows or menu
- ④ Launch “Screenshot.app” (macOS 10.14 Mojave or later)
- ⑤ Capture touch bar (Only touch bar models)
3 additional keyboard shortcuts to keep in mind
In addition to the five basic keyboard shortcuts in the previous section, it’s helpful to remember the following three:
| Content | Operation |
|---|---|
| Interruption of screenshot operation | esc |
| Copy to clipboard (File won’t be saved) | control ⌃ with other keys |
| Capture without shadows | option ⌥ with other keys |
Let me give you a few concrete examples.
For example, for a full screen screenshot, the following shortcut.
- shift + command ⌘ + 3
On the other hand, if you want to copy the full screen screenshot to the clipboard:
- shift + command ⌘ + 3 + control ⌃
Also, the screenshot feature on your Mac defaults to “With shadow”, but you can set it to “No shadow”.
【With shadow】

【No shadow】
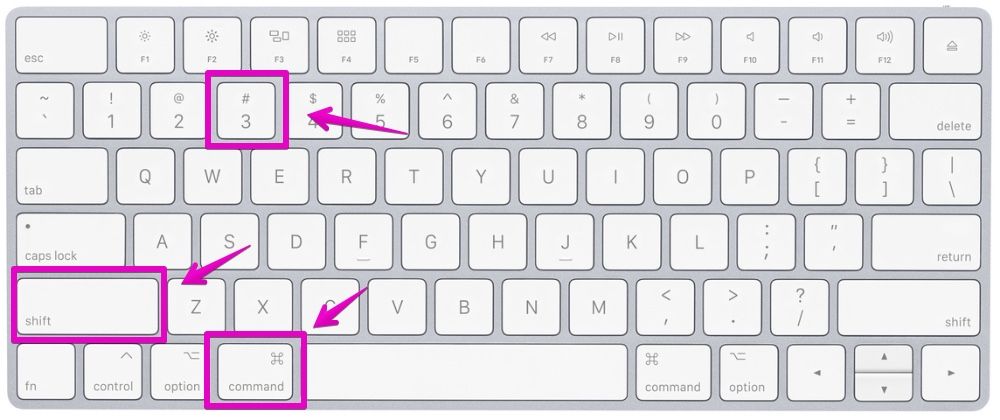
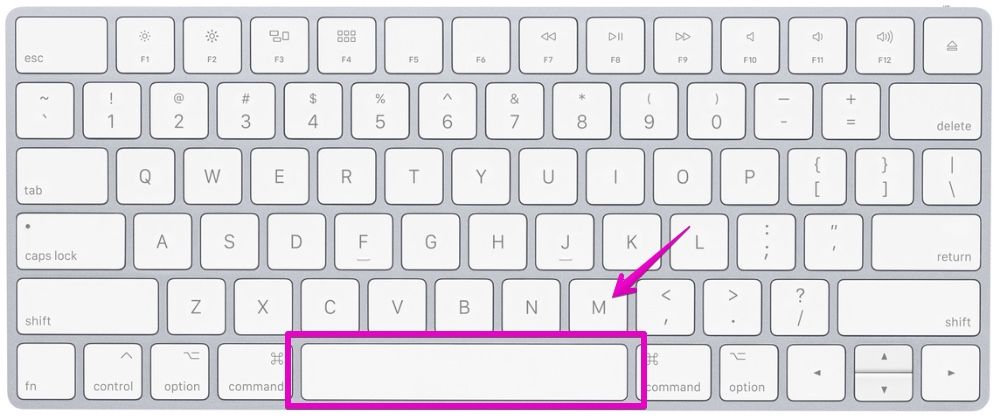
① Capture full screen
The operation procedure is as follows.
▶ Press the following three keys at the same time to call the function with the keyboard shortcut.
- shift + command ⌘ + 3
Combined with the additional keyboard shortcuts introduced earlier, you can do the following:
| With shadow | No shadow | |
|---|---|---|
| Save to file | Default operation shift + command ⌘ + 3 | shift + command ⌘ + 3 + option ⌥ |
| Copy to clipboard | shift + command ⌘ + 3 + control ⌃ | shift + command ⌘ + 3 + optionl ⌥ + control ⌃ |
▶ You will hear a “shutter” sound and the screenshot image will be saved on your desktop.
For multiple displays, a screenshot image file is created for each display.
Also, if macOS is 10.14 Mojave or later, thumbnails will be displayed at the bottom right of the screen for about 5 seconds.
However, if you copy it to the clipboard, only the shutter sound will be heard and the file will not be saved or the thumbnail will be displayed.
▶ You can perform the following operations while the thumbnail at the bottom right of the screen is displayed.
| Operation | Description |
|---|---|
| ① Swipe the thumbnail to the right | Screenshot image is saved immediately |
| ② Swipe the thumbnail to the left | The edit screen is displayed |
| ③ Right-click the thumbnail | The operation menu is displayed |
For ② and ③, the following screen will be displayed.
【② When left-clicking the thumbnail】
【③ When right-clicking the thumbnail】
(Click “Markup” to display the same edit screen as ②.)
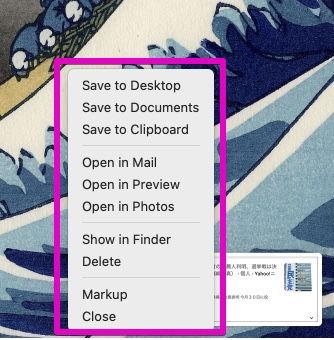
“Markup” means “calibrate” or “insert a red brush”.
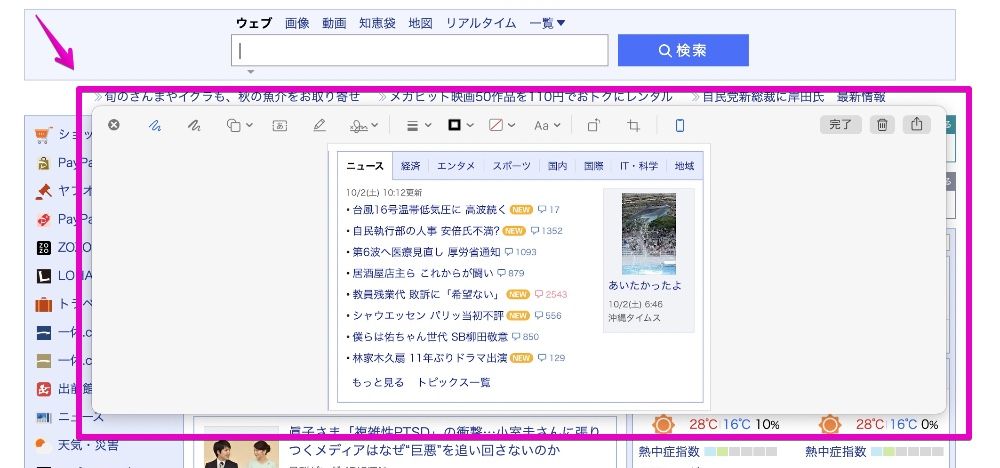
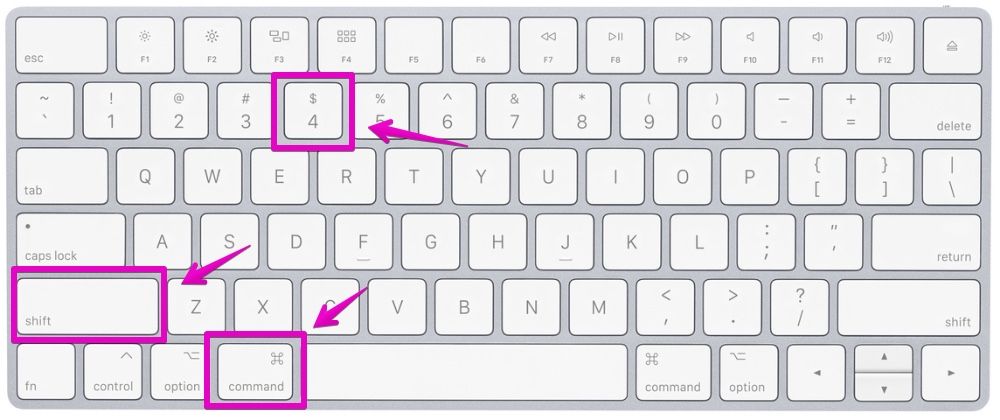
② Capture in any area
▶ Press the following three keys at the same time to call the function with the keyboard shortcut.
- shift + command ⌘ + 4
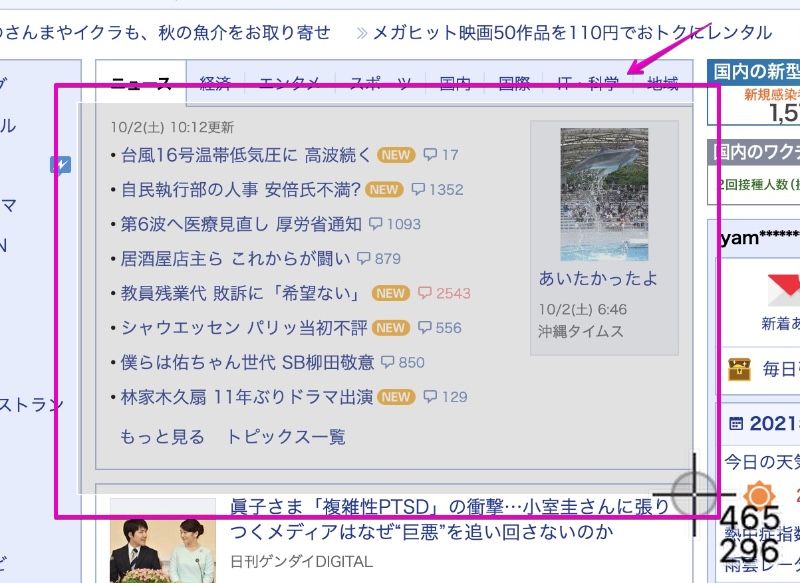
▶ When the cursor with crosses and numbers is displayed as shown in the figure, move the cursor to the upper left, lower left, upper right, or lower right position of the range you want to capture in the screenshot.
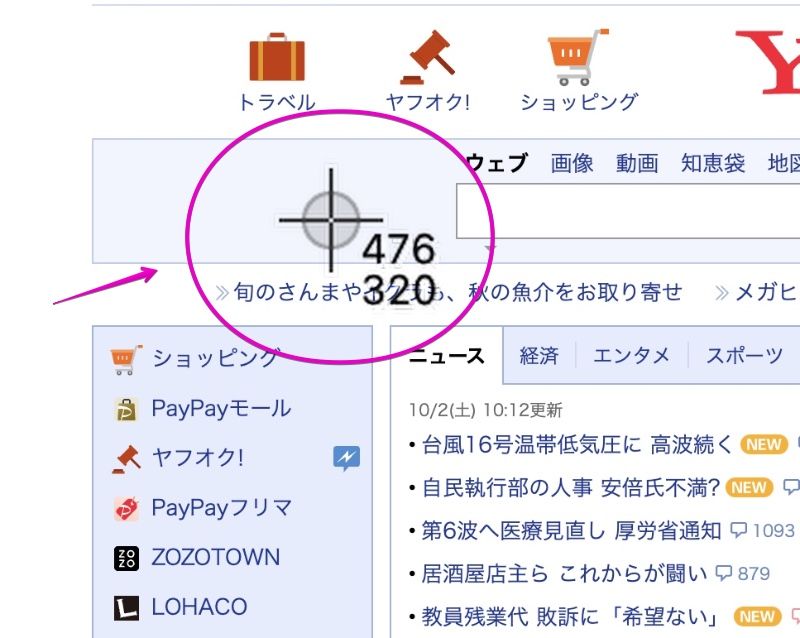
▶ After moving the cursor, click and hold the mouse or trackpad and drag to specify the range you want to capture.
The area where the range is specified is displayed in a different color as shown in the figure.
Even if you specify a range, do not let go of the clicked finger and proceed to the following explanation.
By the way, if you want to stop the screenshot, press esc on your keyboard.
▶ There are the following ways to perform the capture.
The most frequently used operation is to release the finger and save the file, but if necessary, use it in combination with the keyboard shortcut.
| With shadow | No shadow | |
|---|---|---|
| Save to file | Default operation Release the clicked finger | First press and hold option ⌥, then release the clicked finger |
| Copy to clipboard | First press and hold control ⌃, then release the clicked finger | First press and hold option ⌥ + control ⌃, then release the clicked finger |
▶ You will hear a “shutter” sound and the screenshot image will be saved on your desktop.
For multiple displays, a screenshot image file is created for each display.
Also, if macOS is 10.14 Mojave or later, thumbnails will be displayed at the bottom right of the screen for about 5 seconds.
However, if you copy it to the clipboard, only the shutter sound will be heard and the file will not be saved or the thumbnail will be displayed.
▶ You can perform the following operations while the thumbnail at the bottom right of the screen is displayed.
| Operation | Description |
|---|---|
| ① Swipe the thumbnail to the right | Screenshot image is saved immediately |
| ② Swipe the thumbnail to the left | The edit screen is displayed |
| ③ Right-click the thumbnail | The operation menu is displayed |
For ② and ③, the following screen will be displayed.
【② When left-clicking the thumbnail】
【③ When right-clicking the thumbnail】
(Click “Markup” to display the same edit screen as ②.)
“Markup” means “calibrate” or “insert a red brush”.
③ Capture a windows or menu
▶ Press the following three keys at the same time to call the function with the keyboard shortcut.
- shift + command ⌘ + 4

▶ When you see the cursor with the crosses and numbers as shown, press space on your keyboard.
▶ The crosshair cursor changes to a camera icon.
When it changes, move the cursor to the window or menu you want to import.
Then, the background color of the window or menu to be imported will change as shown in the figure.
Even if you specify the import target, do not click or press the keyboard yet, and proceed to the following explanation.
By the way, if you want to stop the screenshot, press esc on your keyboard.
▶ There are the following ways to perform the capture.
The most frequently used operation is to click and save the file to complete, but use it in combination with the keyboard shortcut if necessary.
| With shadow | No shadow | |
|---|---|---|
| Save to file | Default operation Click | First press and hold option ⌥, then click |
| Copy to clipboard | First press and hold control ⌃, then click | First press and hold option ⌥ + control ⌃, then click |
Click left or right.
You can also use the keyboard return.
▶ You will hear a “shutter” sound and the screenshot image will be saved on your desktop.
For multiple displays, a screenshot image file is created for each display.
Also, if macOS is 10.14 Mojave or later, thumbnails will be displayed at the bottom right of the screen for about 5 seconds.
However, if you copy it to the clipboard, only the shutter sound will be heard and the file will not be saved or the thumbnail will be displayed.
▶ You can perform the following operations while the thumbnail at the bottom right of the screen is displayed.
| Operation | Description |
|---|---|
| ① Swipe the thumbnail to the right | Screenshot image is saved immediately |
| ② Swipe the thumbnail to the left | The edit screen is displayed |
| ③ Right-click the thumbnail | The operation menu is displayed |
For ② and ③, the following screen will be displayed.
【② When left-clicking the thumbnail】
【③ When right-clicking the thumbnail】
(Click “Markup” to display the same edit screen as ②.)
“Markup” means “calibrate” or “insert a red brush”.
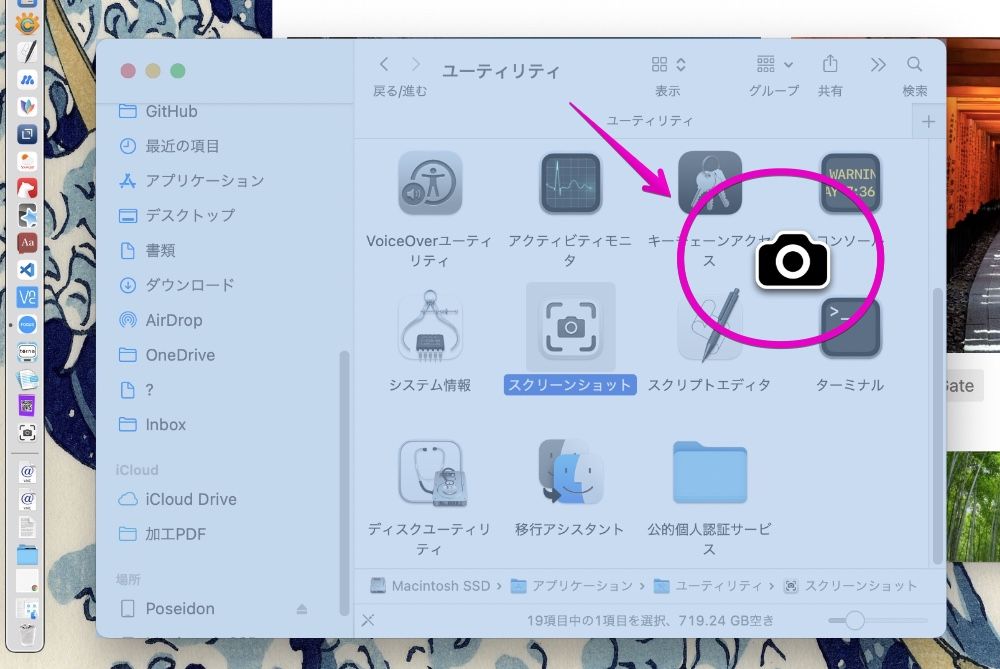
④ Launch “Screenshot.app” (macOS 10.14 Mojave or later)

From macOS 10.14 Mojave, the screenshot function of Mac has been enhanced and a new genuine application called “Screenshot” is included.
You can call the “Screenshot.app” app by the following operation method.
▶ Press the following three keys at the same time to call the function with the keyboard shortcut.
- shift + command ⌘ + 5

▶ As shown in the figure, a list of icons and menu items for operating “Screenshot” is displayed at the bottom of the screen.

The following is a description of each icon and menu item.
| Item | Description |
|---|---|
 | ・Capture Full Screen ・Same as “① Capture full screen” |
 | ・Capture a window or menu ・Same as “③ Capture a window or menu“ |
 | ・Capture in any area ・Same as “② Capture in any area“ |
 | ・Record full screen |
 | ・Record in any area |
 | ・Click to display menu ・See table below for details |
 | ・Capture |
 | ・Start to record |
When you click “Options”, the following menu will be displayed.
A description of each item is just following the figure.
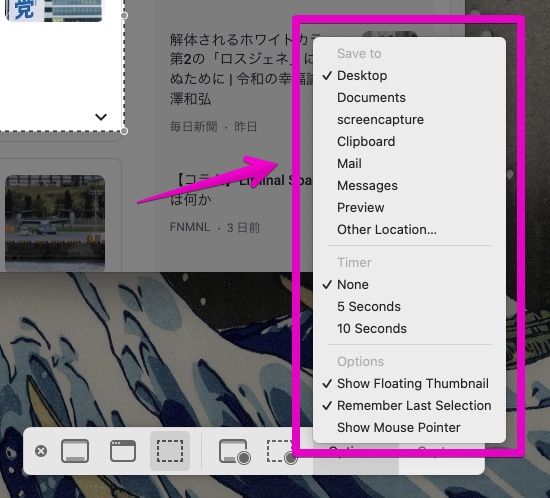
Save to :
| Item | Description |
|---|---|
| Desktop | Save as image file(s) in the folder “Desktop” |
| Documents | Save as image file(s) in the folder “Documents” |
| Clipboard | Copy to clipboard |
| Attach image file(s) to Apple genuine application “Mail.app” | |
| Messages | Attach image file(s) to Apple genuine application “Messages.app” |
| Preview | Display image file(s) with Apple genuine application “Preview.app” |
| Other Location… | Save as image file(s) in the specified location |
Timer :
| Item | Description |
|---|---|
| None | Immediately capture / record |
| 5 Seconds | After 5 seconds capture / record |
| 10 Seconds | After 10 seconds capture / record |
Options :
| Item | Description |
|---|---|
| Show Floating Thumbnail | Display the thumbnail at the bottom right immediately after the screenshot |
| Remember Last Selection | Memorize selected area |
| Show Mouse Pointer | Show mouse pointer on a screenshot image / video |
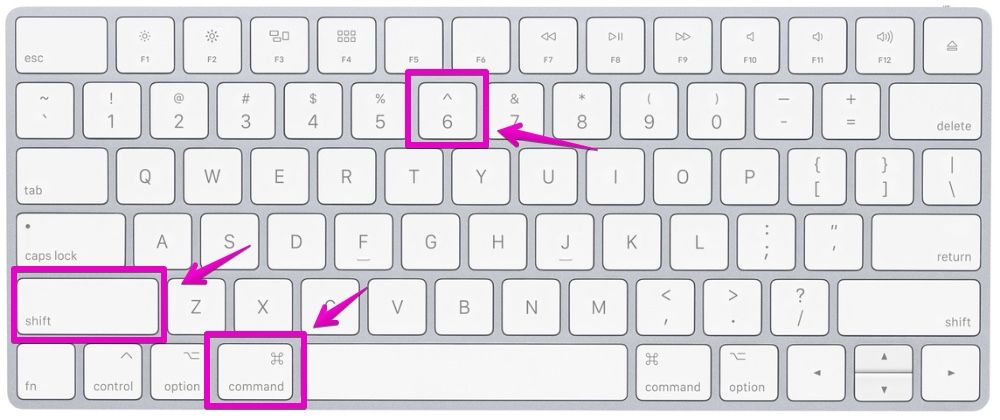
⑤ Capture touch bar (Only touch bar models)
Since I don’t have a Mac with a touch bar, I will write a summary of what I searched on the net, not what I actually operated on the Mac.

▶ Press the following three keys at the same time to call the function with the keyboard shortcut.
- shift + command ⌘ + 6
Combined with the additional keyboard shortcuts introduced earlier, you can do the following:
| With shadow | No shadow | |
|---|---|---|
| Save to file | Default operation shift + command ⌘ + 6 | shift + command ⌘ + 6 + option ⌥ |
| Copy to clipboard | shift + command ⌘ + 6 + control ⌃ | shift + command ⌘ + 6 + optionl ⌥ + control ⌃ |
▶ You will hear a “shutter” sound and the screenshot image will be saved on your desktop.
For multiple displays, a screenshot image file is created for each display.
Also, if macOS is 10.14 Mojave or later, thumbnails will be displayed at the bottom right of the screen for about 5 seconds.
However, if you copy it to the clipboard, only the shutter sound will be heard and the file will not be saved or the thumbnail will be displayed.
▶ You can perform the following operations while the thumbnail at the bottom right of the screen is displayed.
| Operation | Description |
|---|---|
| ① Swipe the thumbnail to the right | Screenshot image is saved immediately |
| ② Swipe the thumbnail to the left | The edit screen is displayed |
| ③ Right-click the thumbnail | The operation menu is displayed |
For ② and ③, the following screen will be displayed.
【② When left-clicking the thumbnail】
【③ When right-clicking the thumbnail】
(Click “Markup” to display the same edit screen as ②.)
“Markup” means “calibrate” or “insert a red brush”.
Conclusion
As I wrote at the beginning, the screenshot function of Mac is becoming more and more multifunctional and difficult to operate.
However, I think that most of your needs can be met by keeping only the first two of this article.
From there, it’s a good idea to learn other features as needed or search for apps online.
Reference information

This is the end of this article.
コメント