
I will explain in detail how to create / edit / delete a table in “Notes” app on Mac using illustrations.
I will also explains how to sort, add / delete rows and columns, and exchange data with other apps.
The following explanation is given in the following environment.
Please note that there are some differences depending on the version of macOS.
- macOS Big Sur 11.4
- Add a table
- Enter / edit data in cells
- Restrictions on data entered in cells
- Copy the table (copy and paste)
- Cut and paste the table
- Move the table
- Delete the table completely
- Erase the cell contents
- Sort table rows and columns
- Add / remove table rows and columns
- Copy and paste data with other apps
- FAQ
- Reference information
Add a table
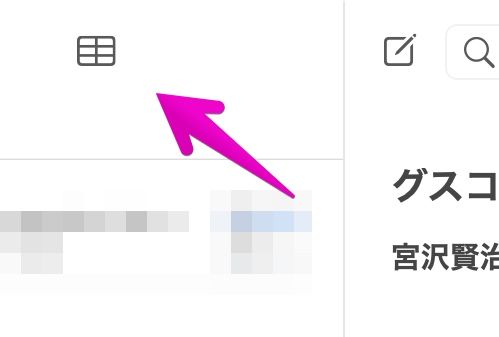
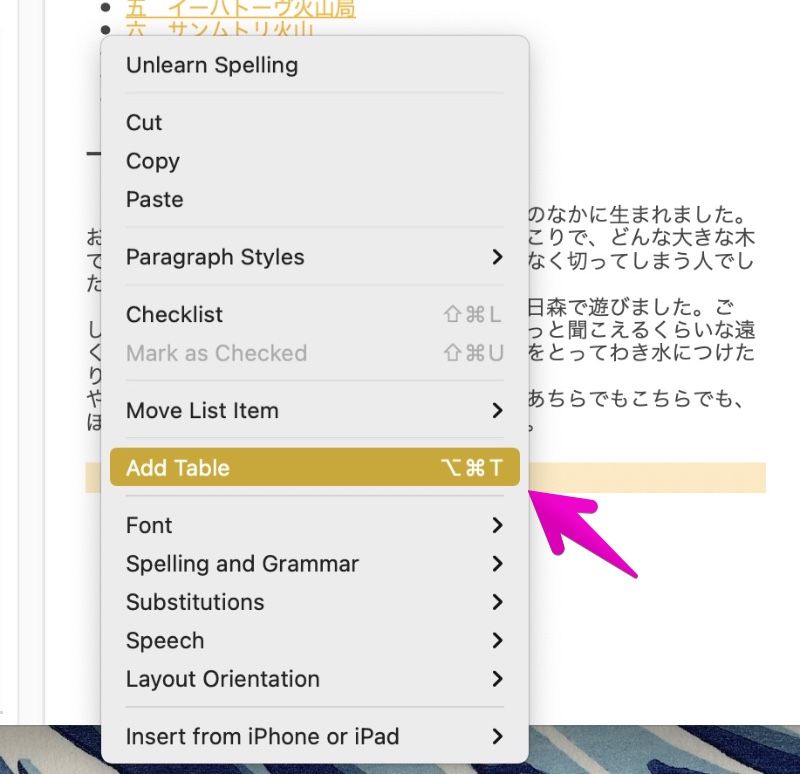
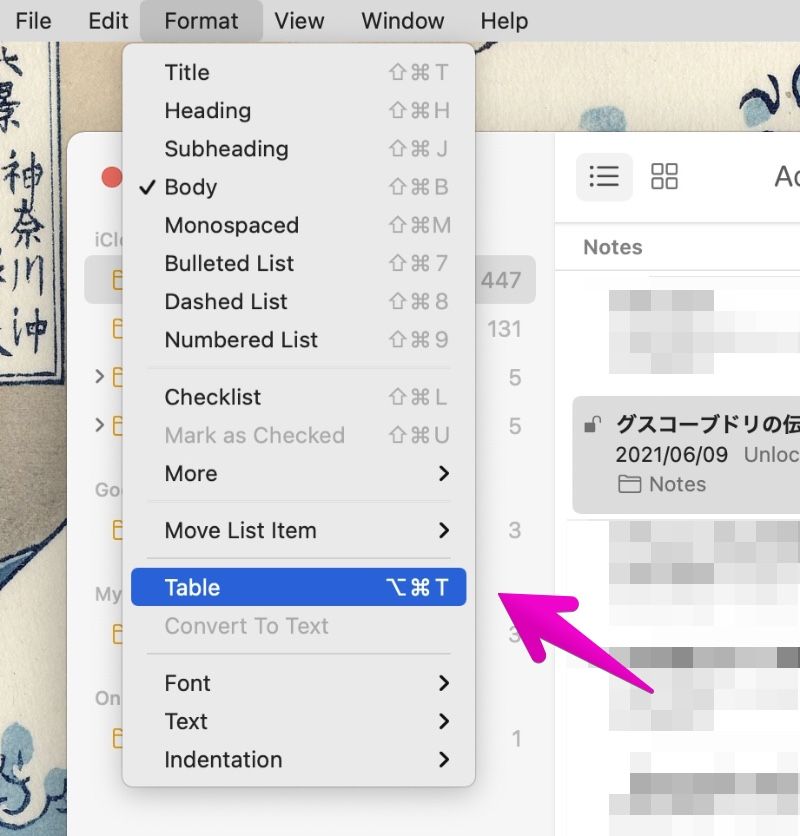
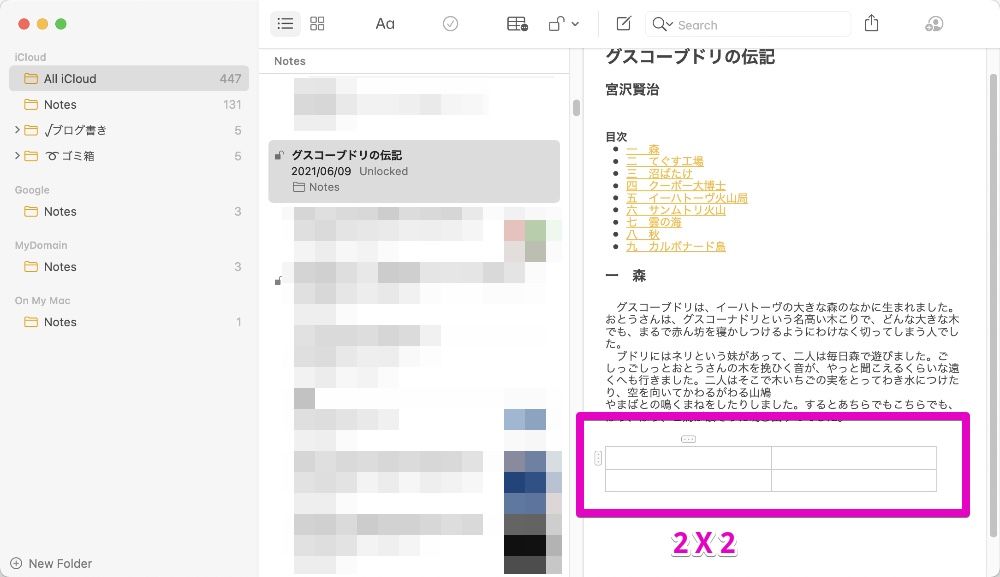
▶ In the “Notes” app, click where you want to add a table.
▶ To add a table, do one of four things:
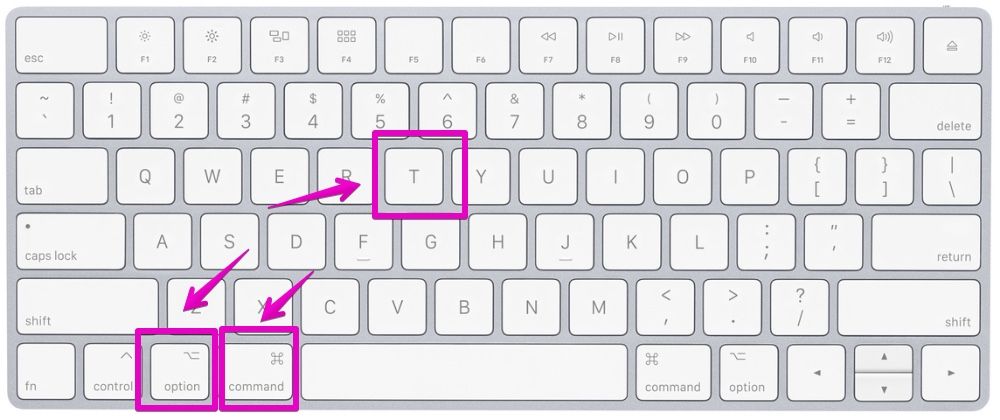
①. From the toolbar, click the “Add a table” icon
②. Select “Add Table” from the right-click menu
③. Select “Format” – “Table” from the menu bar
④. Use the keyboard shortcut option ⌥ + command ⌘ + T
▶ When the table is added, it displays a 2 row x 2 column table by default.
Enter / edit data in cells
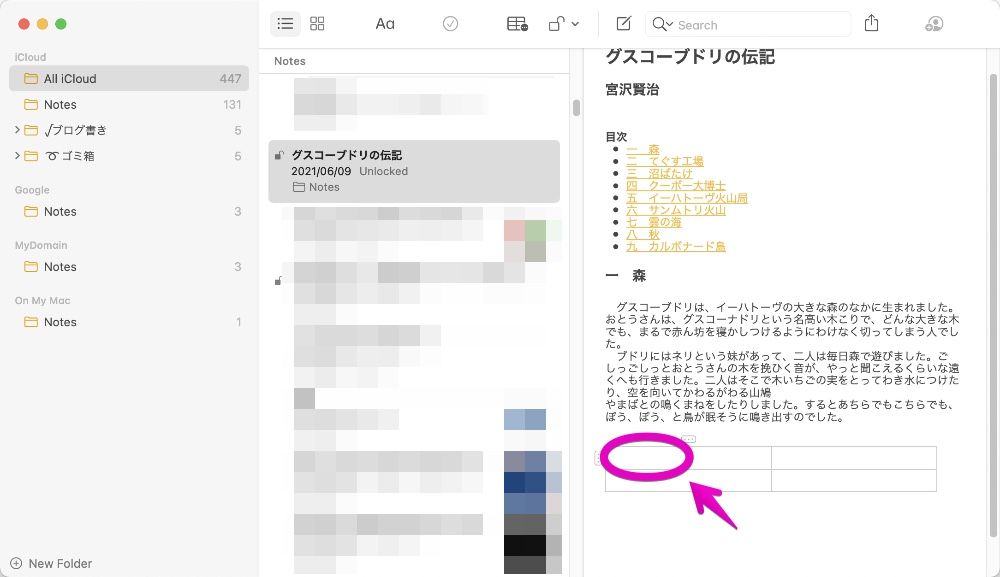
- To enter / edit data in a cell, click inside the target cell.
- You can move between cells in the following ways:
| Keyboard operation | Operation result |
| tab | You can move to the right, if at the right end, move one line down to the left end |
| shift + tab | You can move to the left, if it is the left end, move to the right end one line up |
| enter | You can move down one line |
| shift + enter | You can move up one line |
| ← or ↑ or → or ↓ | The movement is the same as tab and enter in the direction of the arrow. |
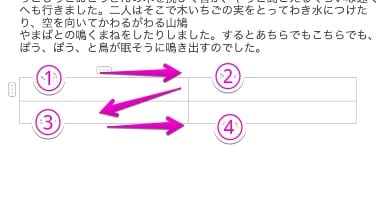
It may be difficult to understand if it is only letters, so I will give an example.
The figure shows the cells in the table with 2 rows and 2 columns, but if you press tab continuously from the cell from the upper left, the movement will be as shown in ① to ④ below.
Restrictions on data entered in cells
Unlike typing elsewhere in the “Notes” app, the data you enter in a table cell has the following restrictions:
| Things possible | Things impossible |
| New line (Hold down option and return) |
Indent (Lower line) |
| Add URL link | Paragraph style (Title / Heading / Subheading) |
| Font (Type / Size / Color) |
List (Bullets / Dashed / Numbered / Checklist) |
| Font style (Bold / Italic / Underline / Strikethrough) |
Paste / attach images and files |
| Text alignment (Left / Center / Justified / Right) |
– |
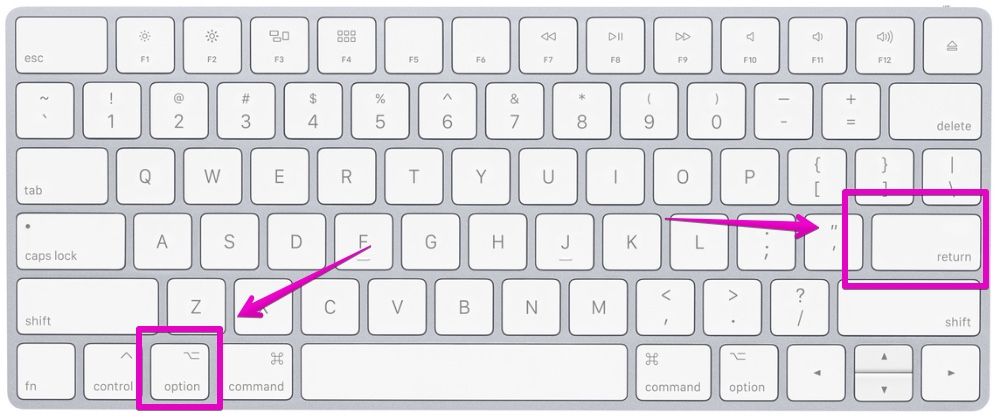
By the way, to input a line break, perform the following keyboard operations.
- option ⌥ + return(enter)
Copy the table (copy and paste)
▶ Leaves the entire table selected.
The method is to do one of the following two operations.
①. With the mouse / trackpad, drag the entire table from the left or right edge of the table
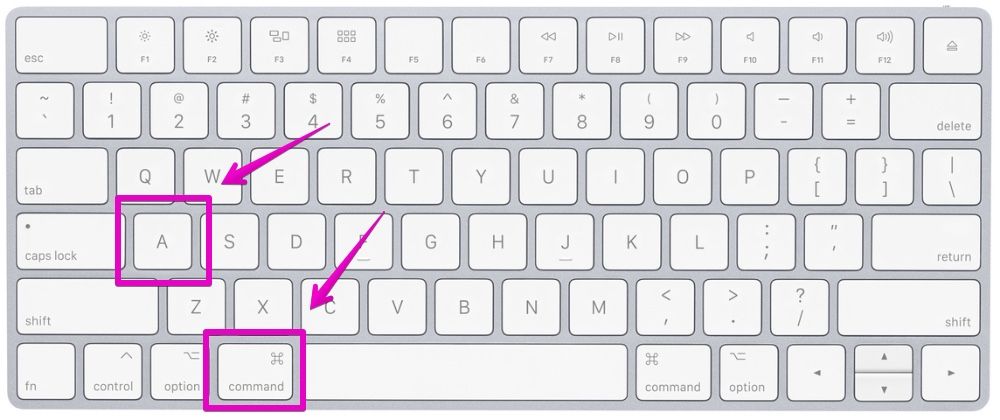
②. Click inside any cell and execute the keyboard shortcut command ⌘ + A once or twice
(Twice for cells with characters, once for empty cells)
The following video shows the keyboard shortcut executed.
▶ When the entire table is selected, the cell background color changes.
【The entire table is not selected】
【The entire table is selected】
▶ Copy the table to the clipboard.
The method is to do one of the following two operations.
①. Execute the keyboard shortcut, command ⌘ + C

②. Select “Edit” – “Copy” from the menu bar

▶ Click directly where you want to paste or move the cursor.
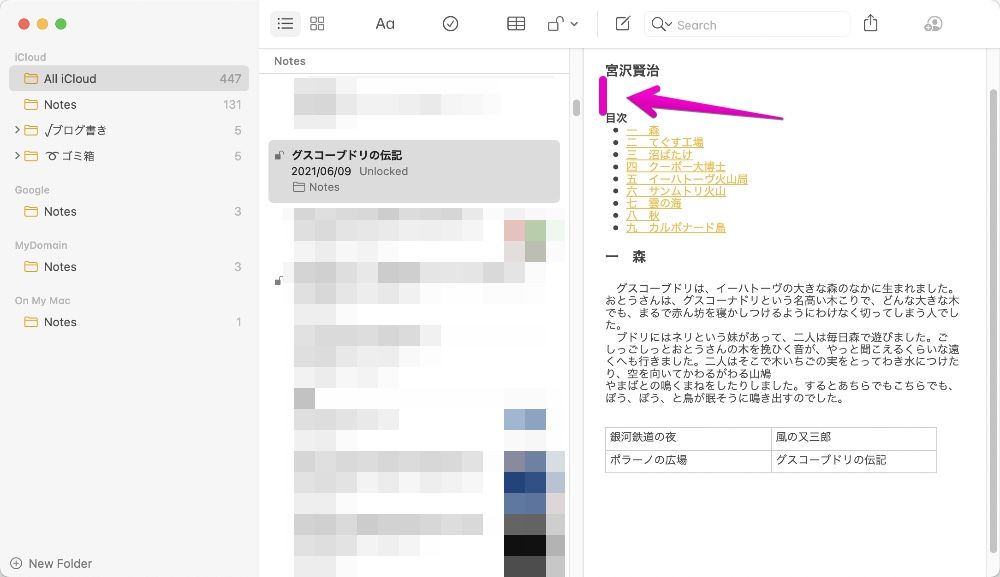
▶ Paste the table from the clipboard.
To do this, do one of the following three operations.
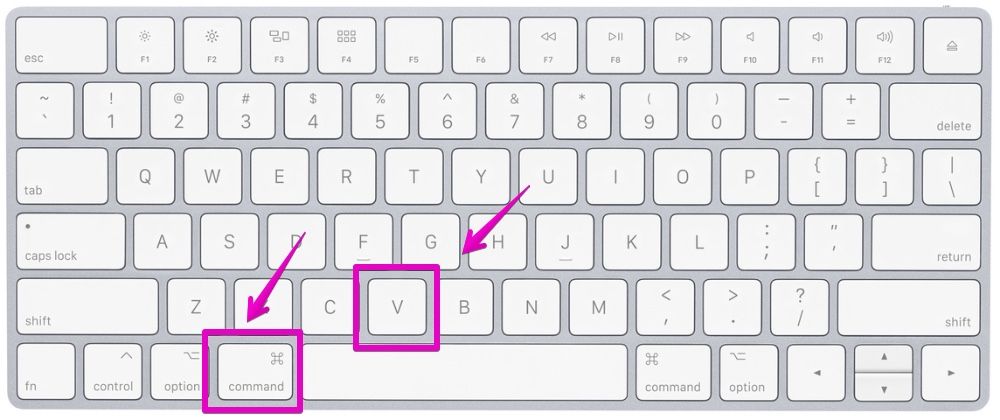
①. Execute the keyboard shortcut, command ⌘ + V
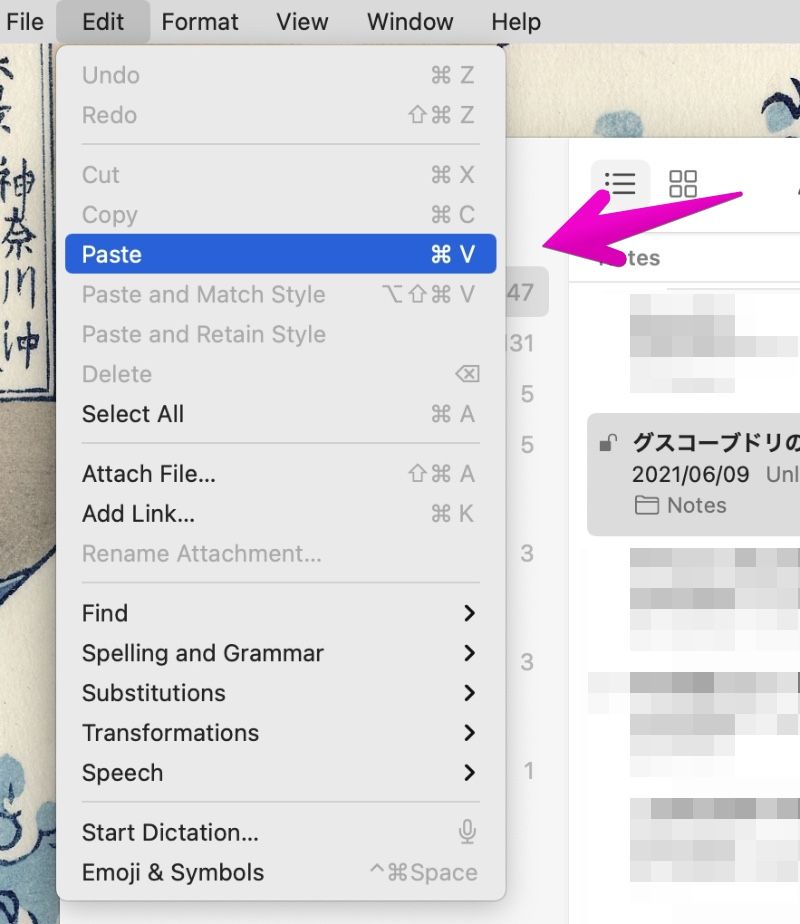
②. Select “Edit” – “Paste” from the menu bar
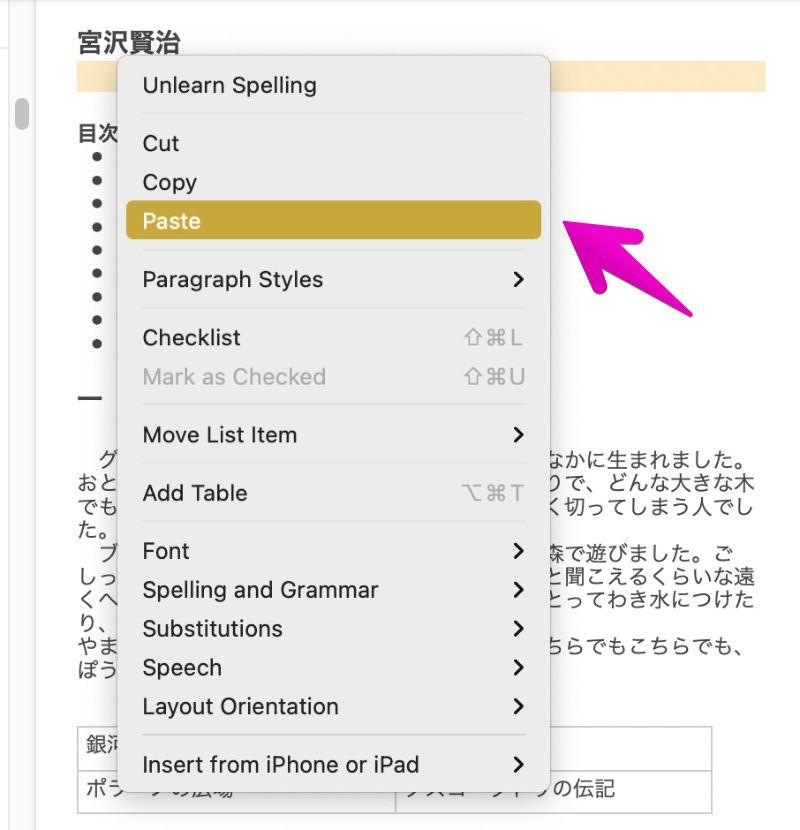
③. Select “Paste” from the right-click menu
Cut and paste the table
“Cut and paste the table” and “move the table” are very similar.
However, the difference is that the former can be pasted into another note, while the latter is only in the same note.
▶ Leaves the entire table selected.
The method is to do one of the following two operations.
①. With the mouse / trackpad, drag the entire table from the left or right edge of the table
②. Click inside any cell and execute the keyboard shortcut command ⌘ + A once or twice
(Twice for cells with characters, once for empty cells)
The following video shows the keyboard shortcut executed.
▶ When the entire table is selected, the cell background color changes.
【The entire table is not selected】
【The entire table is selected】
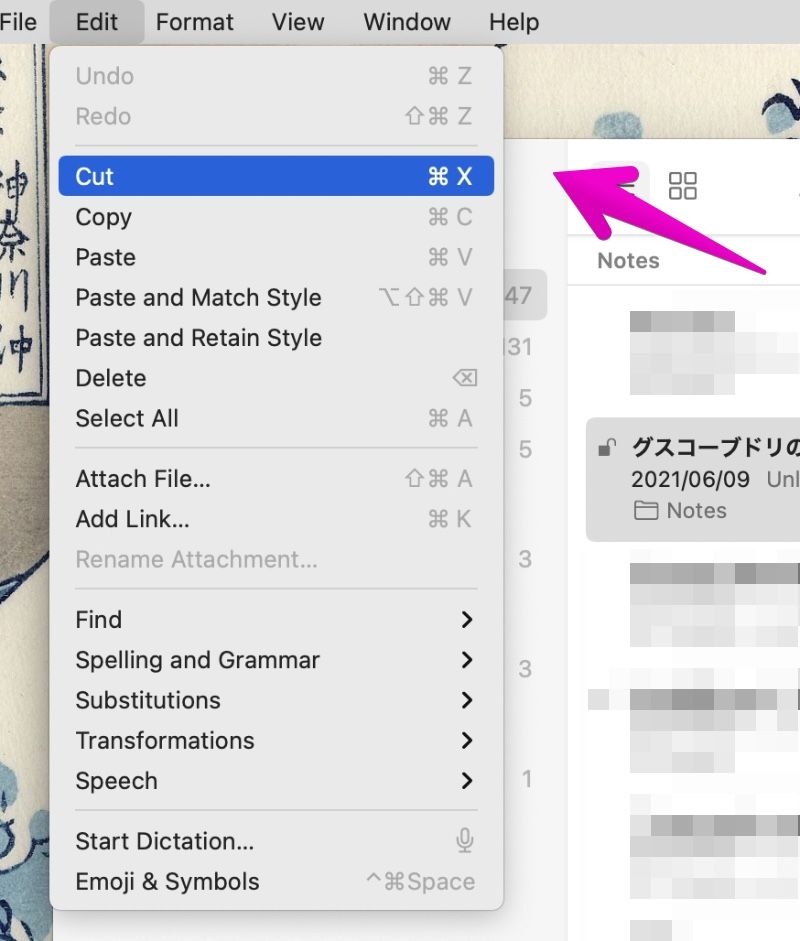
▶ Cut the table to the clipboard.
The method is to do one of the following two operations.
①. Use the keyboard shortcut, command ⌘ + X

②. Select “Edit” – “Cut” from the menu bar
▶ Click directly where you want to paste or move the cursor.
▶ Paste the table from the clipboard.
To do this, do one of the following three operations.
①. Execute the keyboard shortcut, command ⌘ + V
②. Select “Edit” – “Paste” from the menu bar
③. Select “Paste” from the right-click menu
Move the table
“Cut and paste the table” and “Move the table” are very similar, except that the former can be pasted into another memo, while the latter is only in the same memo. there is.
▶ Leaves the entire table selected.
The method is to do one of the following two operations.
①. With the mouse / trackpad, drag the entire table from the left or right edge of the table
②. Click inside any cell and execute the keyboard shortcut command ⌘ + A once or twice
(Twice for cells with characters, once for empty cells)
The following video shows the keyboard shortcut executed.
▶ When the entire table is selected, the cell background color changes.
【The entire table is not selected】
【The entire table is selected】
▶ Click and hold the colored part of the selected table with the mouse / trackpad, then drag and drop it to the destination.
The following is explained in the video.
Delete the table completely
“Delete the table completely” and “Erase the cell contents” are very similar, but the former deletes the table itself, while the latter does not delete the frame of the table but only the contents of the cell.
▶ Leaves the entire table selected.
The method is to do one of the following two operations.
①. With the mouse / trackpad, drag the entire table from the left or right edge of the table
②. Click inside any cell and execute the keyboard shortcut command ⌘ + A once or twice
(Twice for cells with characters, once for empty cells)
The following video shows the keyboard shortcut executed.
▶ When the entire table is selected, the cell background color changes.
【The entire table is not selected】
【The entire table is selected】
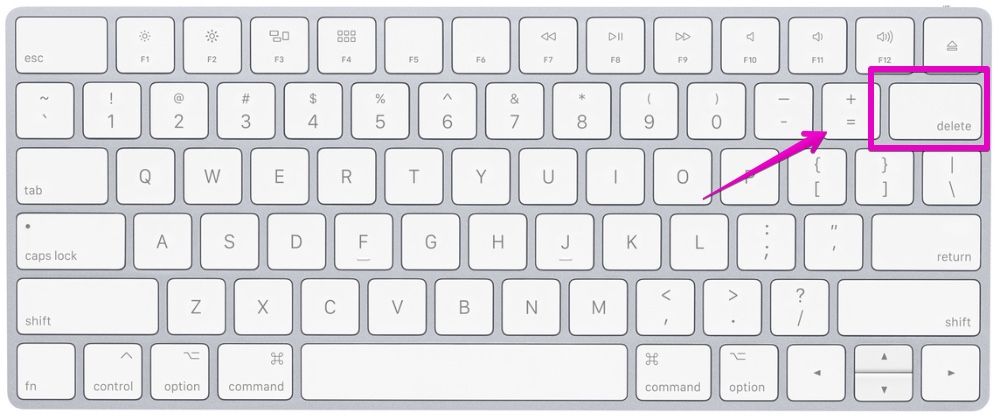
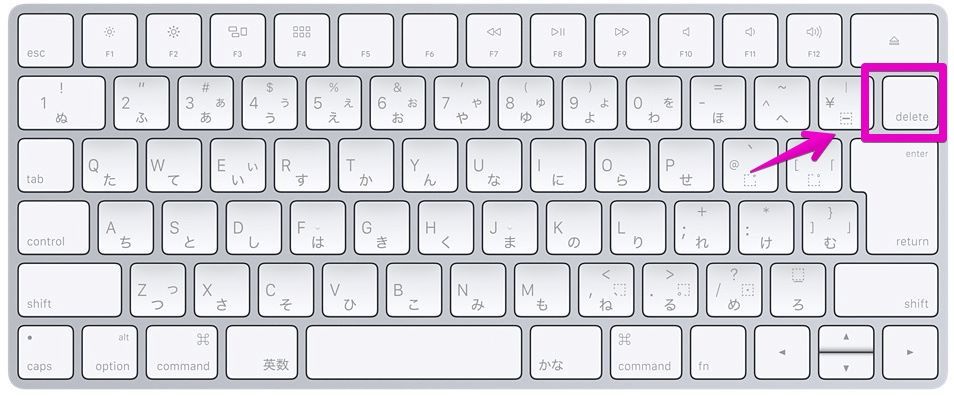
▶ Press delete on your keyboard to delete the table.
Erase the cell contents
“Delete the table completely” and “Erase the cell contents” are very similar, but the former deletes the table itself, while the latter does not delete the frame of the table but only the contents of the cell.
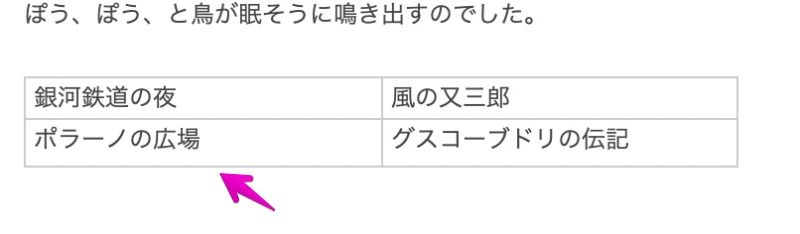
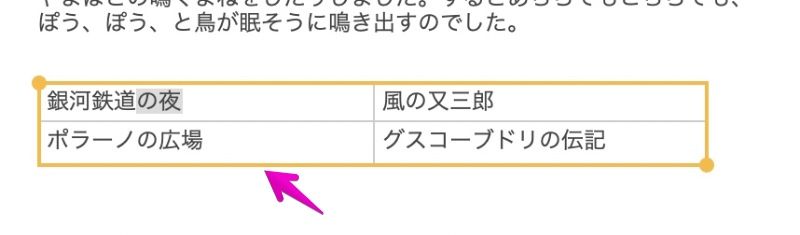
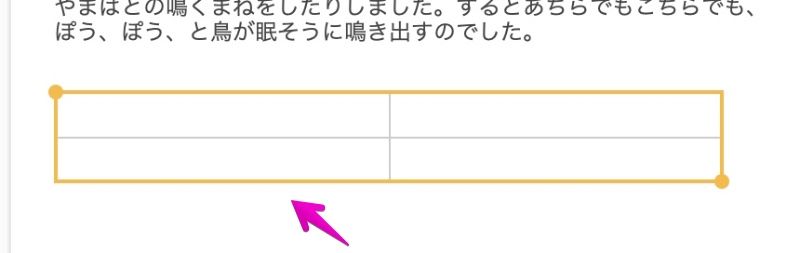
▶ If there are multiple cells to be deleted, click in one of the upper left / lower left / upper right / lower right cells.

▶ Hold down shift on your keyboard and press ← / ↑ / → / ↓ to select the area you want to erase.
▶ When the cell content is selected, the table border color changes to yellow.
【The entire contents of the cell are not selected】
【The entire contents of the cell are selected】
▶ Pressing delete once on your keyboard deletes the contents of the cell.
By the way, pressing it again will delete the table itself.
The following is the state where the cell contents are deleted by pressing delete only once, but the border of the table still remains.
If you press it again, the table will also be deleted.
Sort table rows and columns
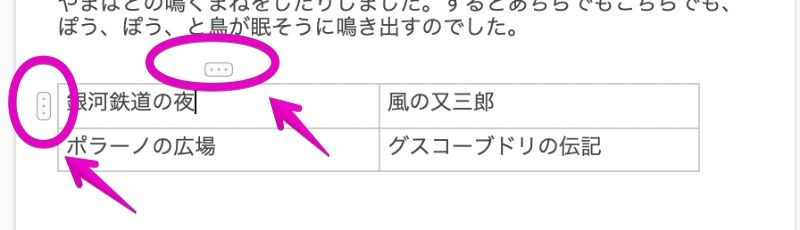
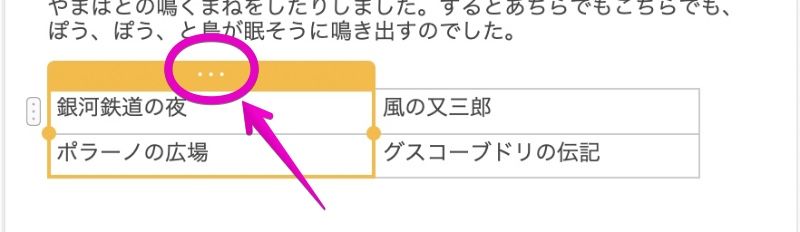
▶ Click inside the cell that contains the row or column you want to sort.
▶ A small icon called a “handle” appears on the far left or top of the cell you clicked, so click the handle of the row or column you want to sort.
▶ Now that the row or column is selected, click and hold the handle and drag and drop it to the destination you want to swap.
The following is a video of the actual operation.
Add / remove table rows and columns
▶ Click in the cell just before or after you want to add a row or column.
Alternatively, click inside the row or column cell you want to delete.
▶ A small icon called a “handle” will appear on the far left or top of the cell you clicked, so click on the handle just before or after you want to add a row or column.
Alternatively, click the row or column handle you want to delete.
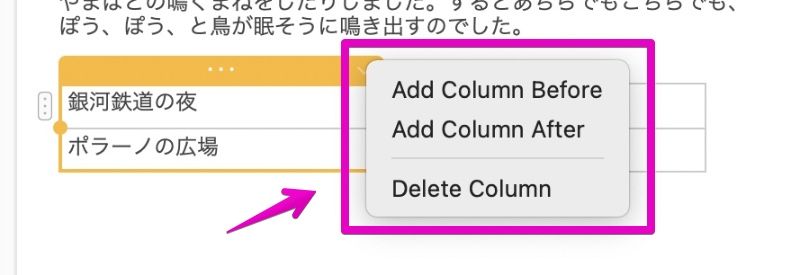
▶ Now that the row or column is selected, click the down arrow ∨ near the hand.
Alternatively, click the down arrow ∨ near the row or column handle you want to delete.
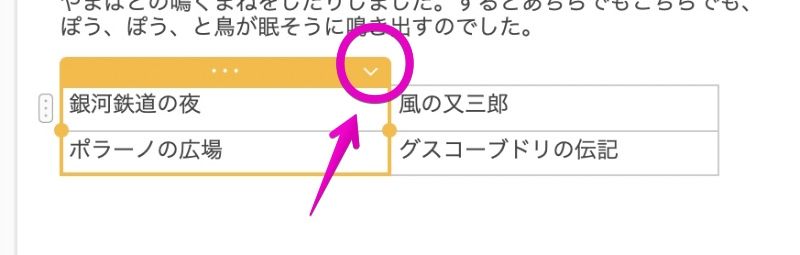
▶ Menu items for adding and deleting rows and columns are displayed, so select one of them as necessary.
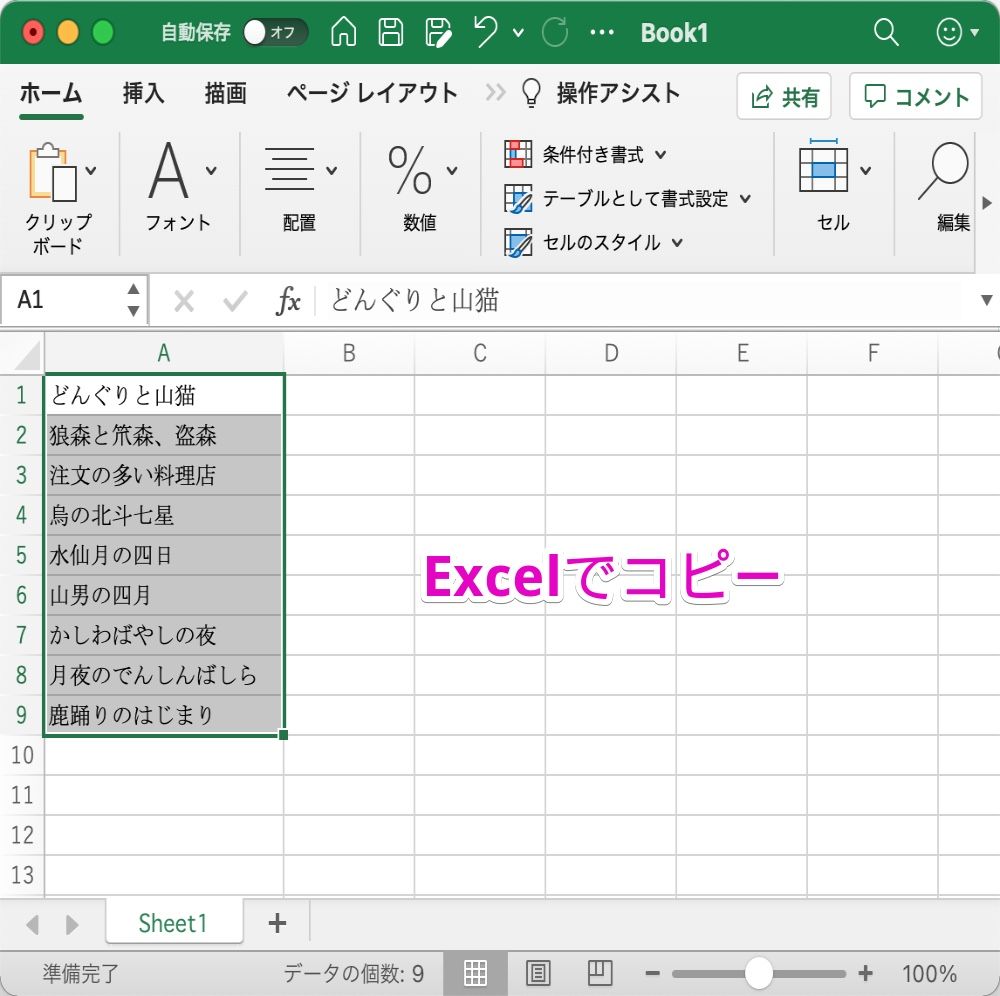
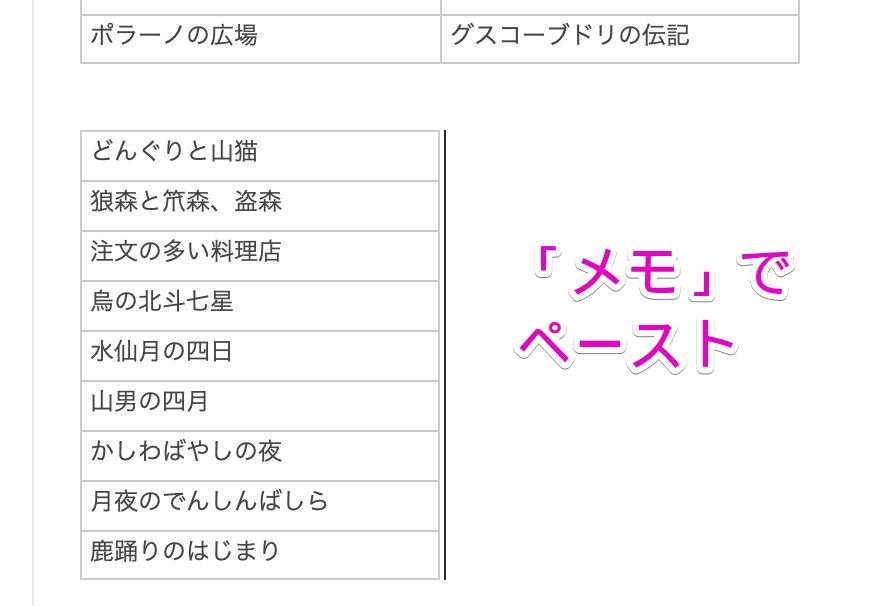
Copy and paste data with other apps
Calculation formulas and formats cannot be copied between the Mac “Notes” app and other apps, but the text and number data itself are compatible.
Specifically, you can paste the data copied in Excel or Google Sheets into a “memo” and vice versa.
Furthermore, if you copy and paste from Excel or Google Sheets to “Notes”, the table will be created automatically.
【Copy source Excel】
【Copy destination “Notes”】
FAQ
In addition to this item, see “Restrictions on data entered in cells”.
| Question | Answer |
| How to break a line in a cell? |
Press option ⌥ + return on your keyboard
|
| Can cell column widths and row heights be changed? |
It cannot be changed with standard functions.
Alternatively, you can do the following: ① Column width: Input several blank spaces ② Height: Input several brek lines  Standard state of cell  Adding some spaces  Adding some line breaks |
Reference information


コメント