For those who are new to Sidecar on Mac and iPad, I will introduce the basic usage in an easy-to-understand conversational format of animal characters.
Sidecar is a function that realizes multi-display of Mac using the screen of iPad.
The following articles introduce Sidecar-compatible Macs and iPads.

Introduction of characters

M1 MacBook Air is the best!
I’ve been using a MacBook Pro since 2013, but iM1 MBA has three times as much battery as before, it runs faster than ever, and it’s fanless, so it’s silent.

I bought the iPad Air with the momentum.
Since the M1 MacBook Air is a Sidecar compatible model, I also wanted to use Sidecar on Mac and iPad at this time.

I’ve been using Sidecar since the release of macOS Catalina, so I’ve been using it for about a year.
If you have any questions, I’ll answer anything.

Then, can you teach me how to use it as a review?

Explaining various things at once makes you confused, so I will focus on the very basic usage.
When you get used to it, you will naturally understand the detailed functions and settings.

Confirmed!
How to connect Mac and iPad

I know this by searching online.
We can connect wirelessly or with a USB cable, right?

exactly.
Just in case, I will add it in detail.

When connecting wirelessly, both Mac and iPad have the following prerequisites:
- You are logged in with the same Apple ID
- Apple ID “two-factor authentication” is enabled
- WiFi is turned on
- Bluetooth is on
- iPad “Network Sharing” is disabled
Please note that there are many people who do not know 2 unexpectedly.
If you’re wondering “two-factor authentication? What’s that?”, read the next page and set it up if necessary.
The last 5 isn’t relevant for a WiFi-only iPad, but it’s a pitfall when you can’t connect with a WiFi + cellular iPad.

When connecting by wire, just connect with a USB cable that can communicate data properly.
Please note that some cheap USB cables are for charging only and cannot perform data communication.
If you’re plugged in with a USB cable and your Mac or iPad asks if you trust each other, you’ll need to set it to trust.

By the way, which is recommended, wireless or wired?

To be honest, it doesn’t matter which one.
You may think wheter there is screen delay in the wired one, but as long as you use apps such as WEB screens and Excel, you don’t have to worry about delays even wirelessly.

By the way, it seems that the illustration creation application for Mac is not easy to operate besides being worried about delay, so it makes you happier to use it for iPad.

I’m not very familiar with the illustration creation app, so please check it online.
How to get started with Sidecar

I know how to get started with Sidecar from the Apple menu!

In the case of macOS Big Sur, you can select “Display” from “Control Center” near the right end of the Apple menu as shown in the video below, and then select the iPad displayed in it.

That’s the basic method.
There is another way.

As you can see in the video below, hover your mouse cursor over the maximize button on the top left of the Mac app screen and wait a second or two to see the iPad that you can use with Sidecar.
Clicking on it will start Sidecar and display the app on the iPad side.

Oh, I didn’t know this!
I’ll remember.
How to finish Sidecar

When we finish Sidecar, it’s the opposite of when we start!
In other words, when we open the “Control Center”, the icon is blue in the “Display” part if Sidecar is in use, so click on it to finish.
It’s complicated to explain in words, but we can see it immediately by watching the video below, right?

I think there is no particular supplement to this.
Sidecar screen layout settings

What does “screen layout settings” mean?

This isn’t limited to Sidecar, but when using two or more screens on a Mac, you can freely set the screen layout.
For example, you can place your iPad on the right or left side of your Mac, or set it above or below your Mac.
In addition, you can make fine adjustments such as moving up or down on the left.

As for the setting method, there is “Arrangement” by switching tabs in “Display” of “System Preferences”.
Here you can set the placement of Mac and iPad

Please see the following video for the specific setting method.

Well, we can put our iPad on the left or right here.
I didn’t know it until now, so I put it all the way to the right.

Mr. otter has become smarter again!

That’s good.

The story goes awry, but I often want to turn the iPad screen vertically when using Sidecar.
Can I turn it vertically?
When viewing the WEB or PDF, it is often more convenient to use the vertical orientation.

Can not.

Immediate answer!

Can’t we do it even if we use tricks or apps?

Can not.

Certainly, I fully agree that it is convenient to be able to make it vertical.
After the Sidecar became available, the SNS site “https://www.reddit.com/” and “https://www.macrumors.com/” etc, I’m checking them, but it seems we can’t do it for now.


So I think it’s a good idea to give feedback so that Apple will officially respond.
If there are many requests, why not think about Apple?

How to operate the Sidecar screen

“Screen operation” means scrolling, clicking, double-clicking, selecting a range, right?

That’s right.

I know them because I’m getting used to them!

Scrolling on Sidecar’s iPad screen is same as using a mouse or trackpad.

After that, we can scroll vertically and horizontally with two fingers!

Using Apple Pencil is a “range selection”, so we can’t use it for scrolling!

It OK so far.

When I first used Sidecar, I was surprised that nothing happened when I touched it with one finger.
Sometimes I still make a mistake and touch the iPad in Sidecar and notice it later.

I sometimes make a mistake too.

After that, if we have an Apple Pencil, we can single-tap with a single mouse click and drag to select a range.

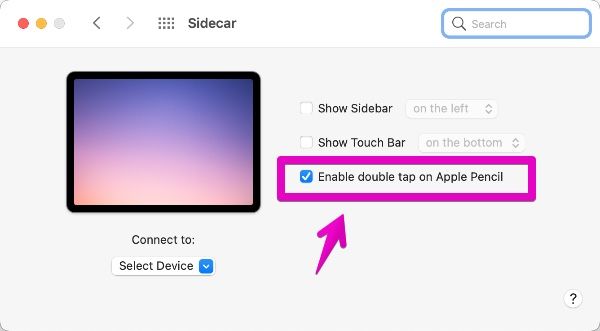
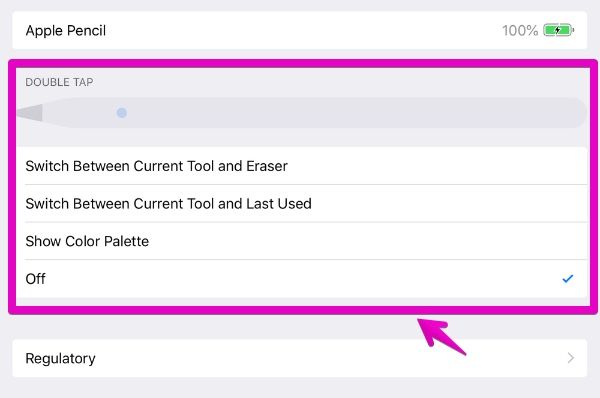
Also, in the “Sidecar” setting of “System Preferences”, there is “Enable double tap with Apple Pencil”. Does this mean that you can double-click?


List of Sidecar screen touch operations and Apple Pencil operations

The operation method has become a little complicated, so I’ve summarized it in a list.
| Operation | iPad screen touch | Apple Pencil |
| ① Scroll up and down | Swipe up and down with 2 fingers |
– |
| ② Scroll left and right | Swipe left or right with 2 fingers |
– |
| ③ Click an item | – | Touch |
| ④ Select a range | – | Touch & Drag |
| ⑤ Copy selected range | Pinch in with 3 fingers |
– |
| ⑥ Cut selected range | Pinch in twice with 3 fingers |
– |
| ⑦ Cancel the last operation (Undo) |
Swipe left with 3 fingers or Tap with 3 fingers |
– |
| ⑧ Redo the last canceled operation (Redo) |
Swipe right with 3 fingers |
– |

Looking at it like this, we can’t do everything just by touching the screen.

I think it’s hard to understand clearly.
Especially, there aren’t many people who use ⑤ ~ ⑧, right?

As a recommended usage, hold down ①② of the screen scroll.
Also, I think it would be convenient to buy an Apple Pencil compatible product for ③ and ④.
With one Apple Pencil compatible product, you can even write PDFs, so it’s convenient even if you’re not a Sidecar.

If you think a trackpad or mouse is enough, you don’t have to force Sidecar to touch the screen or use the Apple Pencil.

By the way, I’m using this now, and it’s not suitable for drawing because it doesn’t detect pressure, but it’s enough to write to PDF and I like it because it’s cost effective.

Mr. Otters, can you tell me if you have any recommendations?

Then, I’ll introduce one recommended item and finish it.
If you think of it as a case, it’s expensive, but if you think of it as a case + keyboard + trackpad, this is reasonable.
I’ve tried different keyboards and mice until I got to this, but it’s probably the best.

You seem to love it a lot.

This is the end of the article on this page.


コメント