

AppleシリコンMacで、Parallels Desktopの仮想マシンファイルをVMware Fusionに変換して成功したので、やり方をシェアします。
通常のやり方では変換できないので、ネット情報を元に「qemuコマンド」を使いました。
- 「qemuコマンド」の仮想マシンファイル変換機能を使う
- 最初のステップのHomebrewとqemuのインストールが最も難関で、その後は手順通り進めるだけ(エラーが出た時の回避方法に手間がかかる)
- 作業の手間や所要時間的には、仮想マシンの変換よりも新規作成した方が早い方が多いと思われる
| 項目 | 内容 |
|---|---|
| Mac機種 | Mac Book Air (M1, 2020) |
| 搭載メモリ | 16GB |
| 搭載CPU・GPU | Apple M1 CPU 8コア、GPU 8コア |
| ホストmacOS バージョン | 14.1 Sonoma |
| Parallels Desktop バージョン | 17.1.7 (51588) |
| VMware Fusion バージョン | 13.5.0 (22583790) |
| ゲストWindows バージョン | Windows 11 Home 22H2 |
概要
a) AppleシリコンMacでのインポート機能の制限について
AppleシリコンMac上でのVMware Fusin 13.5では、以下の仮想マシンのインポート機能は実装されていません。
- インテルMacで作成した仮想マシンのインポート
- AppleシリコンMacのParallelsで作成した仮想マシンのインポート
1番目の項目は、CPU自体が違うのでしょうがないかなと思います。
しかし2番目は、2022年11月にリリースされたVMware Fusion 13からAppleシリコンが正式にサポートされたため、なんとか回避策はないかを調査してみました。
b) 非公式であるがParallel -> VMwareのインポートする方法が見つかった
調査した結果、VMware公式サイトのユーザ情報交換ページで、非公式ながらParallelsからVMwareにインポートする情報が見つかったので、実際にやってみます。

上記サイトではインポート方法がPDFにまとめられていますが、英語表記なので以下に和訳したものを併記して引用します。
必ずしも全部目を通す必要はないので、デフォルトでは閉じた状態にしています。
ステップ 原文 和訳 (1) Install qemu from either Homebrew or MacPorts. Homebrew または MacPorts から qemu をインストールする。 (2) Clone the Parallels openSUSE VM (so that all snapshots and Parallels guest tools can be removed without disturbing the existing VM). Parallels openSUSE VM のクローンを作成します (既存の VM に影響を与えることなく、すべてのスナップショットと Parallels ゲスト ツールを削除できるようにします)。 (3) Delete all VM snapshots in the clone. クローン内のすべての VM スナップショットを削除します。 (4) Start the cloned VM and remove Parallels tools in the clone. クローン作成された VM を起動し、クローン内の Parallels ツールを削除します。 (5) Turn off the VM. VM をオフにします。 (6) Open a Terminal and cd to Parallels VM directory where the VM .hds file is located. ターミナルを開き、VM .hds ファイルが存在する Parallels VM ディレクトリに移動します。 (7) Convert the Parallels virtual disk to VMware vmdk format using the qemu-img command similar to the following:
$ qemu-img convert -f parallels p-disk.hds -O vmdk -o compat6 v-disk.vmdk
Where
• p-disk.hds is the input Parallels virtual disk, and
• v-disk.vmdk is the output converted VMware virtual disk次のような qemu-img コマンドを使用して、Parallels 仮想ディスクを VMware vmdk 形式に変換します。
$ qemu-img convert -f parallels p-disk.hds -O vmdk -o compat6 v-disk.vmdk
以下、置き換え
• p-disk.hds は入力 Parallels 仮想ディスクであり、
• v-disk.vmdk は、出力変換された VMware 仮想ディスクです。(8) 8.
Create a new custom virtual machine in Fusion
Choose the appropriate guest OS version when prompted.
When asked for a virtual disk, opt to use an existing virtual disk. Pick the .vmdk file created from the qemu-img command above.Fusion で新しいカスタム仮想マシンを作成する
プロンプトが表示されたら、適切なゲスト OS バージョンを選択します。
仮想ディスクを要求されたら、既存の仮想ディスクを使用することを選択します。上記の qemu-img コマンドで作成された .vmdk ファイルを選択します。The Unofficial Fusion 13 for Apple Silicon Companion Guid – VMware Technology Network VMTN
以下からは、上記のインポート方法を元にアレンジして、実際にやってみた手順を紹介します。
手順
- (1) Homebrewとqemuのインストール
- (2) Parallels仮想マシンのファイルの複製(クローン)を作成する
- (3) スナップショットの削除
- (4) Parallels Toolsのアンインストール
- (5) 仮想マシンのhdsファイルのフルパスを調べる
- (6) Parallels仮想マシンをVMware仮想マシンに変換する
- (7) VMware Fusionで仮想マシンの設定
(1) Homebrewとqemuのインストール
この(1)の項目は、当サイトの別ページ【MacでHomebrewのインストール・アンインストール、基本的なコマンドの使い方】の多くの部分が使えるので、そこから引用しつつアレンジしています。
手順としては、以下の2段階があります。
- (a) Homebrewのインストール
- (b) qemuのインストール
(a) Homebrewのインストール
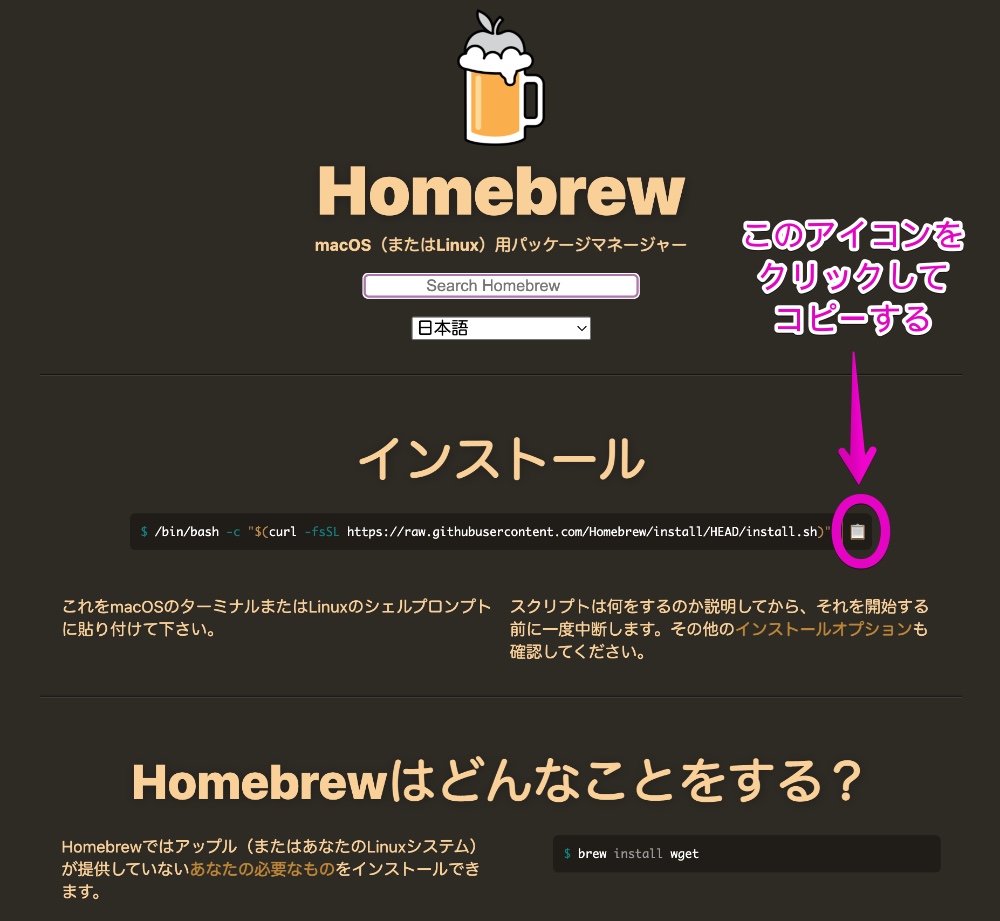
▶︎ 以下のリンクをクリックして、Homebrewの公式サイトを開きます。

▶︎ 図のように公式サイトが開いたら、見出し「インストール」のコマンドの右横にあるクリップボードのアイコンをクリックしてコピーします。
アイコンが表示されていなかったり、アイコンでコピーがうまくいかない場合は、コマンド1行を全選択してコピーしてください。
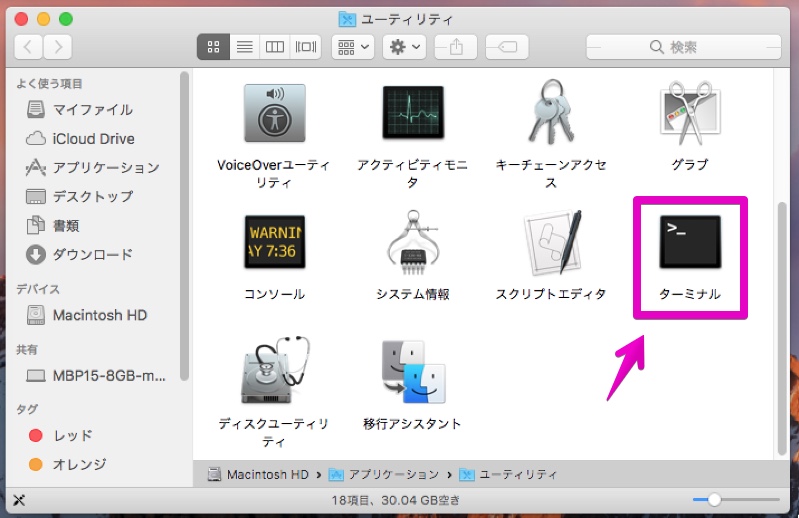
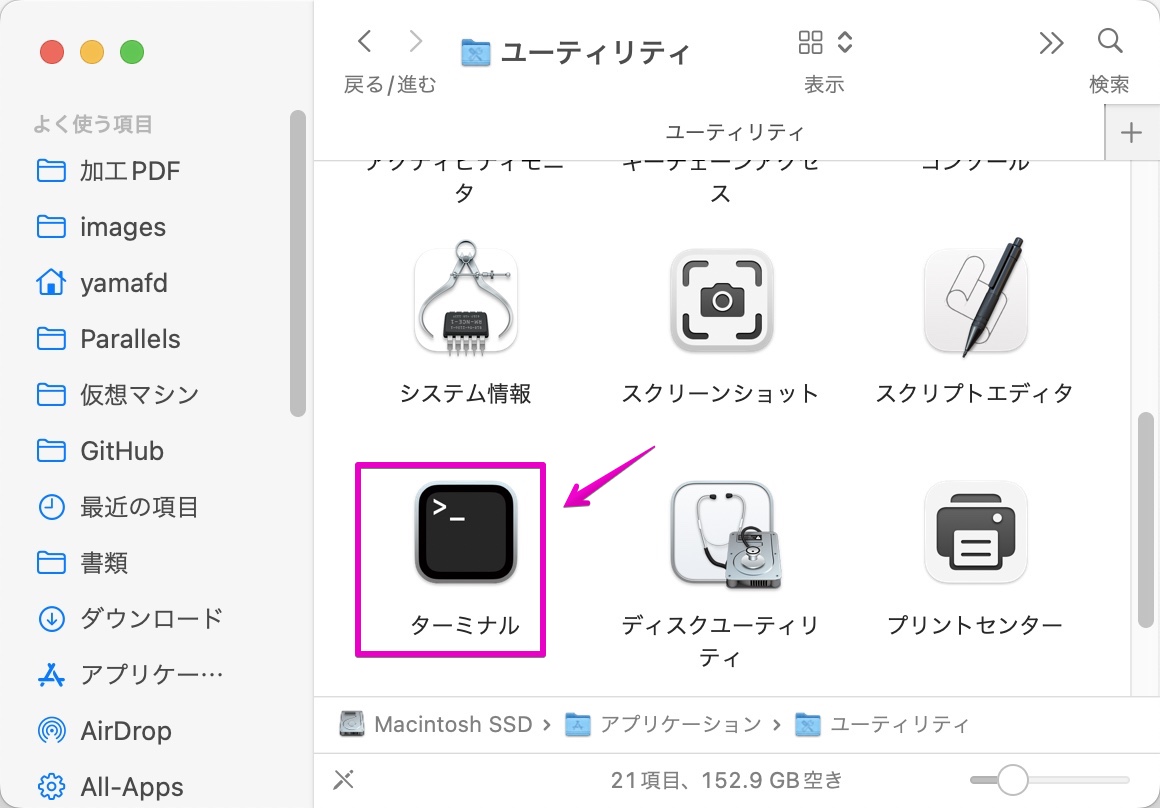
▶︎ MacのFinderを前面に表示して、フォルダ「アプリケーション」→「ユーティリティ」の中にある、アプリ「ターミナル」をダブルクリックして起動します。
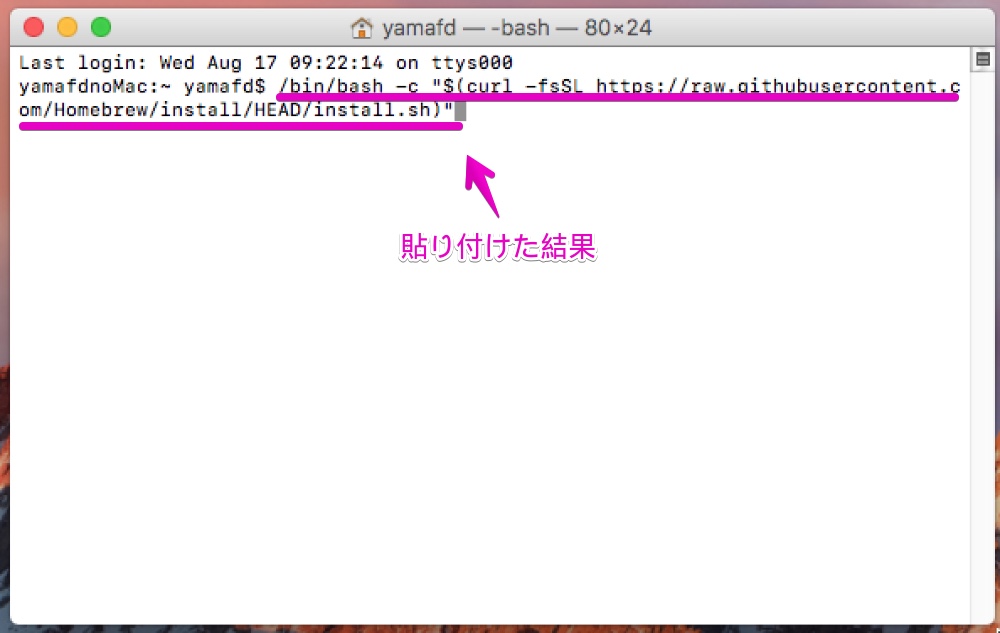
▶︎ アプリ「ターミナル」が起動したら、先ほどコピーしたコマンドを貼り付けます。
貼り付ける方法は、キーボードショートカットのcommnad + V などが使えます。
貼り付けたら、キーボードのreturnを押して、コマンドを実行します。
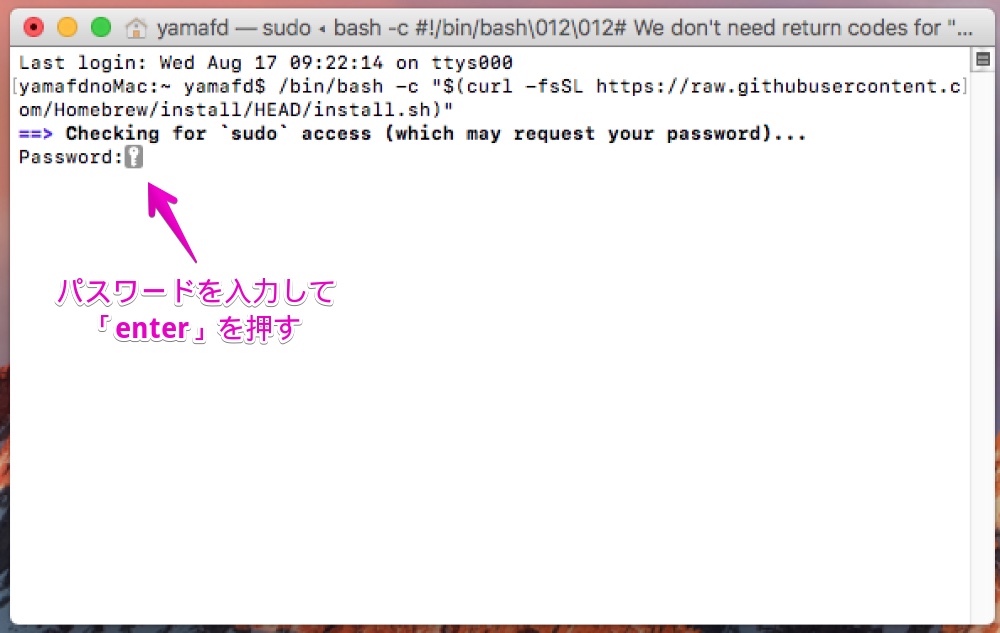
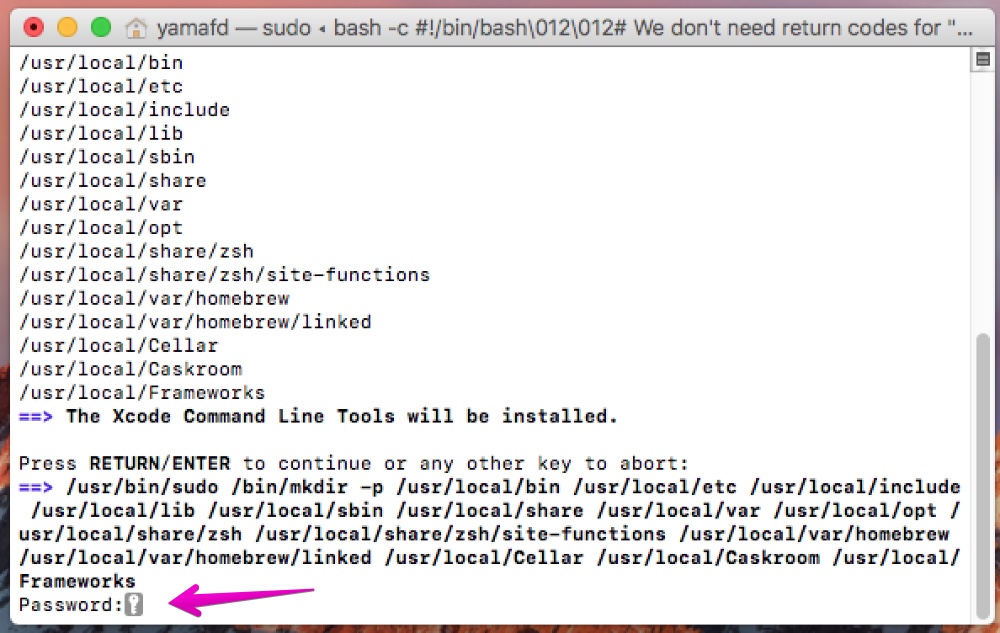
▶︎ 図のようにパスワードを要求されるので、Macにログインしたりアプリをインストールする時に使っているパスワードを入力して、最後にキーボードのreturnを押します。
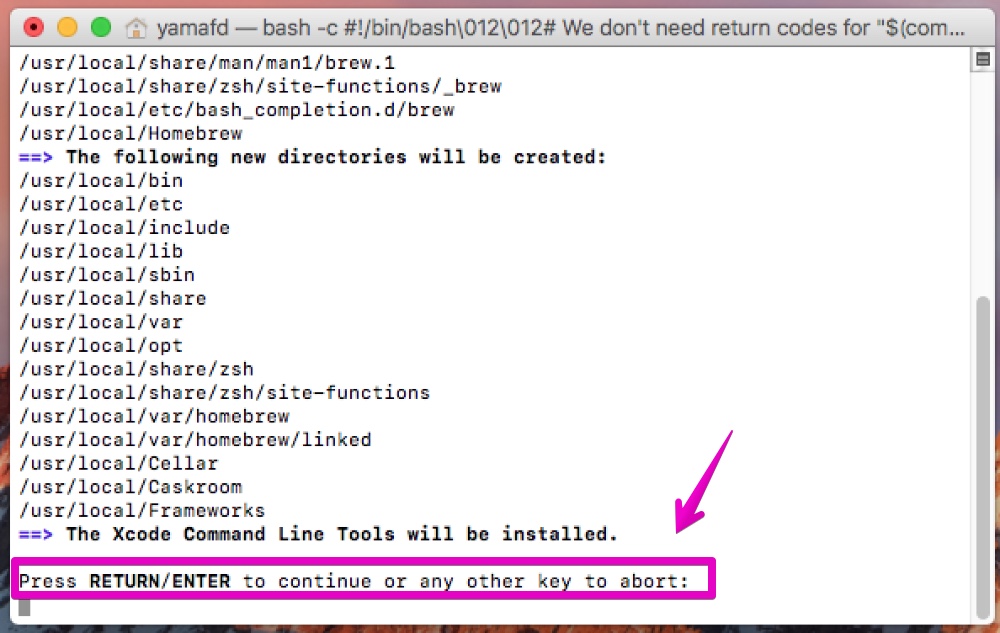
▶︎ 図のように「Press RETURN/ENTER to continue or any other key to abort:」と表示されたら、このまま続ける場合はキーボードのreturnキーを押します。
中断する場合は、spaceなどそれ以外のキーを押します。
ここでの説明は、returnを押して続けます。
▶︎ 再びパスワード入力を求められるので、パスワードを入力して、最後にキーボードのreturnを押します。
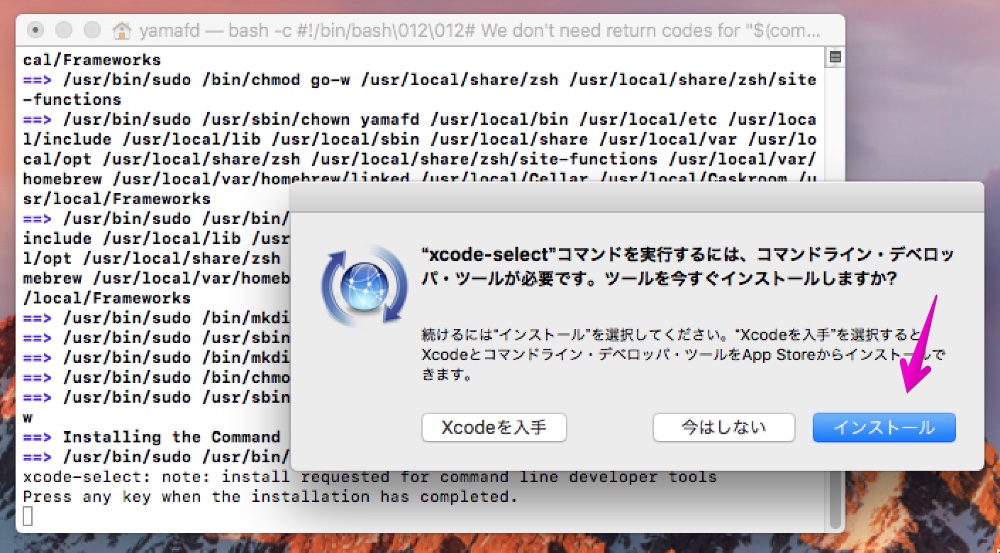
▶︎ 使用しているMacの環境によって、図のようにxcodeコマンドラインツールのインストール実行画面が出るので、表示されたらボタン「インストール」をクリックします。
使用許諾契約の同意画面が表示されたら、ボタン「同意をする」をクリックします。

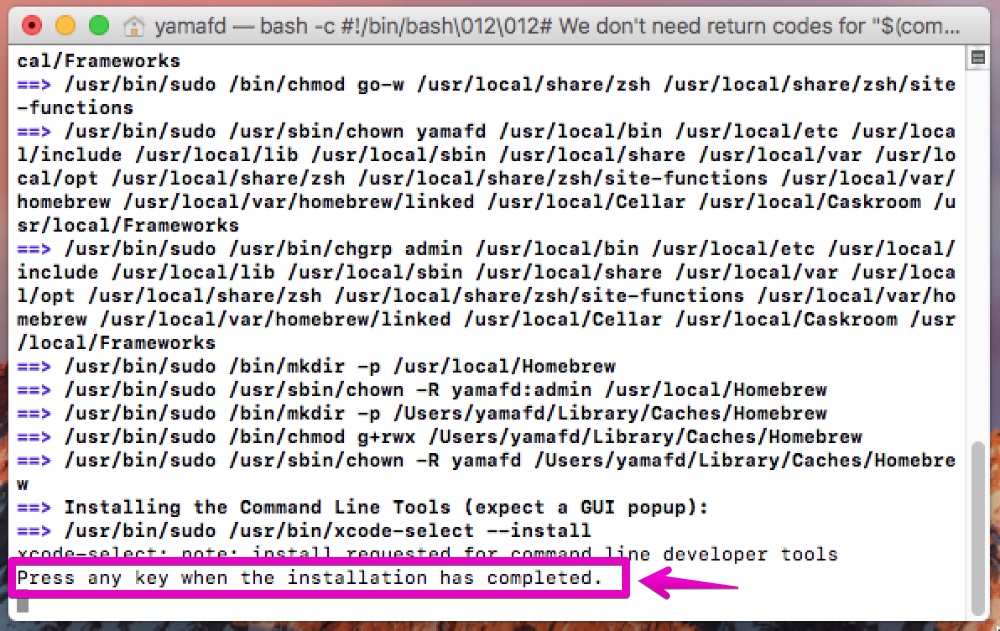
▶︎ xcodeコマンドラインツールのインストールが完了すると、画面に「Press any key when installation has completed.」と表示されるので、表示されたらキーボードのどれでもいいのでキーを押します。
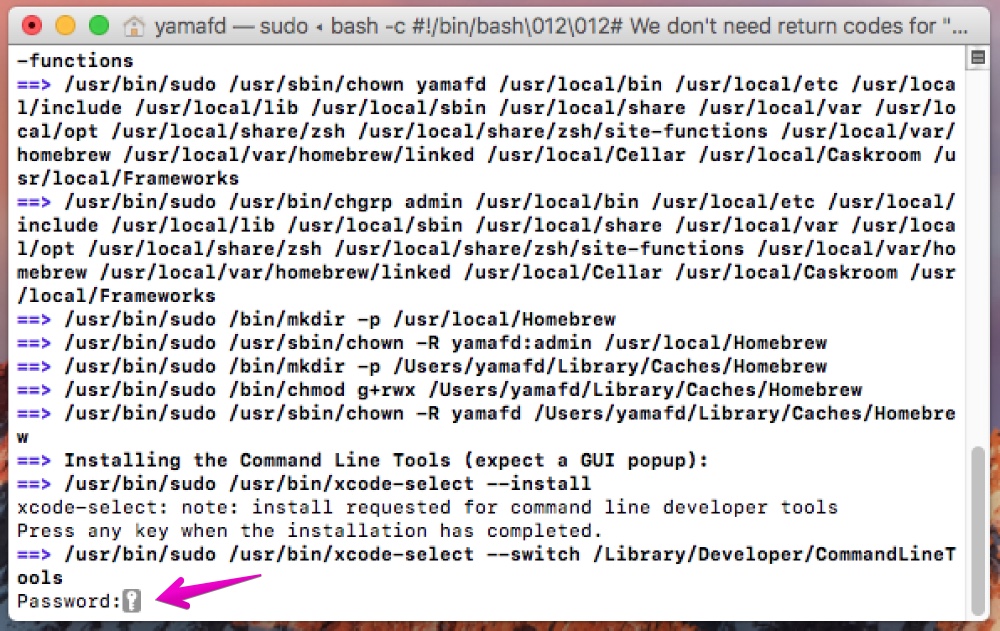
▶︎ 図のようにパスワード入力を求められたら、パスワードを入力して、最後にキーボードのreturnを押します。
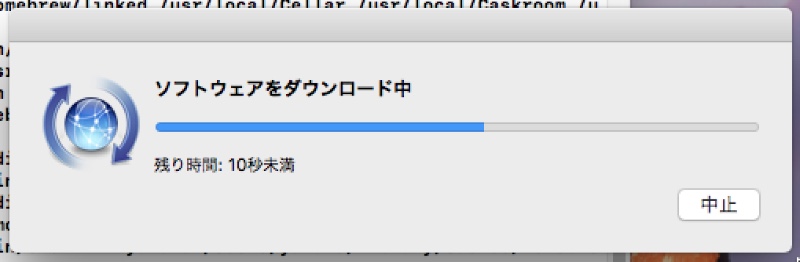
▶︎ インストール進行中は画面が随時更新されるので、完了するまで待ちます。
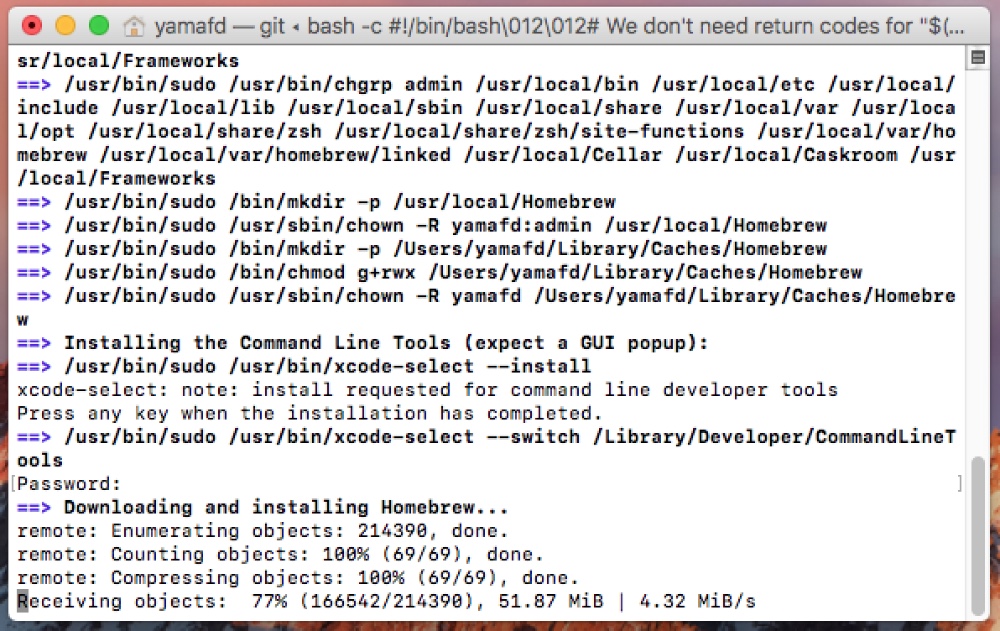
▶︎ 図のようにコマンドプロンプトが表示されたら、Homebrewのインストール完了です。

(b) qemuのインストール
Homebrewでアプリをインストールするには、以下のコマンドを実行します。
brew install (アプリ名)▶︎ アプリ「ターミナル」を起動して、以下のコマンドを入力し、最後にキーボードreturnキーを押下します。
brew install qemu
▶︎ 以下のエラーが出て、インストールに失敗しました。
Error: Cannot install in Homebrew on ARM processor in Intel default prefix (/usr/local)!
Please create a new installation in /opt/homebrew using one of the
"Alternative Installs" from:
  https://docs.brew.sh/Installation
You can migrate you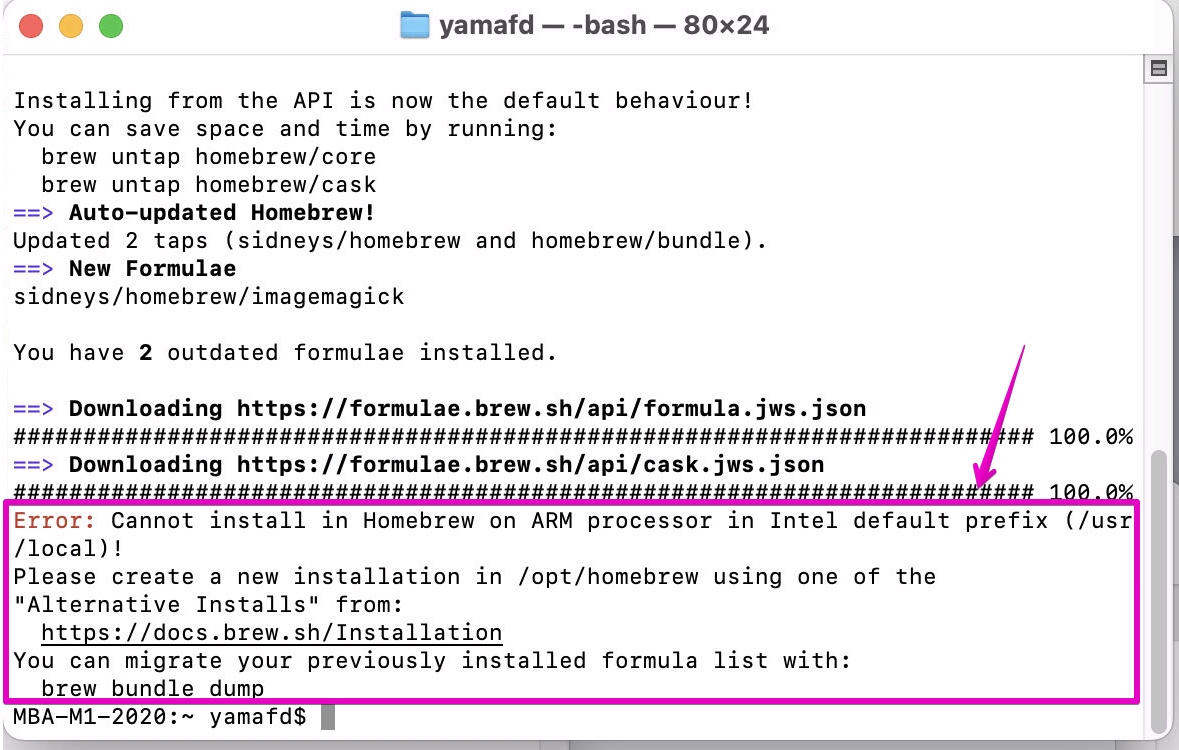
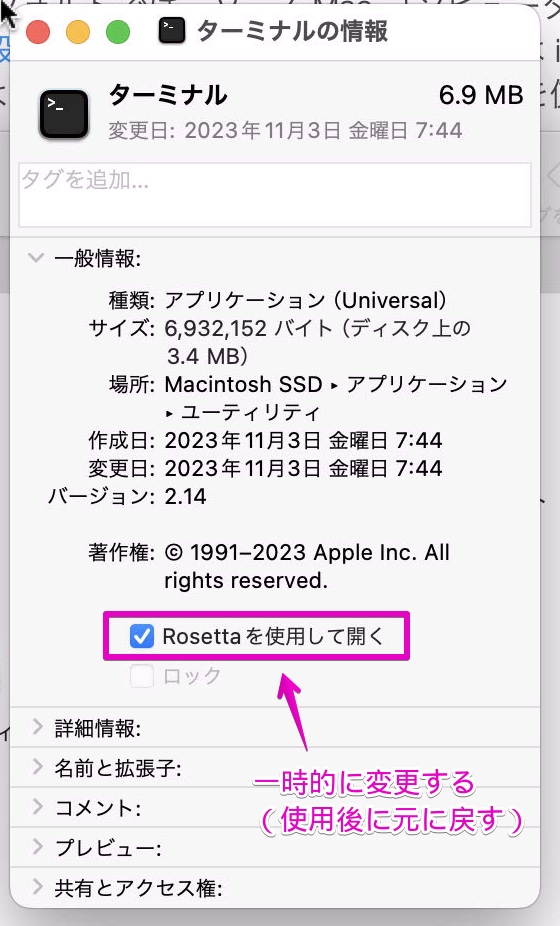
▶︎ Google検索で解決法を探ると、アプリ「ターミナル」のオプションに”ロゼッタを使用して開く”とすれば良さそうです。

参考にしたサイトでは、アプリ「ターミナル」の複製を作って、それに”ロゼッタを使用して開く”としています。
ですが、ここでは複製は作らずに、一時的に設定を変更してみます。
以下からは、その手順です。
あらかじめ、アプリ「ターミナル」が起動していたら終了させてから、以下の設定を行います。
▶︎ 再びアプリ「ターミナル」を起動して、以下のコマンドを入力し、最後にキーボードreturnキーを押下します。
brew install qemu▶︎ 再びエラーが出ました。
エラー内容を見ると、マニュアル関連の所がインストールできなかったようです。
エラー内容では、2つのコマンドを実行しろとのことです。
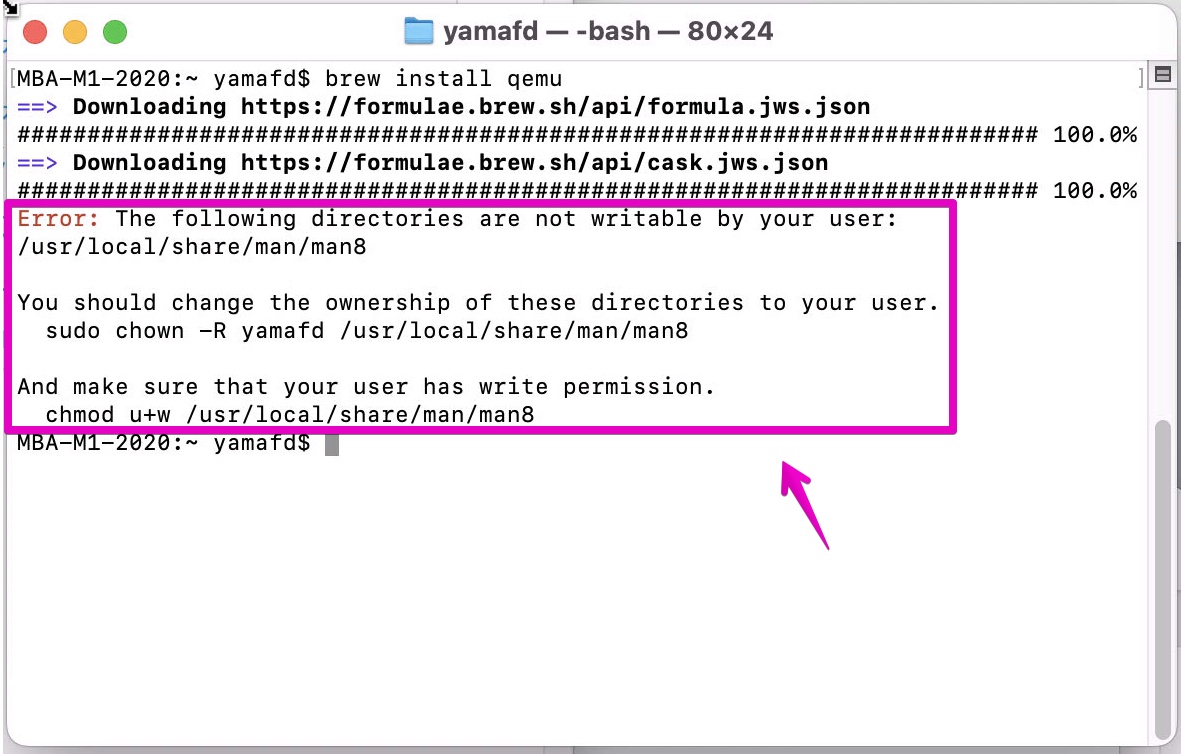
▶︎ エラーで書かれている通り、まずは1番目の次のコマンドを実行します。
sudo chown -R yamafd /usr/local/share/man/man8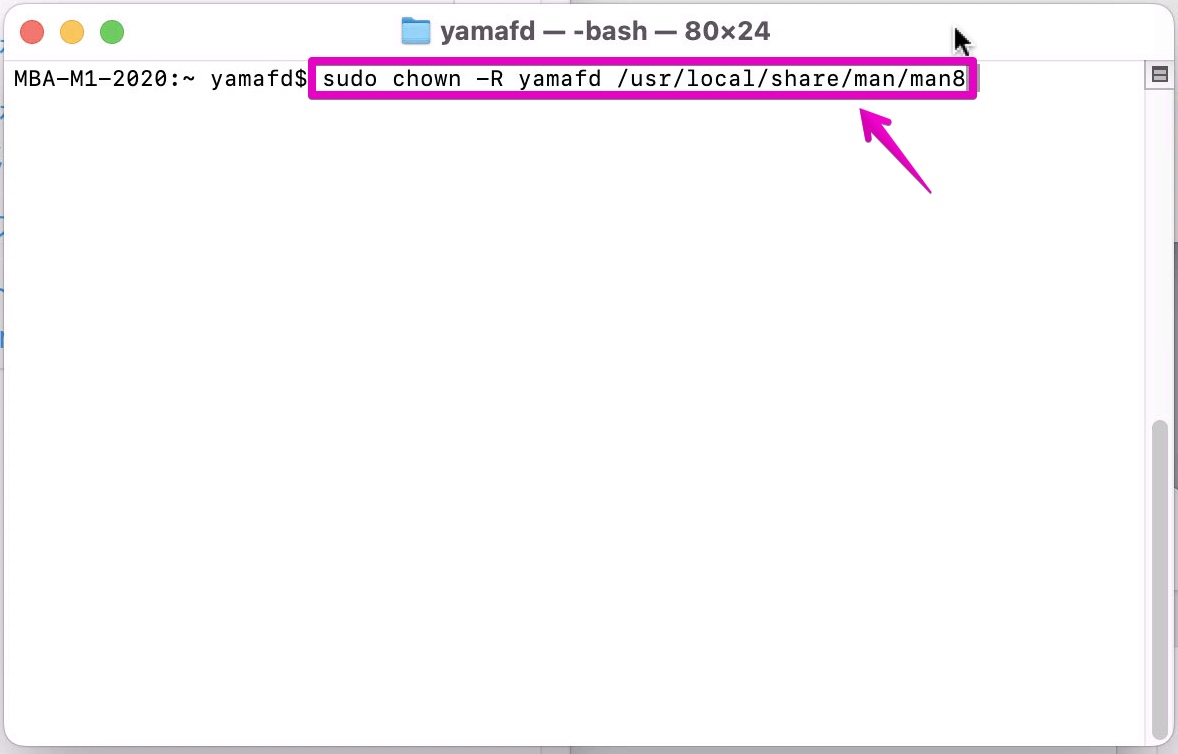
▶︎ コマンドが実行されたら、エラーで2番目に書かれている次のコマンドを実行します。
chmod u+w /usr/local/share/man/man8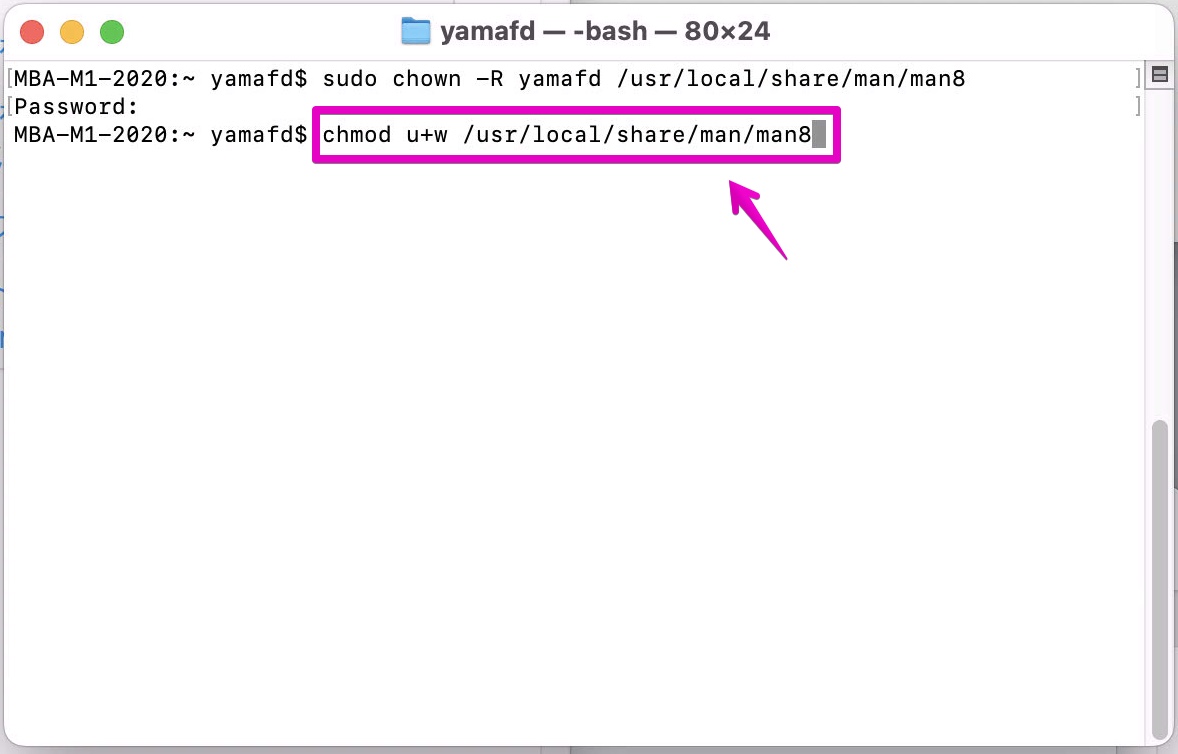
▶︎ コマンドが完了したら、三たび以下のコマンドを入力し、最後にキーボードreturnキーを押下します。
brew install qemu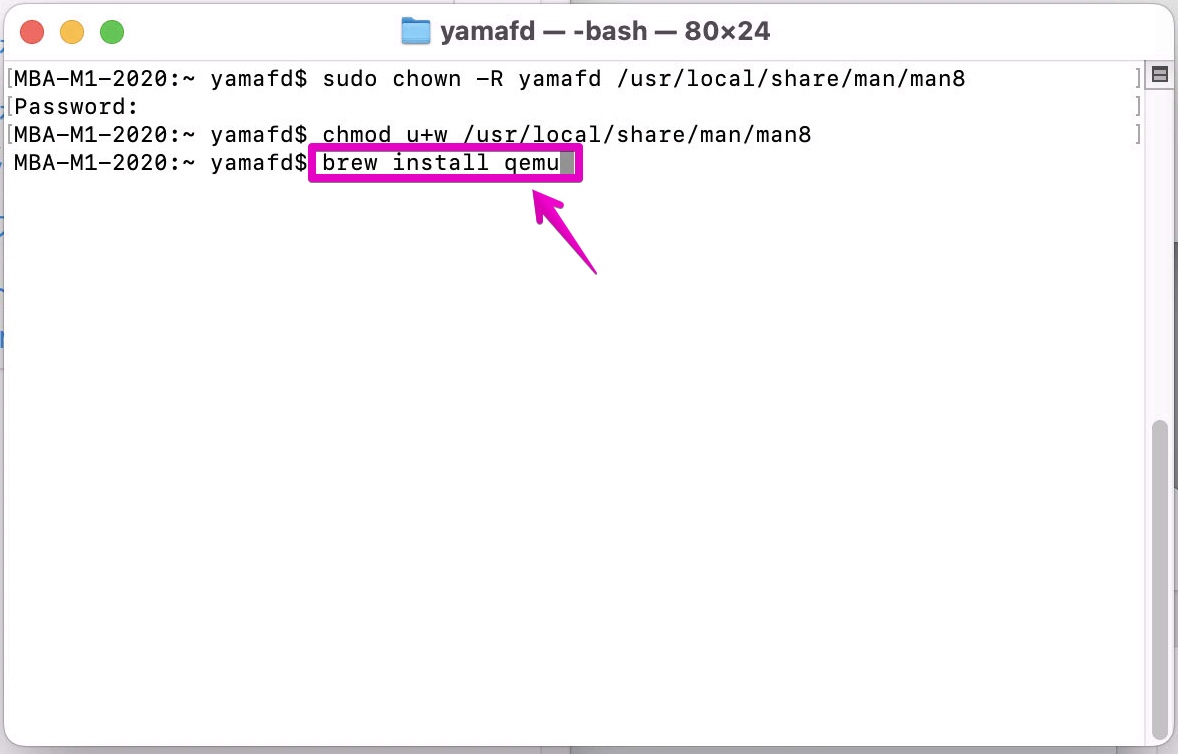
▶︎ 今度は、エラーなくコマンドが完了しました。
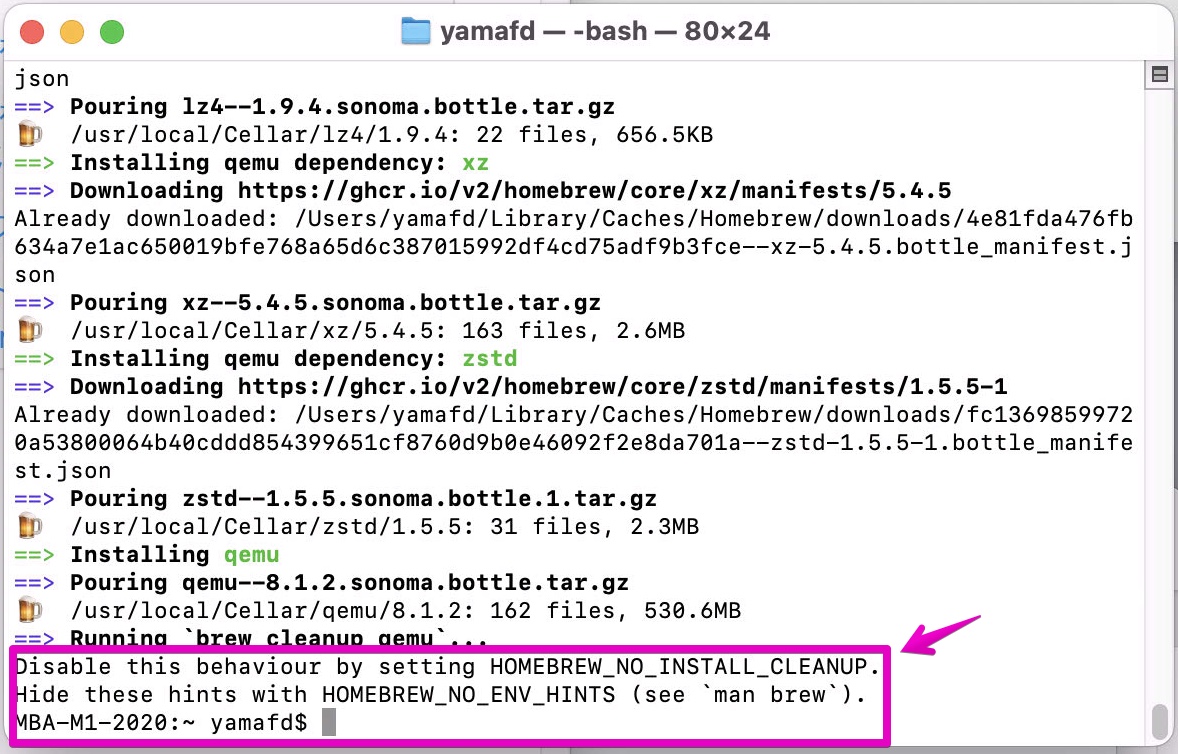
参考までに、以下にコマンド実行ログを掲載します。(非常に長いので、デフォルトでは折りたたんでいます。)
MBA-M1-2020:~ yamafd$ brew install qemu
==> Downloading https://formulae.brew.sh/api/formula.jws.json

==> Downloading https://formulae.brew.sh/api/cask.jws.json
######################################################################### 100.0%
==> Downloading https://ghcr.io/v2/homebrew/core/qemu/manifests/8.1.2
######################################################################### 100.0%
==> Fetching dependencies for qemu: capstone, dtc, pcre2, gettext, glib, ca-certificates, gmp, libunistring, libidn2, libtasn1, nettle, p11-kit, openssl@3, libevent, libnghttp2, unbound, gnutls, jpeg-turbo, libpng, libslirp, libssh, libusb, lzo, ncurses, pixman, snappy, vde, lz4, xz and zstd
==> Downloading https://ghcr.io/v2/homebrew/core/capstone/manifests/5.0.1
######################################################################### 100.0%
==> Fetching capstone
==> Downloading https://ghcr.io/v2/homebrew/core/capstone/blobs/sha256:b20083041
######################################################################### 100.0%
==> Downloading https://ghcr.io/v2/homebrew/core/dtc/manifests/1.7.0
######################################################################### 100.0%
==> Fetching dtc
==> Downloading https://ghcr.io/v2/homebrew/core/dtc/blobs/sha256:2e9b17c2bbaf2b
######################################################################### 100.0%
==> Downloading https://ghcr.io/v2/homebrew/core/pcre2/manifests/10.42
######################################################################### 100.0%
==> Fetching pcre2
==> Downloading https://ghcr.io/v2/homebrew/core/pcre2/blobs/sha256:c090875eb7e3
######################################################################### 100.0%
==> Downloading https://ghcr.io/v2/homebrew/core/gettext/manifests/0.22.3
######################################################################### 100.0%
==> Fetching gettext
==> Downloading https://ghcr.io/v2/homebrew/core/gettext/blobs/sha256:1853891cc1
######################################################################### 100.0%
==> Downloading https://ghcr.io/v2/homebrew/core/glib/manifests/2.78.1
######################################################################### 100.0%
==> Fetching glib
==> Downloading https://ghcr.io/v2/homebrew/core/glib/blobs/sha256:2c612f4d692e8
######################################################################### 100.0%
==> Downloading https://ghcr.io/v2/homebrew/core/ca-certificates/manifests/2023-
######################################################################### 100.0%
==> Fetching ca-certificates
==> Downloading https://ghcr.io/v2/homebrew/core/ca-certificates/blobs/sha256:a3
######################################################################### 100.0%
==> Downloading https://ghcr.io/v2/homebrew/core/gmp/manifests/6.3.0
######################################################################### 100.0%
==> Fetching gmp
==> Downloading https://ghcr.io/v2/homebrew/core/gmp/blobs/sha256:e8410d92339535
######################################################################### 100.0%
==> Downloading https://ghcr.io/v2/homebrew/core/libunistring/manifests/1.1
######################################################################### 100.0%
==> Fetching libunistring
==> Downloading https://ghcr.io/v2/homebrew/core/libunistring/blobs/sha256:230df
######################################################################### 100.0%
==> Downloading https://ghcr.io/v2/homebrew/core/libidn2/manifests/2.3.4_1-1
######################################################################### 100.0%
==> Fetching libidn2
==> Downloading https://ghcr.io/v2/homebrew/core/libidn2/blobs/sha256:69b39ffdb1
######################################################################### 100.0%
==> Downloading https://ghcr.io/v2/homebrew/core/libtasn1/manifests/4.19.0
######################################################################### 100.0%
==> Fetching libtasn1
==> Downloading https://ghcr.io/v2/homebrew/core/libtasn1/blobs/sha256:7218661c6
######################################################################### 100.0%
==> Downloading https://ghcr.io/v2/homebrew/core/nettle/manifests/3.9.1
######################################################################### 100.0%
==> Fetching nettle
==> Downloading https://ghcr.io/v2/homebrew/core/nettle/blobs/sha256:1ca02720906
######################################################################### 100.0%
==> Downloading https://ghcr.io/v2/homebrew/core/p11-kit/manifests/0.25.2
######################################################################### 100.0%
==> Fetching p11-kit
==> Downloading https://ghcr.io/v2/homebrew/core/p11-kit/blobs/sha256:8414766fb8
######################################################################### 100.0%
==> Downloading https://ghcr.io/v2/homebrew/core/openssl/3/manifests/3.1.4
######################################################################### 100.0%
==> Fetching openssl@3
==> Downloading https://ghcr.io/v2/homebrew/core/openssl/3/blobs/sha256:42038036
######################################################################### 100.0%
==> Downloading https://ghcr.io/v2/homebrew/core/libevent/manifests/2.1.12_1
######################################################################### 100.0%
==> Fetching libevent
==> Downloading https://ghcr.io/v2/homebrew/core/libevent/blobs/sha256:5d54f13cd
######################################################################### 100.0%
==> Downloading https://ghcr.io/v2/homebrew/core/libnghttp2/manifests/1.58.0
######################################################################### 100.0%
==> Fetching libnghttp2
==> Downloading https://ghcr.io/v2/homebrew/core/libnghttp2/blobs/sha256:14a0880
######################################################################### 100.0%
==> Downloading https://ghcr.io/v2/homebrew/core/unbound/manifests/1.19.0
######################################################################### 100.0%
==> Fetching unbound
==> Downloading https://ghcr.io/v2/homebrew/core/unbound/blobs/sha256:906bef01d6
######################################################################### 100.0%
==> Downloading https://ghcr.io/v2/homebrew/core/gnutls/manifests/3.8.1
######################################################################### 100.0%
==> Fetching gnutls
==> Downloading https://ghcr.io/v2/homebrew/core/gnutls/blobs/sha256:304cfac2199
######################################################################### 100.0%
==> Downloading https://ghcr.io/v2/homebrew/core/jpeg-turbo/manifests/3.0.0
######################################################################### 100.0%
==> Fetching jpeg-turbo
==> Downloading https://ghcr.io/v2/homebrew/core/jpeg-turbo/blobs/sha256:9615c98
######################################################################### 100.0%
==> Downloading https://ghcr.io/v2/homebrew/core/libpng/manifests/1.6.40
######################################################################### 100.0%
==> Fetching libpng
==> Downloading https://ghcr.io/v2/homebrew/core/libpng/blobs/sha256:2178ff2980d
######################################################################### 100.0%
==> Downloading https://ghcr.io/v2/homebrew/core/libslirp/manifests/4.7.0
######################################################################### 100.0%
==> Fetching libslirp
==> Downloading https://ghcr.io/v2/homebrew/core/libslirp/blobs/sha256:179c52b30
######################################################################### 100.0%
==> Downloading https://ghcr.io/v2/homebrew/core/libssh/manifests/0.10.5_1
######################################################################### 100.0%
==> Fetching libssh
==> Downloading https://ghcr.io/v2/homebrew/core/libssh/blobs/sha256:10feea24449
######################################################################### 100.0%
==> Downloading https://ghcr.io/v2/homebrew/core/libusb/manifests/1.0.26
######################################################################### 100.0%
==> Fetching libusb
==> Downloading https://ghcr.io/v2/homebrew/core/libusb/blobs/sha256:e5b50e9a452
######################################################################### 100.0%
==> Downloading https://ghcr.io/v2/homebrew/core/lzo/manifests/2.10
######################################################################### 100.0%
==> Fetching lzo
==> Downloading https://ghcr.io/v2/homebrew/core/lzo/blobs/sha256:11b8557744feb2
######################################################################### 100.0%
==> Downloading https://ghcr.io/v2/homebrew/core/ncurses/manifests/6.4-1
######################################################################### 100.0%
==> Fetching ncurses
==> Downloading https://ghcr.io/v2/homebrew/core/ncurses/blobs/sha256:3111efe742
######################################################################### 100.0%
==> Downloading https://ghcr.io/v2/homebrew/core/pixman/manifests/0.42.2-1
######################################################################### 100.0%
==> Fetching pixman
==> Downloading https://ghcr.io/v2/homebrew/core/pixman/blobs/sha256:73469a943a0
######################################################################### 100.0%
==> Downloading https://ghcr.io/v2/homebrew/core/snappy/manifests/1.1.10
######################################################################### 100.0%
==> Fetching snappy
==> Downloading https://ghcr.io/v2/homebrew/core/snappy/blobs/sha256:b97a0a65ebf
######################################################################### 100.0%
==> Downloading https://ghcr.io/v2/homebrew/core/vde/manifests/2.3.3
######################################################################### 100.0%
==> Fetching vde
==> Downloading https://ghcr.io/v2/homebrew/core/vde/blobs/sha256:9015f4eeed08db
######################################################################### 100.0%
==> Downloading https://ghcr.io/v2/homebrew/core/lz4/manifests/1.9.4
######################################################################### 100.0%
==> Fetching lz4
==> Downloading https://ghcr.io/v2/homebrew/core/lz4/blobs/sha256:2bad368b2869db
######################################################################### 100.0%
==> Downloading https://ghcr.io/v2/homebrew/core/xz/manifests/5.4.5
######################################################################### 100.0%
==> Fetching xz
==> Downloading https://ghcr.io/v2/homebrew/core/xz/blobs/sha256:bdd5146737d8a84
######################################################################### 100.0%
==> Downloading https://ghcr.io/v2/homebrew/core/zstd/manifests/1.5.5-1
######################################################################### 100.0%
==> Fetching zstd
==> Downloading https://ghcr.io/v2/homebrew/core/zstd/blobs/sha256:2137fe12a2660
######################################################################### 100.0%
==> Fetching qemu
==> Downloading https://ghcr.io/v2/homebrew/core/qemu/blobs/sha256:82d75ff431672
######################################################################### 100.0%
==> Installing dependencies for qemu: capstone, dtc, pcre2, gettext, glib, ca-certificates, gmp, libunistring, libidn2, libtasn1, nettle, p11-kit, openssl@3, libevent, libnghttp2, unbound, gnutls, jpeg-turbo, libpng, libslirp, libssh, libusb, lzo, ncurses, pixman, snappy, vde, lz4, xz and zstd
==> Installing qemu dependency: capstone
==> Downloading https://ghcr.io/v2/homebrew/core/capstone/manifests/5.0.1
Already downloaded: /Users/yamafd/Library/Caches/Homebrew/downloads/eb17389103bcda1a9712be38238eb72e8056accea2c41fe32618aada1d7e1d79--capstone-5.0.1.bottle_manifest.json
==> Pouring capstone--5.0.1.sonoma.bottle.tar.gz
🍺  /usr/local/Cellar/capstone/5.0.1: 30 files, 22MB
==> Installing qemu dependency: dtc
==> Downloading https://ghcr.io/v2/homebrew/core/dtc/manifests/1.7.0
Already downloaded: /Users/yamafd/Library/Caches/Homebrew/downloads/00668efdbca5875f420621ff3011ae53448a6324636c2a27fe2323933c1ef3fa--dtc-1.7.0.bottle_manifest.json
==> Pouring dtc--1.7.0.sonoma.bottle.tar.gz
🍺  /usr/local/Cellar/dtc/1.7.0: 18 files, 545.7KB
==> Installing qemu dependency: pcre2
==> Downloading https://ghcr.io/v2/homebrew/core/pcre2/manifests/10.42
Already downloaded: /Users/yamafd/Library/Caches/Homebrew/downloads/6a53794fcaabc5cc5e05b19c02ca9c4c5f2cb9a4d65a5790a6841146465b040f--pcre2-10.42.bottle_manifest.json
==> Pouring pcre2--10.42.sonoma.bottle.tar.gz
🍺  /usr/local/Cellar/pcre2/10.42: 230 files, 6.3MB
==> Installing qemu dependency: gettext
==> Downloading https://ghcr.io/v2/homebrew/core/gettext/manifests/0.22.3
Already downloaded: /Users/yamafd/Library/Caches/Homebrew/downloads/c39063a94fdbad486d1b2e0bb3832dc7d7d7533dd55e07a10322af82dc115e44--gettext-0.22.3.bottle_manifest.json
==> Pouring gettext--0.22.3.sonoma.bottle.tar.gz
🍺  /usr/local/Cellar/gettext/0.22.3: 2,040 files, 21.4MB
==> Installing qemu dependency: glib
==> Downloading https://ghcr.io/v2/homebrew/core/glib/manifests/2.78.1
Already downloaded: /Users/yamafd/Library/Caches/Homebrew/downloads/6ef3501ffd4f007bb747429336ed6863943ab073a318bec642ca6f98e8a052a2--glib-2.78.1.bottle_manifest.json
==> Pouring glib--2.78.1.sonoma.bottle.tar.gz
🍺  /usr/local/Cellar/glib/2.78.1: 456 files, 21.3MB
==> Installing qemu dependency: ca-certificates
==> Downloading https://ghcr.io/v2/homebrew/core/ca-certificates/manifests/2023-
Already downloaded: /Users/yamafd/Library/Caches/Homebrew/downloads/a8cd32e30cae0b7335779e93a6554f294f09485802fc253a3a8be441337a6115--ca-certificates-2023-08-22.bottle_manifest.json
==> Pouring ca-certificates--2023-08-22.sonoma.bottle.tar.gz
==> Regenerating CA certificate bundle from keychain, this may take a while...
🍺  /usr/local/Cellar/ca-certificates/2023-08-22: 3 files, 221.7KB
==> Installing qemu dependency: gmp
==> Downloading https://ghcr.io/v2/homebrew/core/gmp/manifests/6.3.0
Already downloaded: /Users/yamafd/Library/Caches/Homebrew/downloads/70a72a71216843d66a953c06ff6337445ce9bc94fae9f0e301e2f59005274a8e--gmp-6.3.0.bottle_manifest.json
==> Pouring gmp--6.3.0.sonoma.bottle.tar.gz
🍺  /usr/local/Cellar/gmp/6.3.0: 21 files, 3.3MB
==> Installing qemu dependency: libunistring
==> Downloading https://ghcr.io/v2/homebrew/core/libunistring/manifests/1.1
Already downloaded: /Users/yamafd/Library/Caches/Homebrew/downloads/a34801f1ad5800ba51b2b3951d82a913ccf0641982f86b02df2f0aa182535055--libunistring-1.1.bottle_manifest.json
==> Pouring libunistring--1.1.sonoma.bottle.tar.gz
🍺  /usr/local/Cellar/libunistring/1.1: 56 files, 5MB
==> Installing qemu dependency: libidn2
==> Downloading https://ghcr.io/v2/homebrew/core/libidn2/manifests/2.3.4_1-1
Already downloaded: /Users/yamafd/Library/Caches/Homebrew/downloads/03ad193177f4e7d05ee2ed19a455028cb5fbf7ea1a812d88f18f5e9e8b4a4d43--libidn2-2.3.4_1-1.bottle_manifest.json
==> Pouring libidn2--2.3.4_1.sonoma.bottle.1.tar.gz
🍺  /usr/local/Cellar/libidn2/2.3.4_1: 79 files, 1003KB
==> Installing qemu dependency: libtasn1
==> Downloading https://ghcr.io/v2/homebrew/core/libtasn1/manifests/4.19.0
Already downloaded: /Users/yamafd/Library/Caches/Homebrew/downloads/8abecce04f40738bc8a6921a6b96d847ea5c9759185d4bd9c7c9b5fb4922c375--libtasn1-4.19.0.bottle_manifest.json
==> Pouring libtasn1--4.19.0.sonoma.bottle.tar.gz
🍺  /usr/local/Cellar/libtasn1/4.19.0: 61 files, 657.6KB
==> Installing qemu dependency: nettle
==> Downloading https://ghcr.io/v2/homebrew/core/nettle/manifests/3.9.1
Already downloaded: /Users/yamafd/Library/Caches/Homebrew/downloads/a02ae3a1ecc6cff56e632f6452fd57f3fa72be16cde0b69e5b47747283fd3f6b--nettle-3.9.1.bottle_manifest.json
==> Pouring nettle--3.9.1.sonoma.bottle.tar.gz
🍺  /usr/local/Cellar/nettle/3.9.1: 94 files, 2.6MB
==> Installing qemu dependency: p11-kit
==> Downloading https://ghcr.io/v2/homebrew/core/p11-kit/manifests/0.25.2
Already downloaded: /Users/yamafd/Library/Caches/Homebrew/downloads/3dad508a716a2f3f450a15f82955dfa8d62acf199195a91ad1fe422b08b50c8e--p11-kit-0.25.2.bottle_manifest.json
==> Pouring p11-kit--0.25.2.sonoma.bottle.tar.gz
🍺  /usr/local/Cellar/p11-kit/0.25.2: 28 files, 3.7MB
==> Installing qemu dependency: openssl@3
==> Downloading https://ghcr.io/v2/homebrew/core/openssl/3/manifests/3.1.4
Already downloaded: /Users/yamafd/Library/Caches/Homebrew/downloads/528fccab152aa17857e73f54f268d413bf94e22188c0e4ff17a6c497d2783b88--openssl@3-3.1.4.bottle_manifest.json
==> Pouring openssl@3--3.1.4.sonoma.bottle.tar.gz
🍺  /usr/local/Cellar/openssl@3/3.1.4: 6,496 files, 30.0MB
==> Installing qemu dependency: libevent
==> Downloading https://ghcr.io/v2/homebrew/core/libevent/manifests/2.1.12_1
Already downloaded: /Users/yamafd/Library/Caches/Homebrew/downloads/68b113f9ab63db45f4e1860de522ce2ca4fa081eb3c0d5c7d6005a35c3cf8d06--libevent-2.1.12_1.bottle_manifest.json
==> Pouring libevent--2.1.12_1.sonoma.bottle.tar.gz
🍺  /usr/local/Cellar/libevent/2.1.12_1: 57 files, 2MB
==> Installing qemu dependency: libnghttp2
==> Downloading https://ghcr.io/v2/homebrew/core/libnghttp2/manifests/1.58.0
Already downloaded: /Users/yamafd/Library/Caches/Homebrew/downloads/9b2081d73959d4308c84740344d5f8169bbb9125dd76d20a71556a11a0171253--libnghttp2-1.58.0.bottle_manifest.json
==> Pouring libnghttp2--1.58.0.sonoma.bottle.tar.gz
🍺  /usr/local/Cellar/libnghttp2/1.58.0: 13 files, 722KB
==> Installing qemu dependency: unbound
==> Downloading https://ghcr.io/v2/homebrew/core/unbound/manifests/1.19.0
Already downloaded: /Users/yamafd/Library/Caches/Homebrew/downloads/5ef4c435591de61234a87b911b8f2793a67aea99fa163a6c156bb9303f7fac11--unbound-1.19.0.bottle_manifest.json
==> Pouring unbound--1.19.0.sonoma.bottle.tar.gz
🍺  /usr/local/Cellar/unbound/1.19.0: 58 files, 5.7MB
==> Installing qemu dependency: gnutls
==> Downloading https://ghcr.io/v2/homebrew/core/gnutls/manifests/3.8.1
Already downloaded: /Users/yamafd/Library/Caches/Homebrew/downloads/6aa6ab211150ac0413509ee48a0b8b969ec36daf5056bc946d8c811bae202db9--gnutls-3.8.1.bottle_manifest.json
==> Pouring gnutls--3.8.1.sonoma.bottle.tar.gz
🍺  /usr/local/Cellar/gnutls/3.8.1: 1,284 files, 10.6MB
==> Installing qemu dependency: jpeg-turbo
==> Downloading https://ghcr.io/v2/homebrew/core/jpeg-turbo/manifests/3.0.0
Already downloaded: /Users/yamafd/Library/Caches/Homebrew/downloads/325e745bcb7840d6a83df7bfcafaa4dbc30b29140f252fb82b7714493df29d6d--jpeg-turbo-3.0.0.bottle_manifest.json
==> Pouring jpeg-turbo--3.0.0.sonoma.bottle.tar.gz
🍺  /usr/local/Cellar/jpeg-turbo/3.0.0: 44 files, 4.8MB
==> Installing qemu dependency: libpng
==> Downloading https://ghcr.io/v2/homebrew/core/libpng/manifests/1.6.40
Already downloaded: /Users/yamafd/Library/Caches/Homebrew/downloads/d2caacc64e32be045b902fa78d2bb4aea7fba8f088cef85cd34b1beab15b755a--libpng-1.6.40.bottle_manifest.json
==> Pouring libpng--1.6.40.sonoma.bottle.tar.gz
🍺  /usr/local/Cellar/libpng/1.6.40: 27 files, 1.3MB
==> Installing qemu dependency: libslirp
==> Downloading https://ghcr.io/v2/homebrew/core/libslirp/manifests/4.7.0
Already downloaded: /Users/yamafd/Library/Caches/Homebrew/downloads/d8b5de971474690b01b484c84652c487b14a22eded9d5b91cecae2995692c598--libslirp-4.7.0.bottle_manifest.json
==> Pouring libslirp--4.7.0.sonoma.bottle.tar.gz
🍺  /usr/local/Cellar/libslirp/4.7.0: 11 files, 349.3KB
==> Installing qemu dependency: libssh
==> Downloading https://ghcr.io/v2/homebrew/core/libssh/manifests/0.10.5_1
Already downloaded: /Users/yamafd/Library/Caches/Homebrew/downloads/85e02030f335c38124a70d78695341dc20a2d4f47896f4d44c260da135922c44--libssh-0.10.5_1.bottle_manifest.json
==> Pouring libssh--0.10.5_1.sonoma.bottle.tar.gz
🍺  /usr/local/Cellar/libssh/0.10.5_1: 23 files, 1.2MB
==> Installing qemu dependency: libusb
==> Downloading https://ghcr.io/v2/homebrew/core/libusb/manifests/1.0.26
Already downloaded: /Users/yamafd/Library/Caches/Homebrew/downloads/ce7ffd7c94deb7060c2cac56f1d68a97b9d4bdc039f9548c3df327bee3d20ae4--libusb-1.0.26.bottle_manifest.json
==> Pouring libusb--1.0.26.sonoma.bottle.tar.gz
🍺  /usr/local/Cellar/libusb/1.0.26: 22 files, 531.8KB
==> Installing qemu dependency: lzo
==> Downloading https://ghcr.io/v2/homebrew/core/lzo/manifests/2.10
Already downloaded: /Users/yamafd/Library/Caches/Homebrew/downloads/d4aa5b0c239912c53bc857d1012c6b7feb4acb509618f5e100f95bf8521f08e7--lzo-2.10.bottle_manifest.json
==> Pouring lzo--2.10.sonoma.bottle.tar.gz
🍺  /usr/local/Cellar/lzo/2.10: 31 files, 555.8KB
==> Installing qemu dependency: ncurses
==> Downloading https://ghcr.io/v2/homebrew/core/ncurses/manifests/6.4-1
Already downloaded: /Users/yamafd/Library/Caches/Homebrew/downloads/548168356558130632a3202b3fc2f3069f554bd5c1010b30e61f1180cf1f6b09--ncurses-6.4-1.bottle_manifest.json
==> Pouring ncurses--6.4.sonoma.bottle.1.tar.gz
🍺  /usr/local/Cellar/ncurses/6.4: 4,001 files, 9.4MB
==> Installing qemu dependency: pixman
==> Downloading https://ghcr.io/v2/homebrew/core/pixman/manifests/0.42.2-1
Already downloaded: /Users/yamafd/Library/Caches/Homebrew/downloads/2b0d8f2c63712ce503fa54309b732051a7ca5cd31bd561aa4aaba331bf26bcef--pixman-0.42.2-1.bottle_manifest.json
==> Pouring pixman--0.42.2.sonoma.bottle.1.tar.gz
🍺  /usr/local/Cellar/pixman/0.42.2: 11 files, 1.4MB
==> Installing qemu dependency: snappy
==> Downloading https://ghcr.io/v2/homebrew/core/snappy/manifests/1.1.10
Already downloaded: /Users/yamafd/Library/Caches/Homebrew/downloads/66500196008160ff18d67179e002e417a71c59707d74a6706c2e89a8aa2411b8--snappy-1.1.10.bottle_manifest.json
==> Pouring snappy--1.1.10.sonoma.bottle.tar.gz
🍺  /usr/local/Cellar/snappy/1.1.10: 18 files, 153.6KB
==> Installing qemu dependency: vde
==> Downloading https://ghcr.io/v2/homebrew/core/vde/manifests/2.3.3
Already downloaded: /Users/yamafd/Library/Caches/Homebrew/downloads/4e9503141162571c2cd21e89a9e61f524a7403ffe5ffe269f4a39ce5aef9f210--vde-2.3.3.bottle_manifest.json
==> Pouring vde--2.3.3.sonoma.bottle.tar.gz
🍺  /usr/local/Cellar/vde/2.3.3: 66 files, 1MB
==> Installing qemu dependency: lz4
==> Downloading https://ghcr.io/v2/homebrew/core/lz4/manifests/1.9.4
Already downloaded: /Users/yamafd/Library/Caches/Homebrew/downloads/379e59b981667f9585b33a2ff318769d8edca3ce6fd2e9a67ed291ae3e0cc872--lz4-1.9.4.bottle_manifest.json
==> Pouring lz4--1.9.4.sonoma.bottle.tar.gz
🍺  /usr/local/Cellar/lz4/1.9.4: 22 files, 656.5KB
==> Installing qemu dependency: xz
==> Downloading https://ghcr.io/v2/homebrew/core/xz/manifests/5.4.5
Already downloaded: /Users/yamafd/Library/Caches/Homebrew/downloads/4e81fda476fb634a7e1ac650019bfe768a65d6c387015992df4cd75adf9b3fce--xz-5.4.5.bottle_manifest.json
==> Pouring xz--5.4.5.sonoma.bottle.tar.gz
🍺  /usr/local/Cellar/xz/5.4.5: 163 files, 2.6MB
==> Installing qemu dependency: zstd
==> Downloading https://ghcr.io/v2/homebrew/core/zstd/manifests/1.5.5-1
Already downloaded: /Users/yamafd/Library/Caches/Homebrew/downloads/fc13698599720a53800064b40cddd854399651cf8760d9b0e46092f2e8da701a--zstd-1.5.5-1.bottle_manifest.json
==> Pouring zstd--1.5.5.sonoma.bottle.1.tar.gz
🍺  /usr/local/Cellar/zstd/1.5.5: 31 files, 2.3MB
==> Installing qemu
==> Pouring qemu--8.1.2.sonoma.bottle.tar.gz
🍺  /usr/local/Cellar/qemu/8.1.2: 162 files, 530.6MB
==> Running `brew cleanup qemu`...
Disable this behaviour by setting HOMEBREW_NO_INSTALL_CLEANUP.
Hide these hints with HOMEBREW_NO_ENV_HINTS (see `man brew`).
▶︎ 念のために、以下のコマンドを実行して、「qemu」がインストールされているかを確認します。
brew list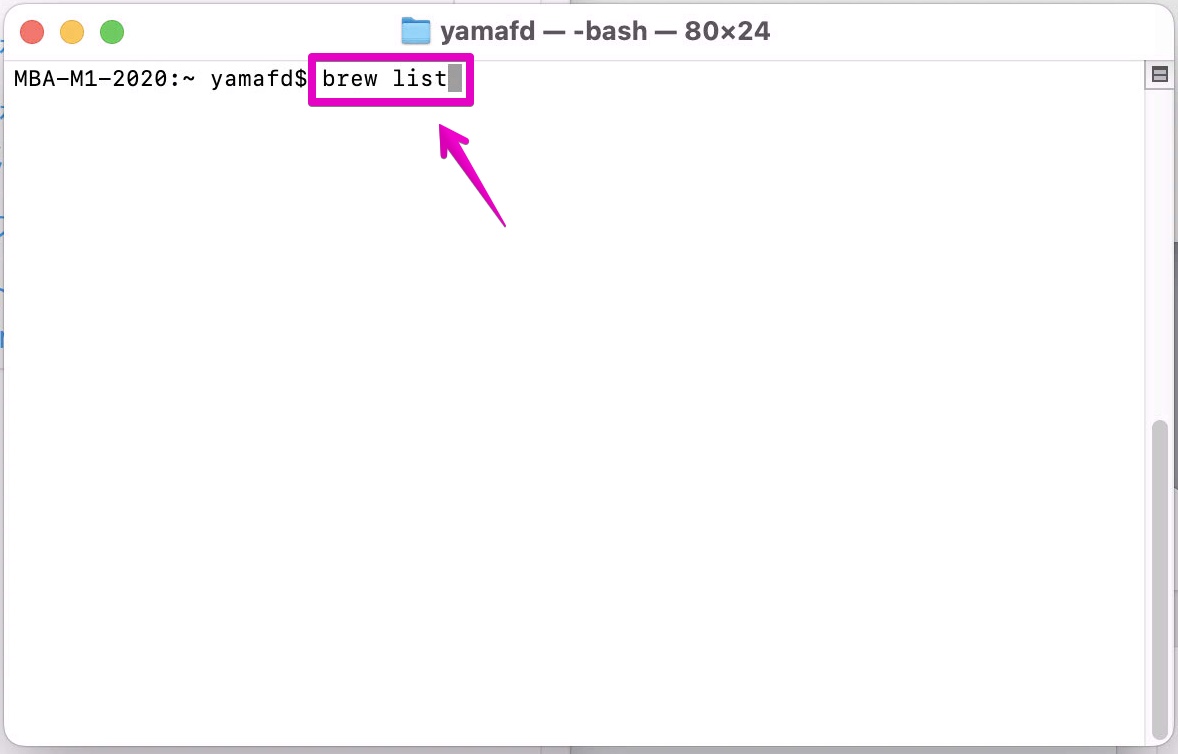
▶︎ コマンドを実行した結果、図のようにインストール済みアプリ一覧に「qemu」が表示されているので、インストールに成功していることが確認できました。

(2) Parallels仮想マシンのファイルの複製(クローン)を作成する
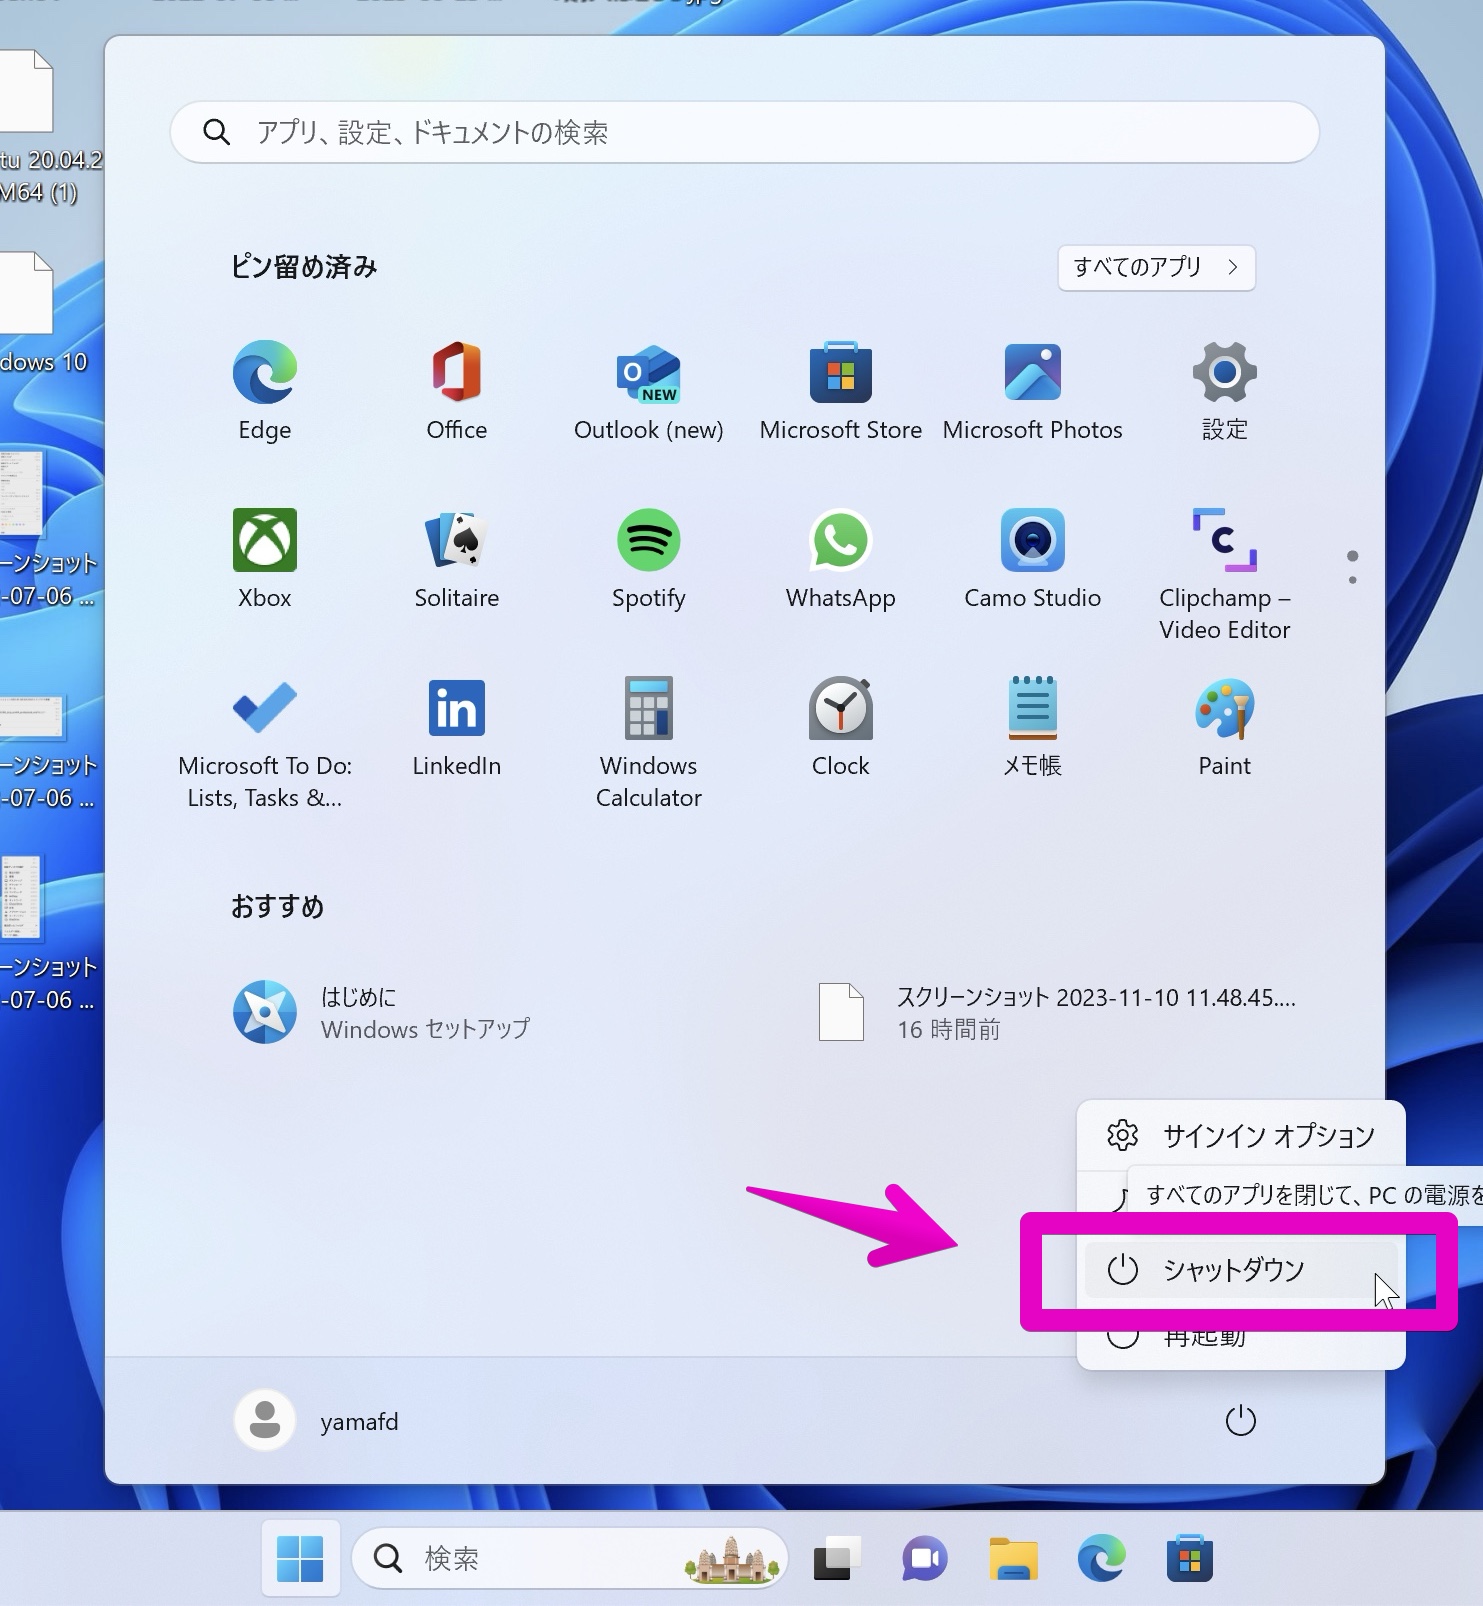
▶︎ Parallels Desktopにおいて、VMwareにインポートする対象のWindows 11の仮想マシンを、Windowsのスタートボタンからシャットダウンします。
サスペンドや一時停止やスリープではなく、シャットダウンにする必要があります。
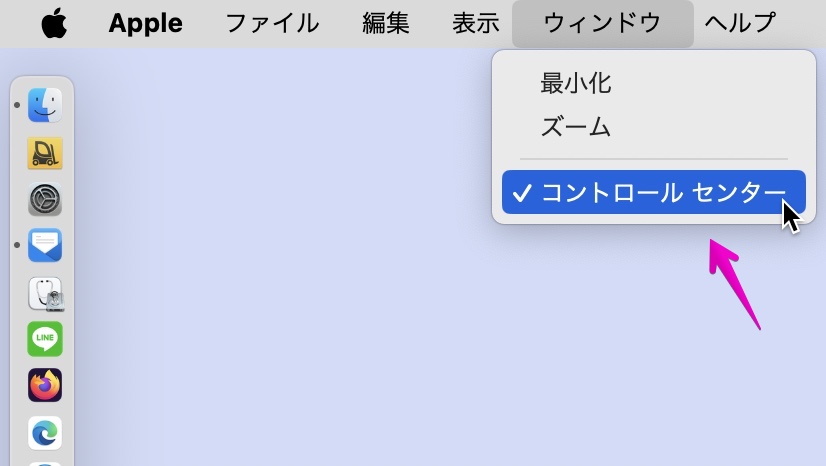
▶︎ Parallelsのメニューバーから、「ウィンドウ」->「コントロールセンター」を選択します。
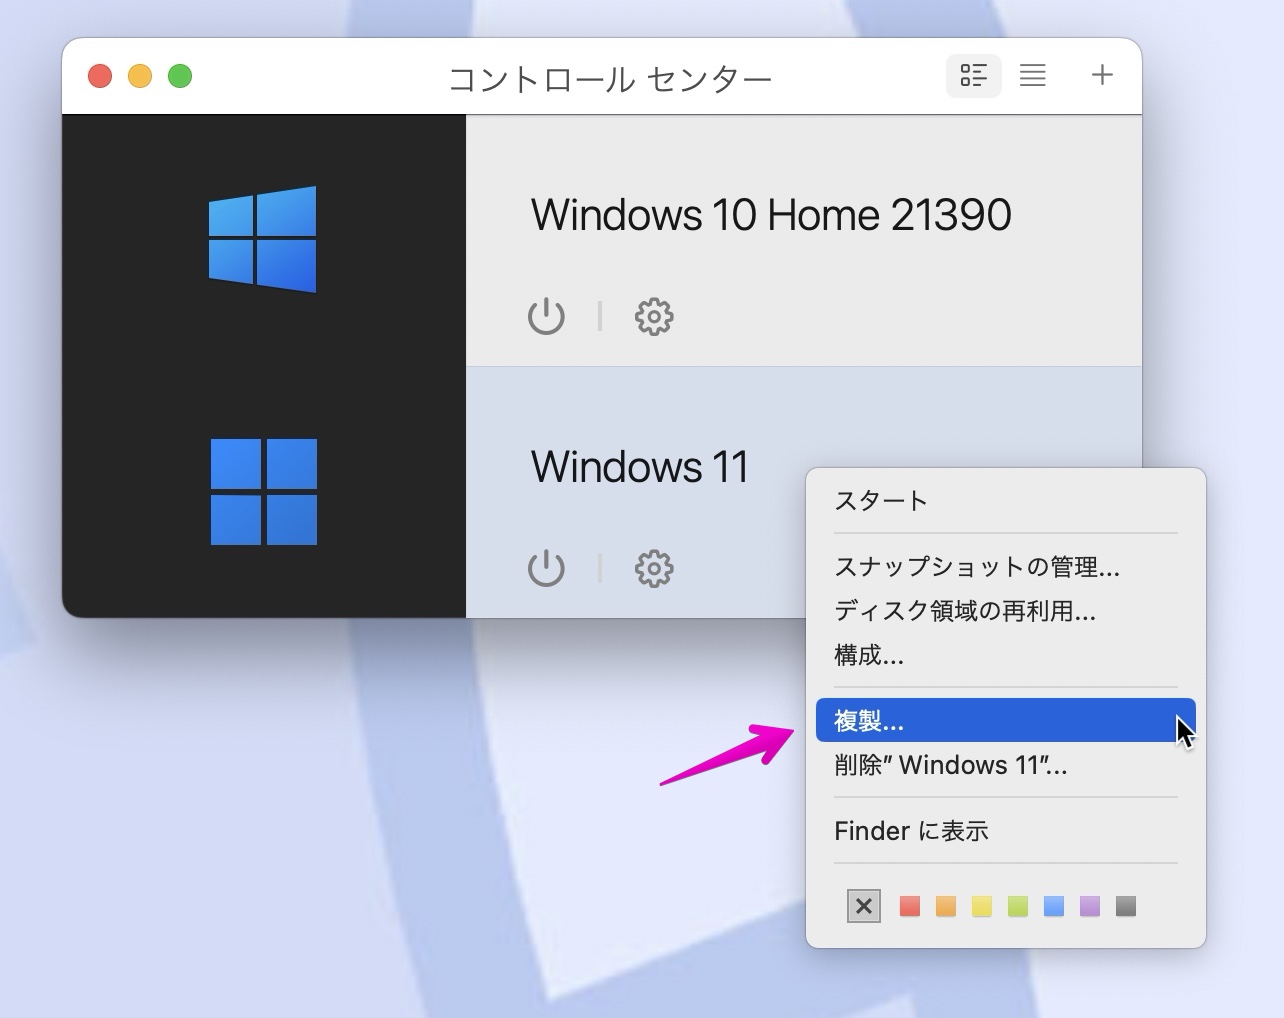
▶︎ 図のように「コントロールセンター」が表示されたら、インポート対象の仮想マシンを右クリックして、表示されるメニューから「複製…」を選択します。
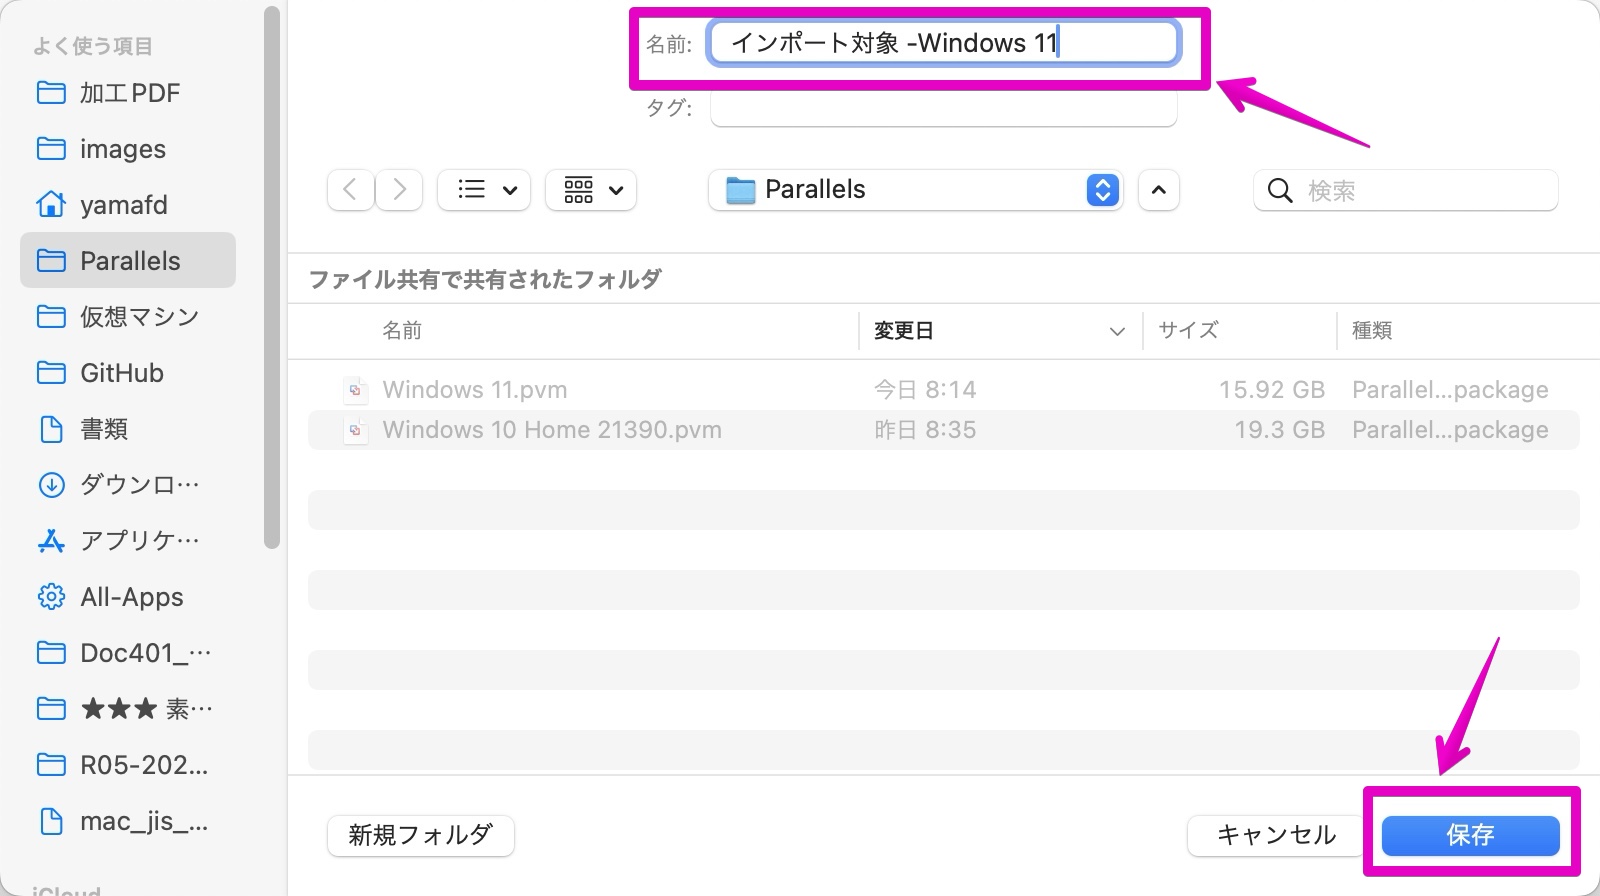
▶︎ 図のようにファイル保存の操作画面が表示されたら、適当なファイル名をつけてから、ボタン「保存」をクリックします。
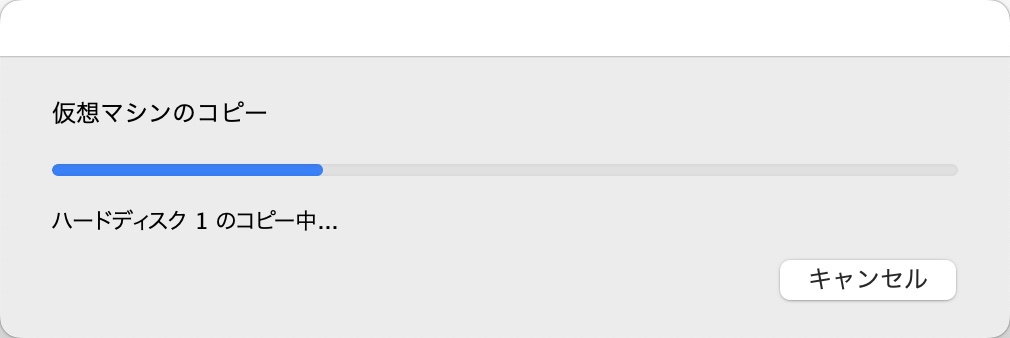
▶︎ 複製が始まったら図のような進捗画面が表示されるので、完了するまで待ちます。
▶︎ 複製が完了したら、図のように「コントロールセンター」に仮想マシンが1つ増えます。
この状態から次のステップに進みますので、次の章に進んでください。
(3) スナップショットの削除
▶︎ 「コントロールセンター」で複製した仮想マシンを右クリックして、表示されるメニューから「スナップショットの管理」を選択します。

▶︎ 図のようにスナップショットの管理画面が表示されたら、「現在の状態」だけを残して、他は全て削除します。
▶︎ 図のように「スナップショットがありません」の表示になったら、左上の赤いボタンをクリックして、この画面を閉じます。
続いて、次の章に進んでください。
(4) Parallels Toolsのアンインストール
▶︎ 複製した仮想マシンを起動します。
▶︎ 仮想マシンが起動したら、スタートボタンからアプリ「設定」を起動します。
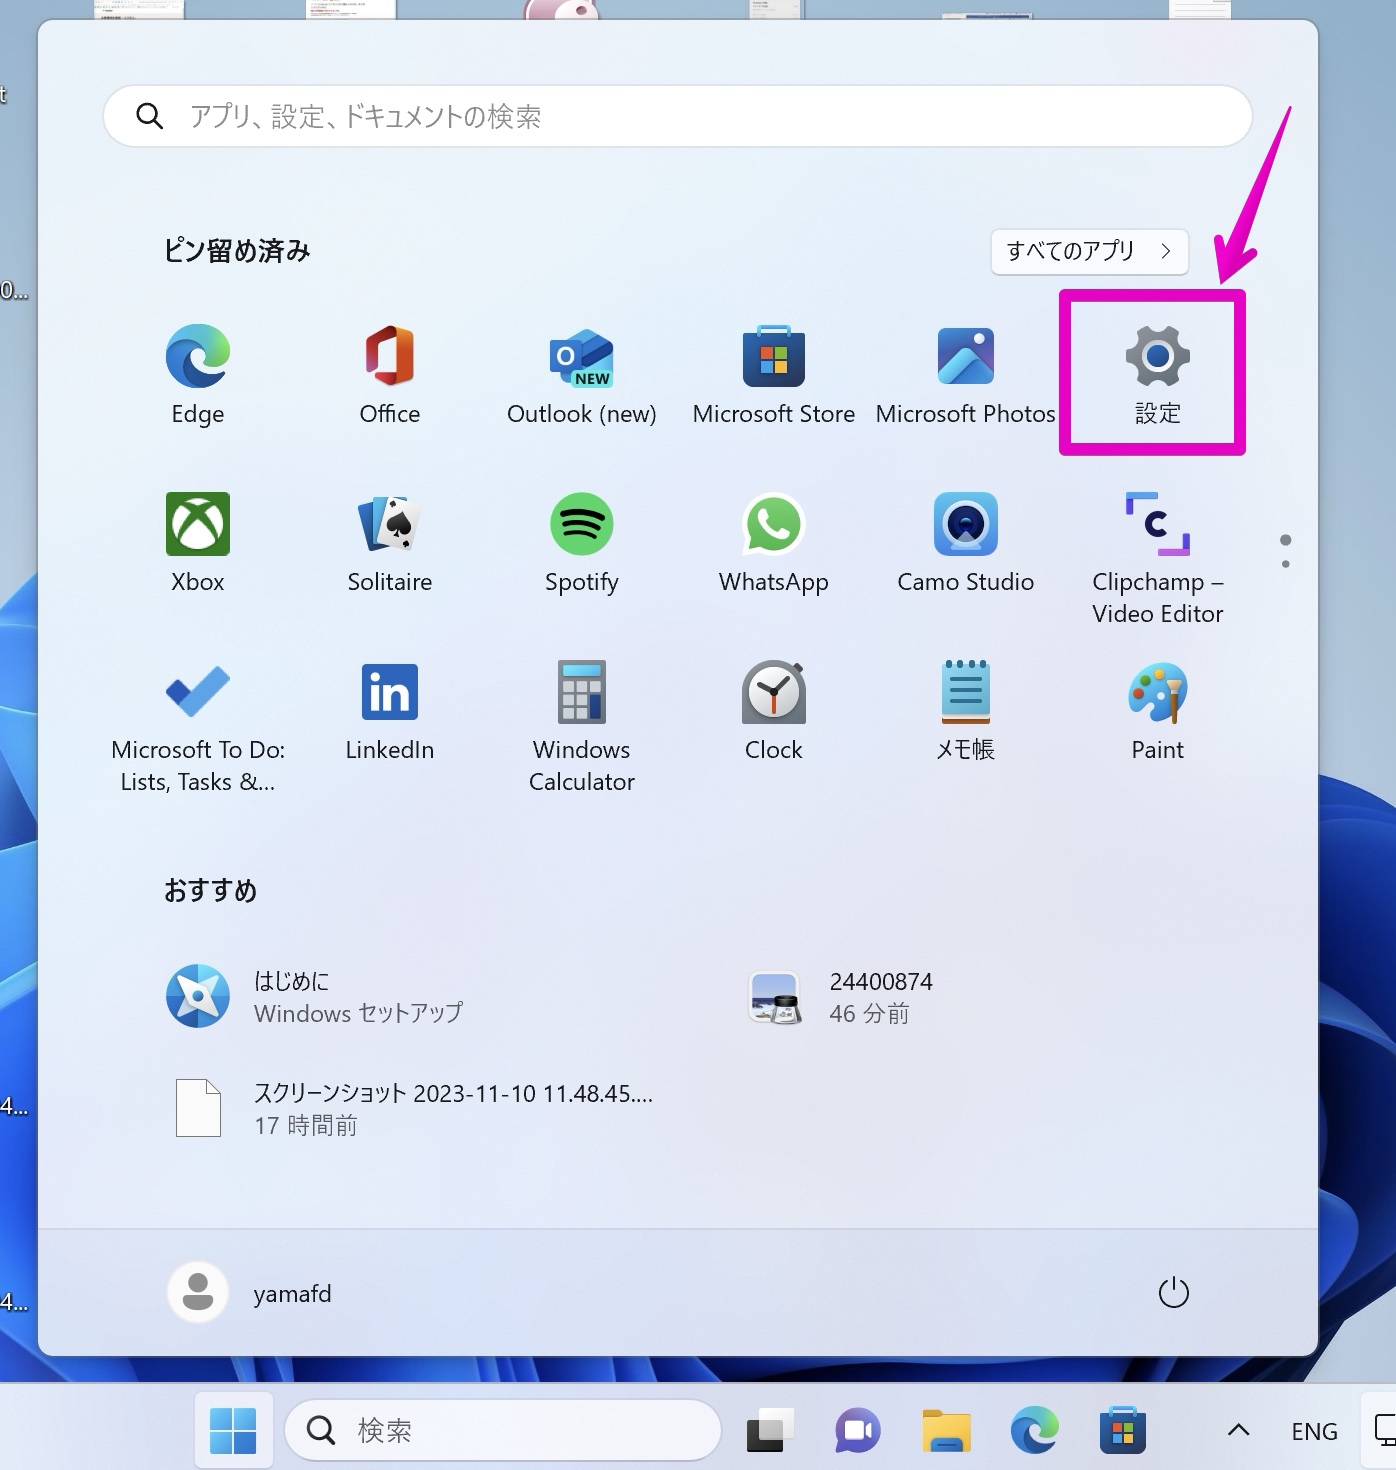
▶︎ アプリ「設定」が起動したら、左のリストから「アプリ」をクリックします。
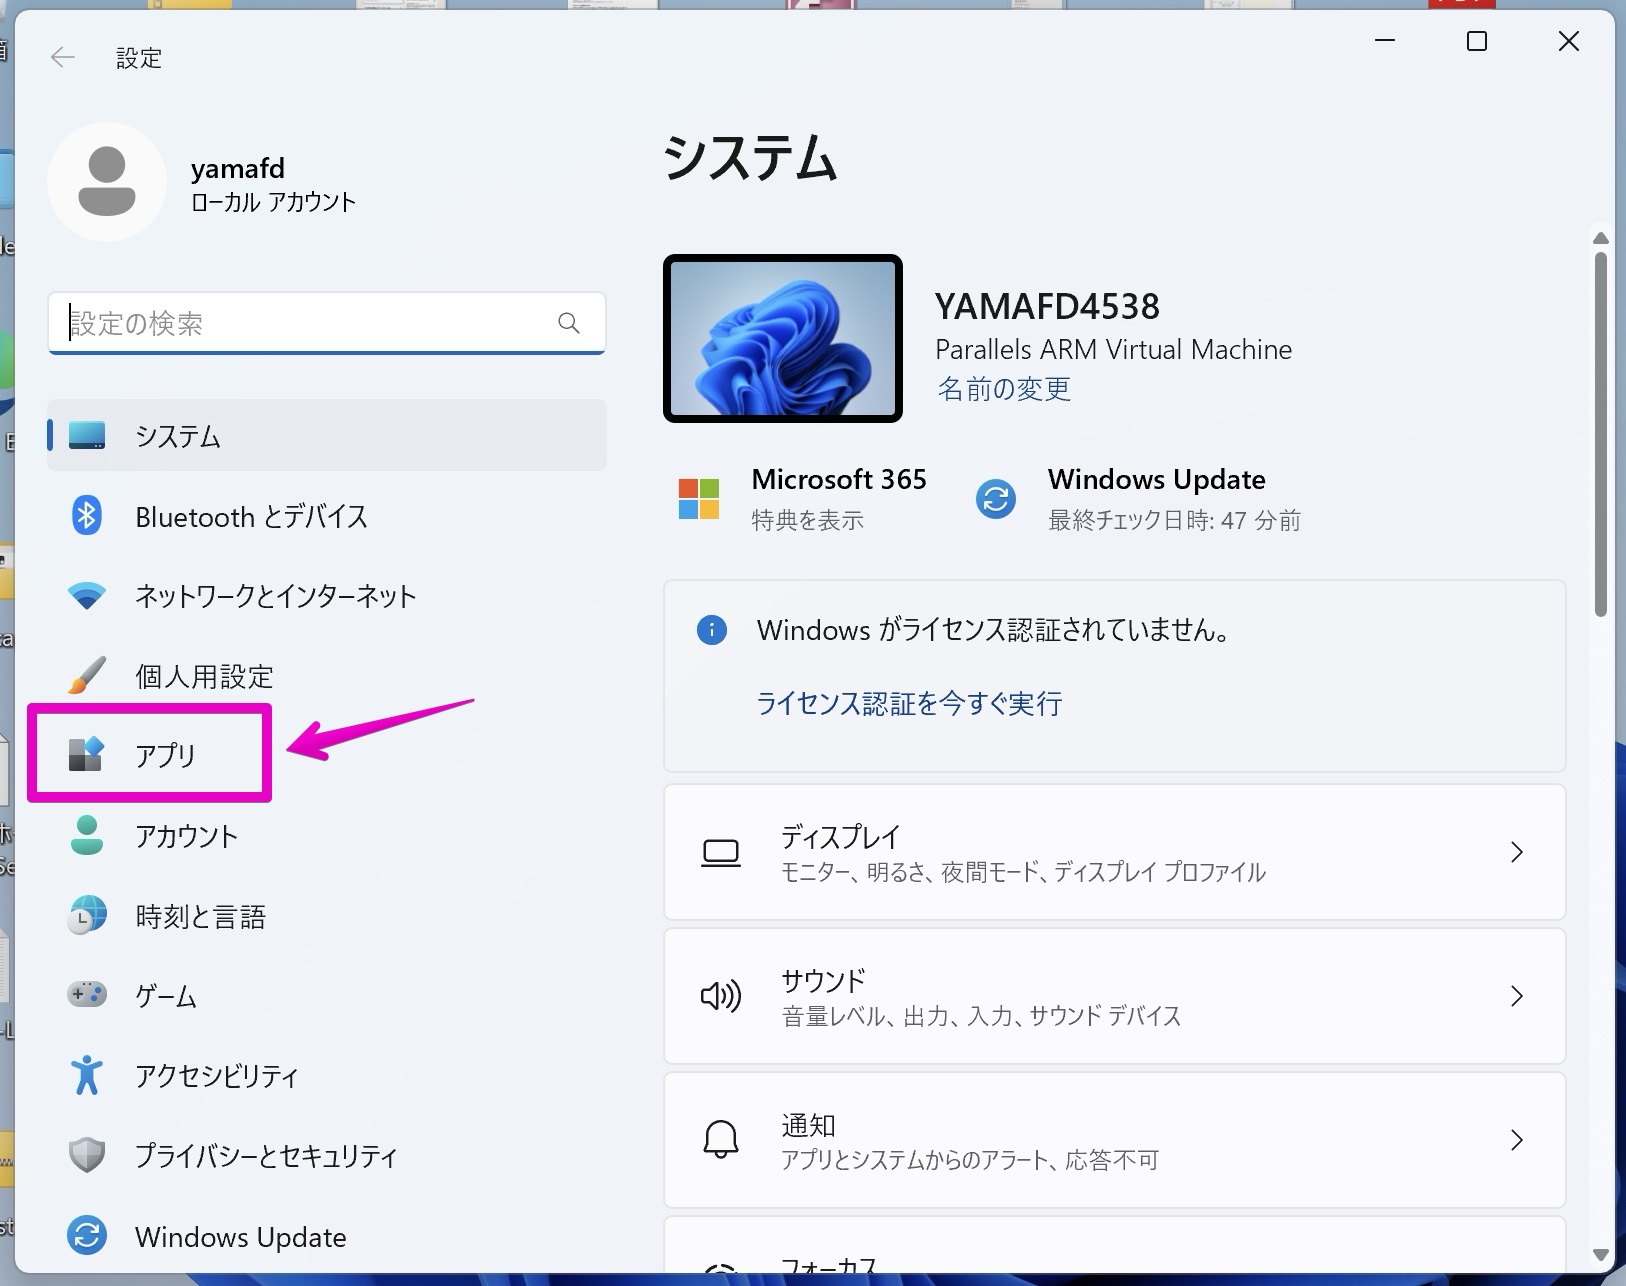
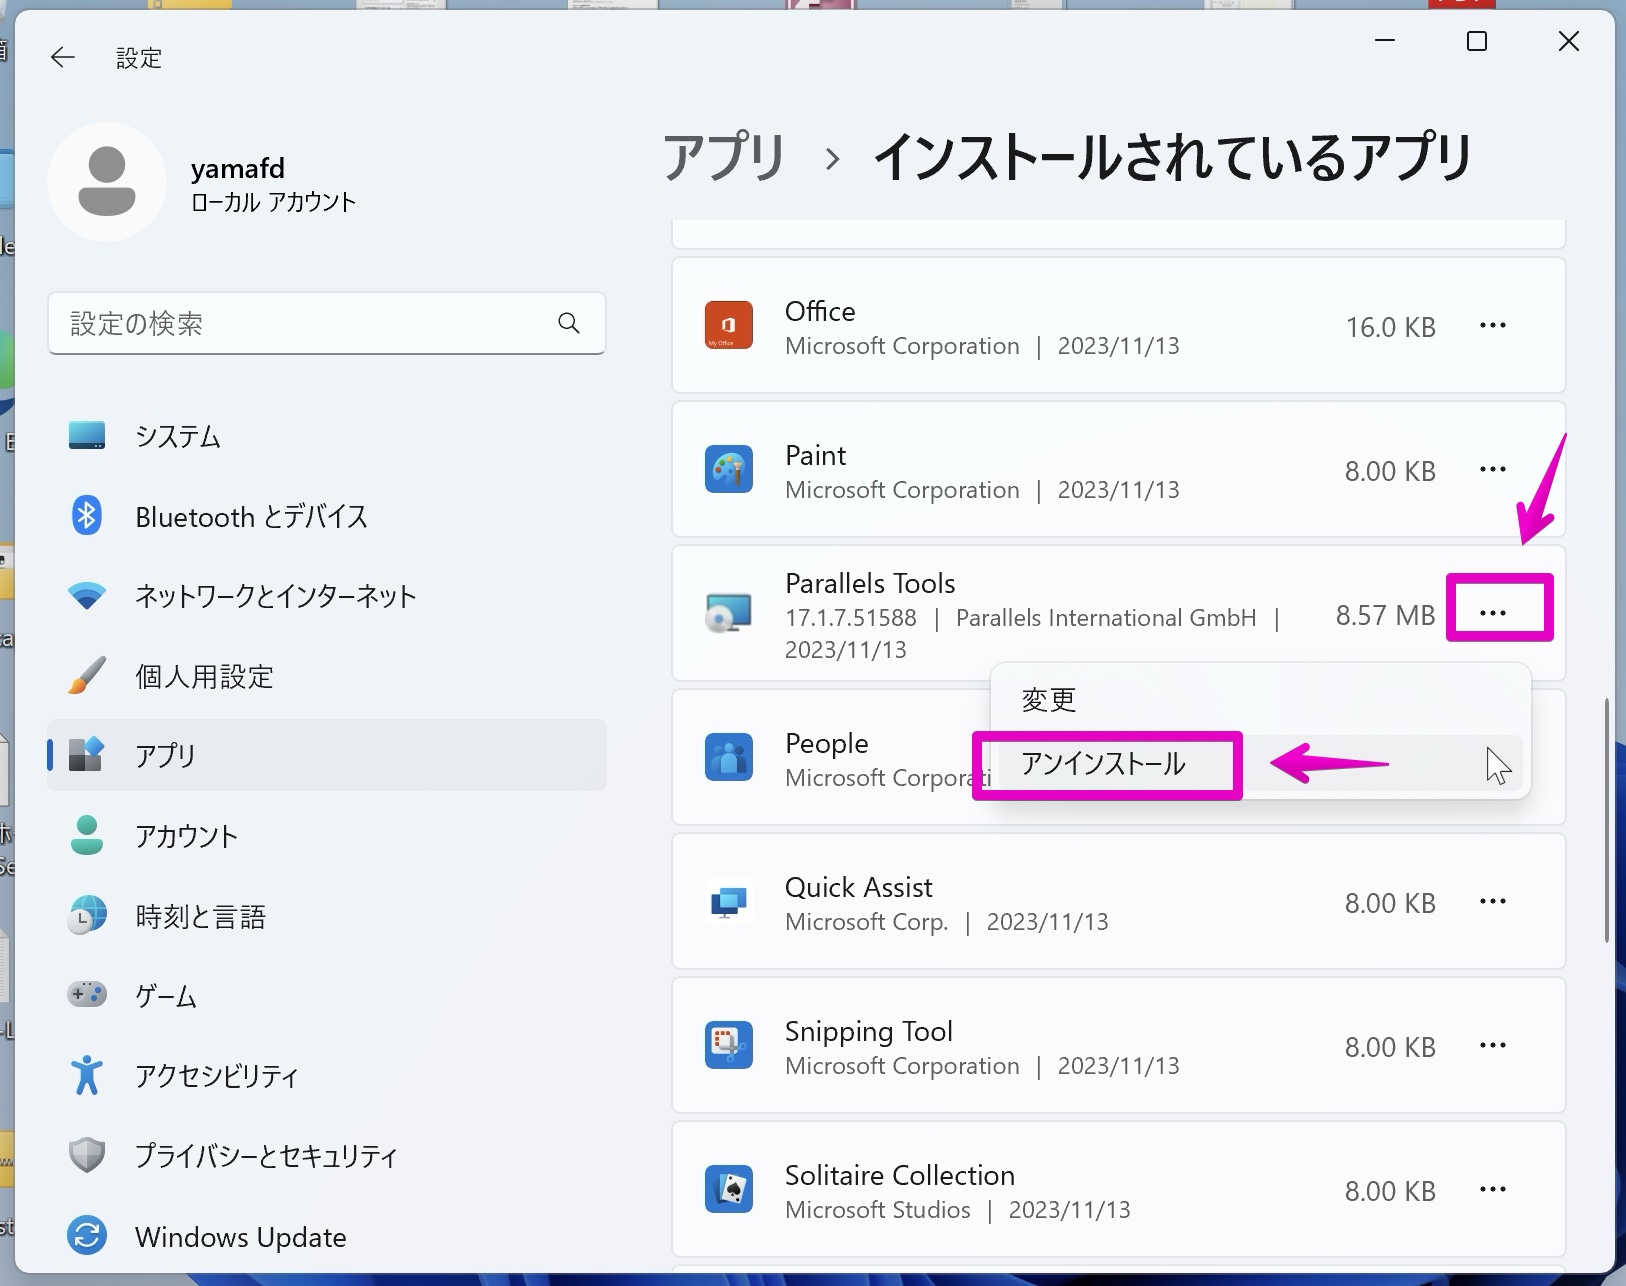
▶︎ 画面の右のリストから、「インストールされているアプリ」をクリックします。

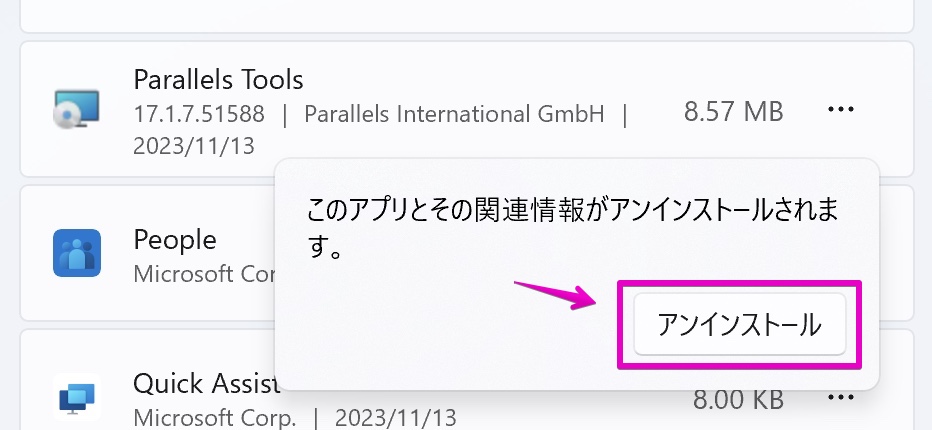
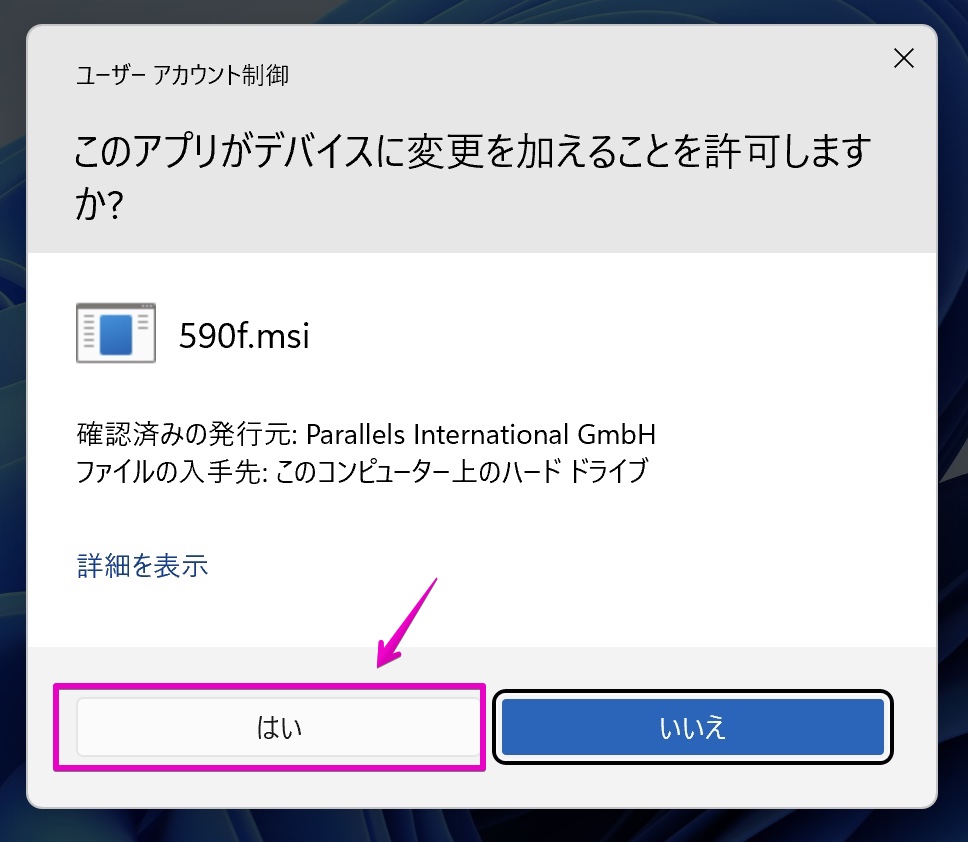
▶︎ 画面の右側にアプリのリストが表示されたら、「Parallels Tools」からメニューアイコン…をクリックして、メニュー項目「アンインストール」を選択します。
▶︎ アンインストールのボタンが表示されたらクリックします。
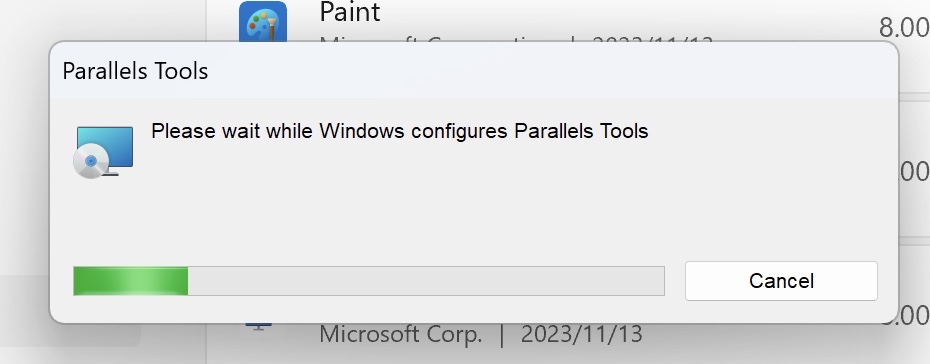
▶︎ この後は、画面の表示に従ってアンインストールを進めます。
詳細な説明文は省きますが、スクリーンショットだけを掲載します。
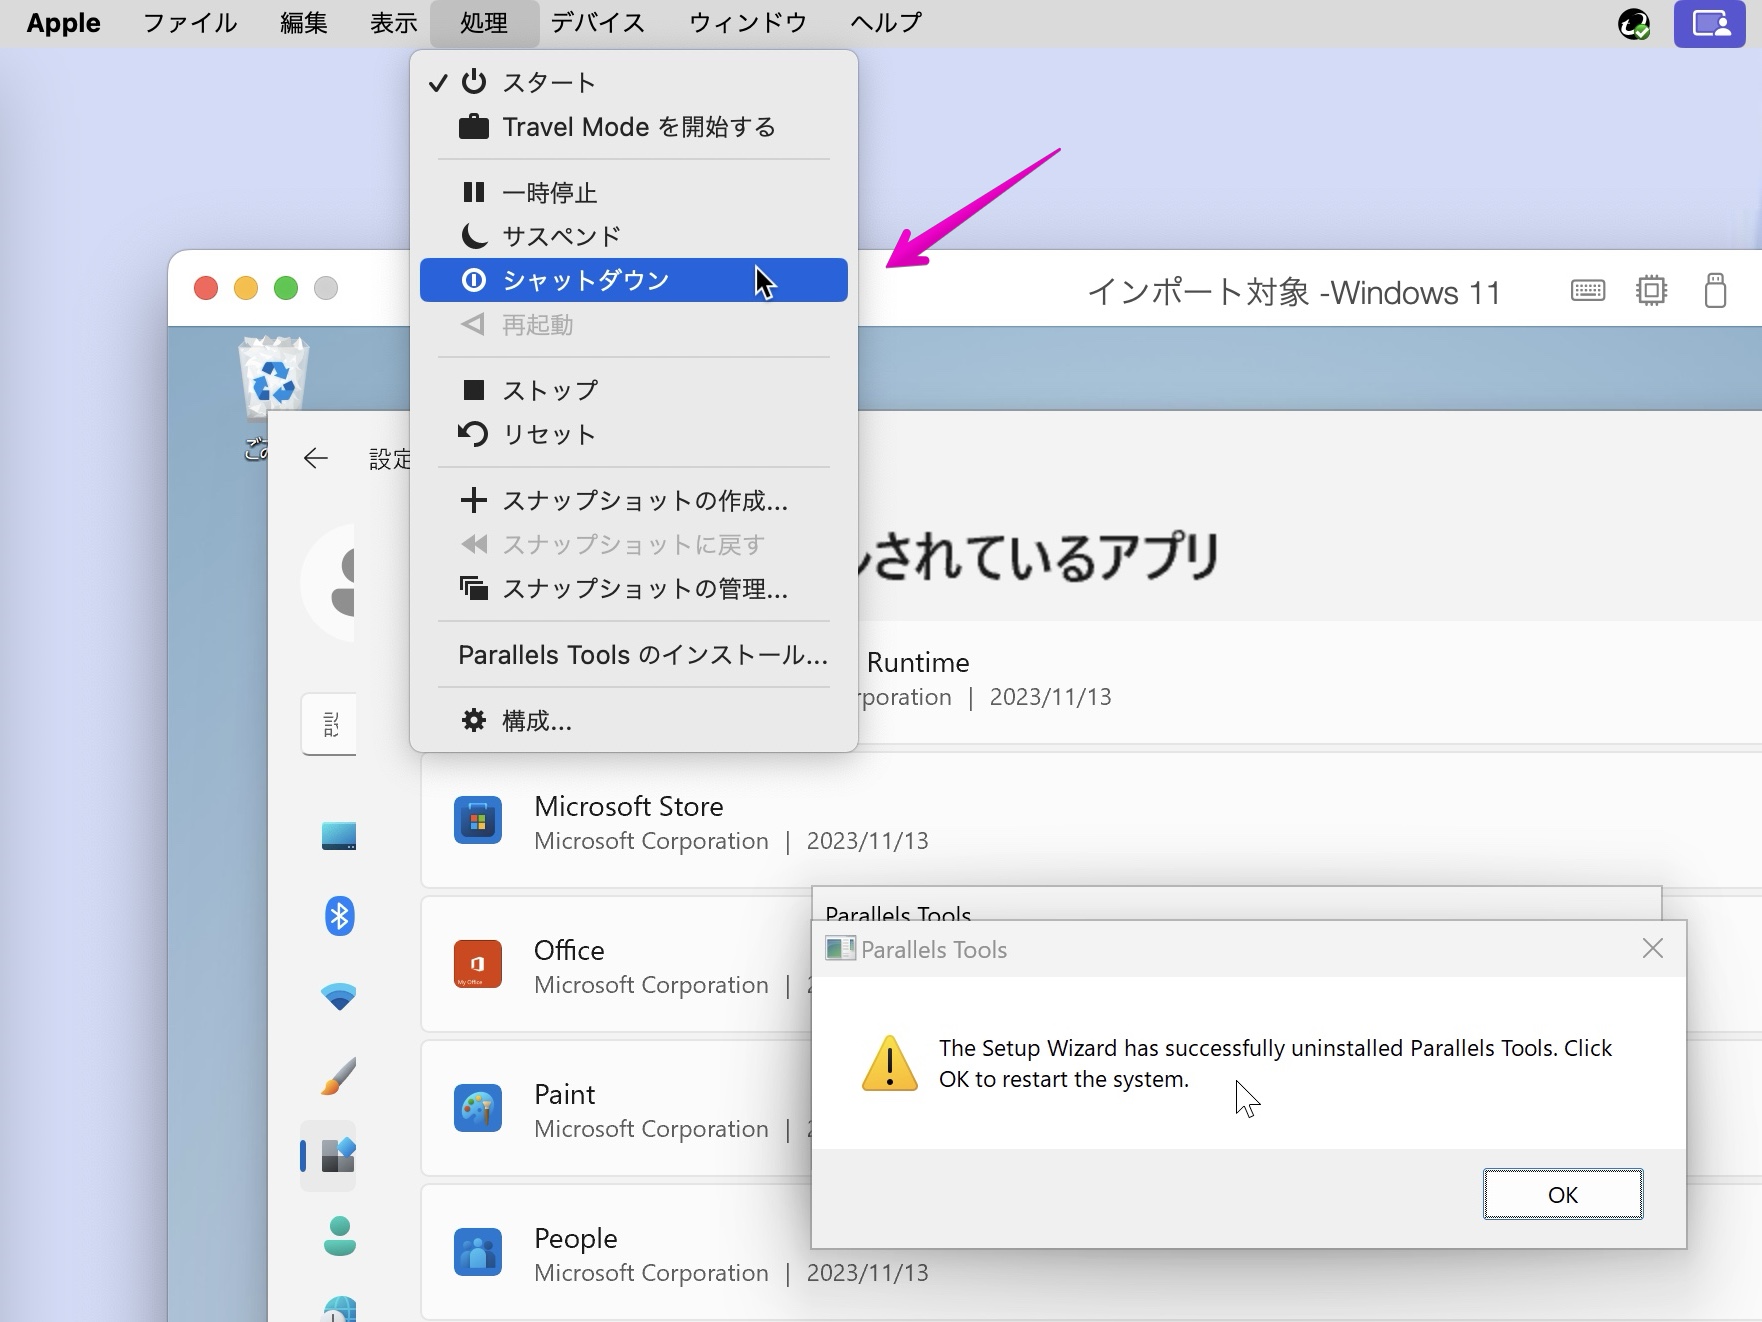
▶︎ アンインストールが完了したら、図のような表示が出るので、ボタン「OK」をクリックして仮想マシンを再起動します。
再起動したら、仮想マシンをシャットダウンします。
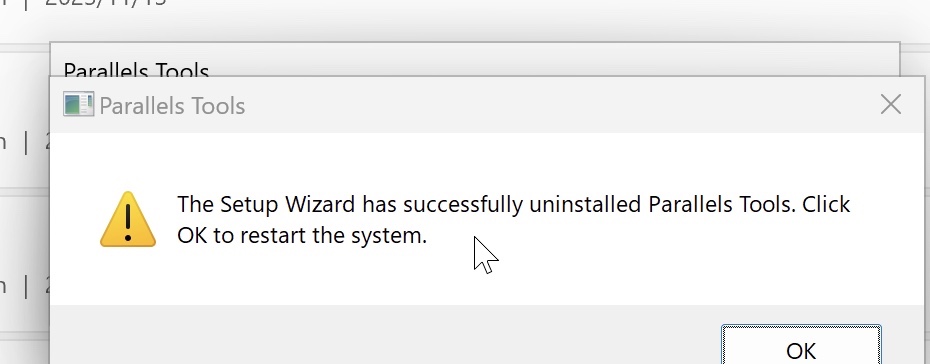
The Setup Wizard has successfully uninstalled Parallels Tools. Click OK to restart the system.
(セットアップ ウィザードは Parallels Tools を正常にアンインストールしました。 「OK」をクリックしてシステムを再起動します。)
もしも、仮想マシンの中のボタンがクリックできないようならば、やむを得ないのですがメニューバーから「処理」->「シャットダウン」を選択します。
▶︎ 続いて、次の章に進んでください。
(5) 仮想マシンのhdsファイルのフルパスを調べる
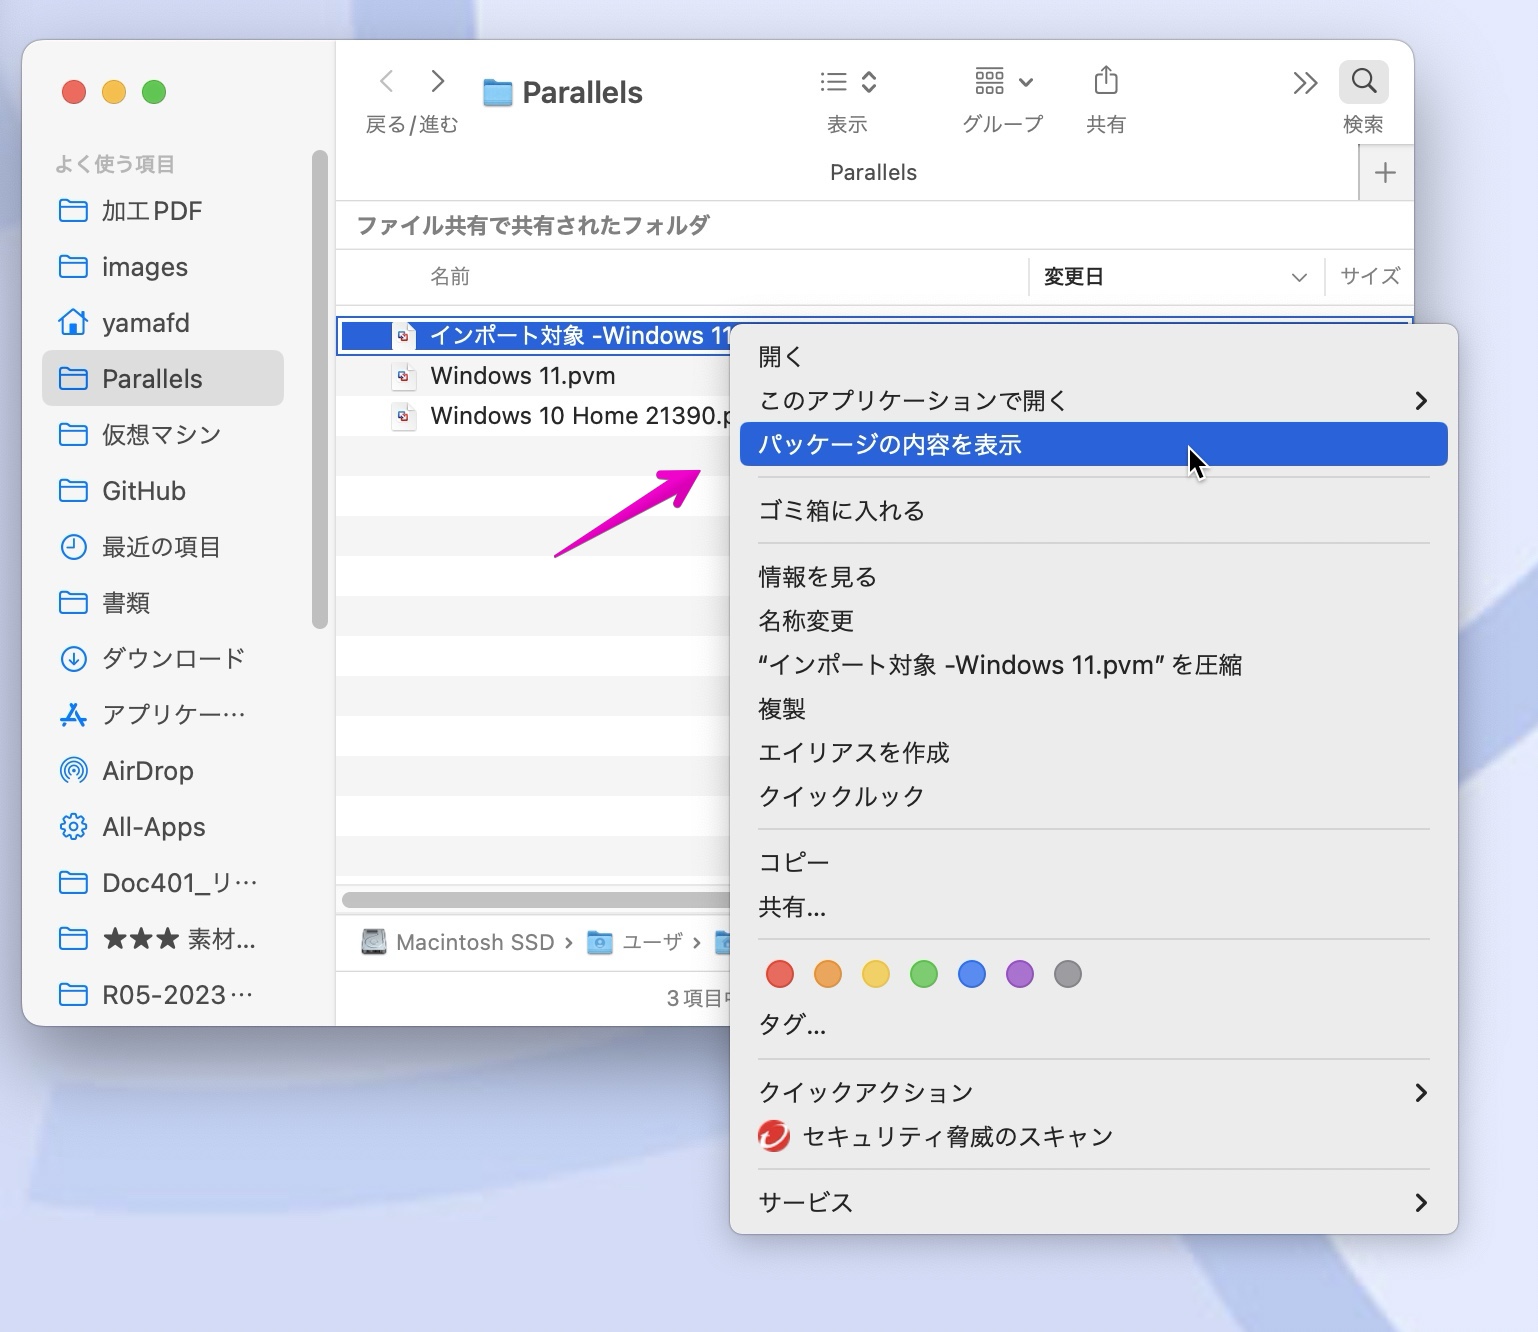
▶︎ Parallels Desktopの「コントロールセンター」で、複製した仮想マシンを右クリックして表示されるメニューから、「Finderに表示」を選択します。

▶︎ Finderに仮想マシンのファイルが表示されたら、ファイルを右クリックして表示されるメニュー項目から、「パッケージの内容を表示」を選択します。
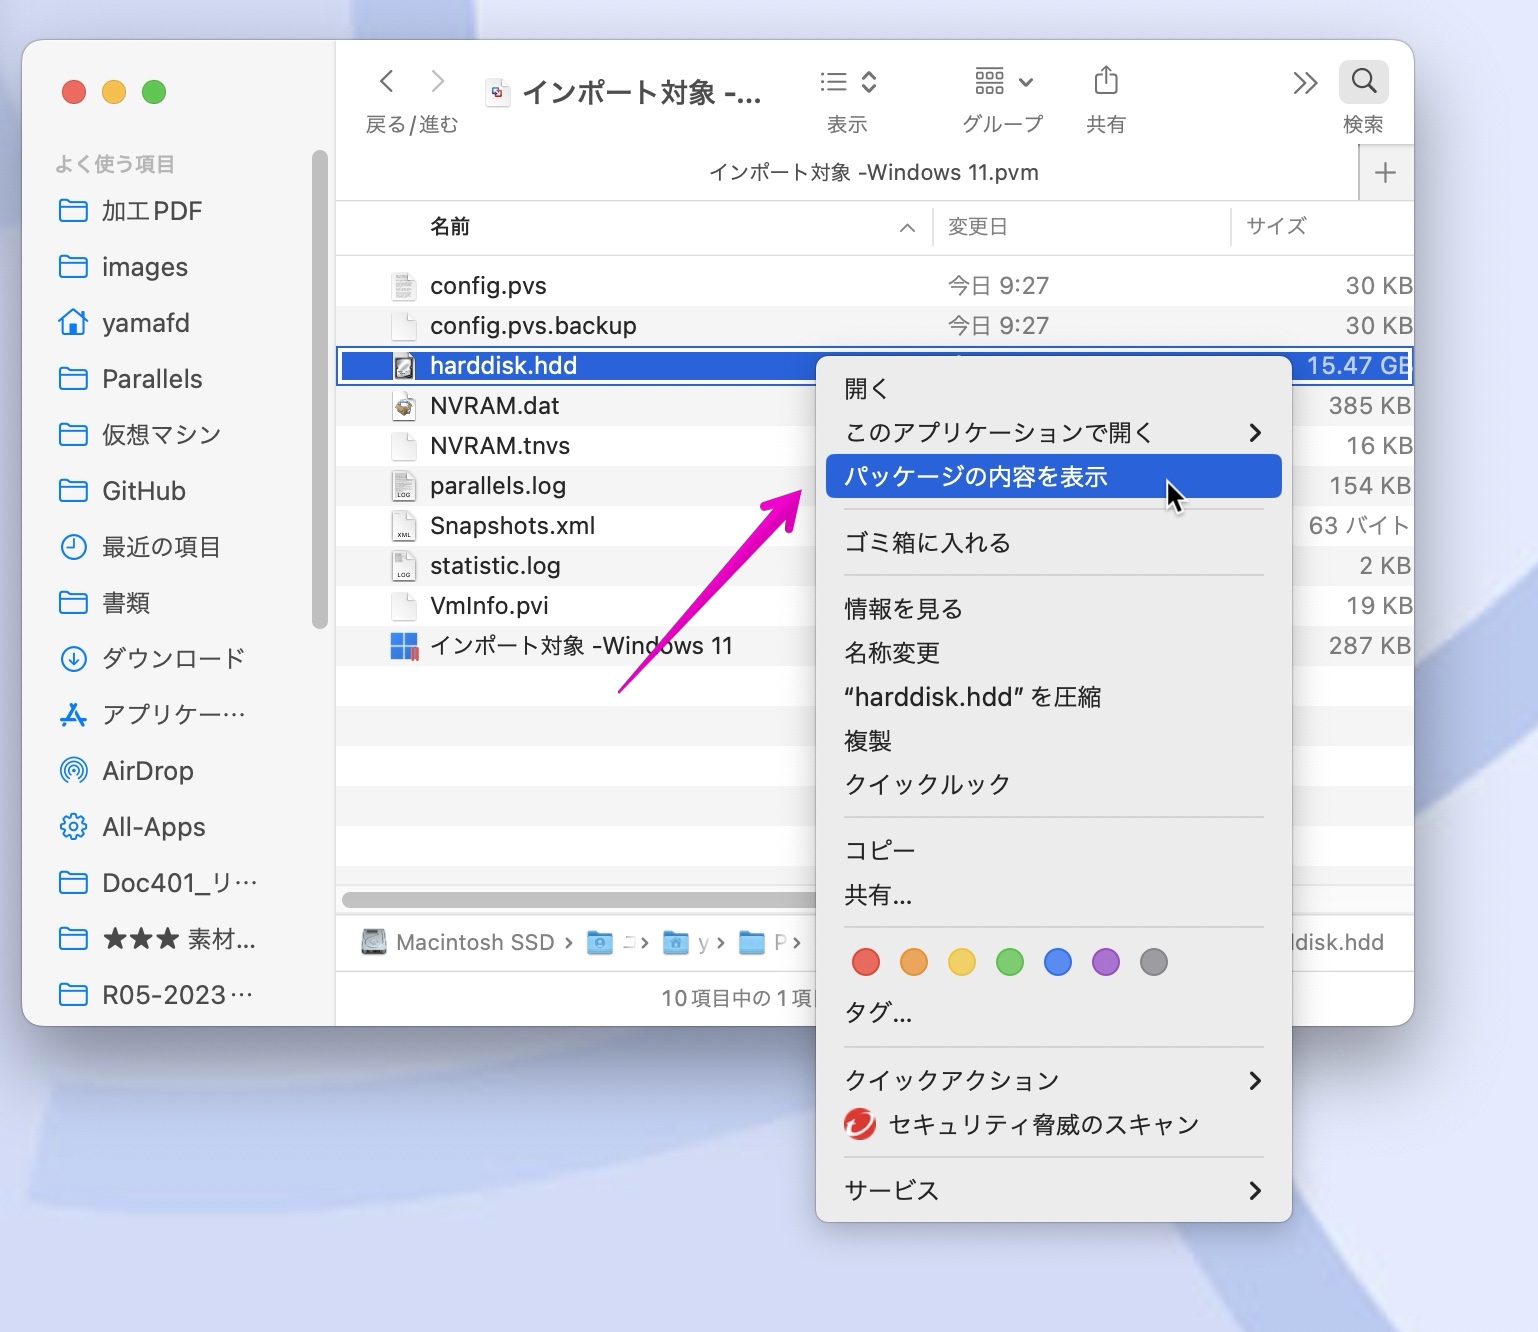
▶︎ 図のようにパッケージの内容が表示されたら、さらにその中の「拡張子.hdd」のファイルを右クリックして表示されるメニュー項目から、「パッケージの内容を表示」を選択します。
「拡張子.hdd」のファイル名は、おそらく「harddisk.hdd」ではないかと思いますが、違うこともあるかもしれません。
▶︎ 図のように「拡張子.hds」のファイルが見つかったでしょうか?
見つかったら、標準アプリ「テキストエディット」や無料アプリ「CotEditor」などのエディタに、フルパス名とファイル名をメモします。
このページのサンプルでは、最終的に以下のフルパス名とファイル名が取得できました。
/Users/yamafd/Parallels/インポート対象 -Windows 11.pvm/harddisk.hdd/harddisk.hdd.0.{5fbaabe3-6958-40ff-92a7-860e329aab41}.hds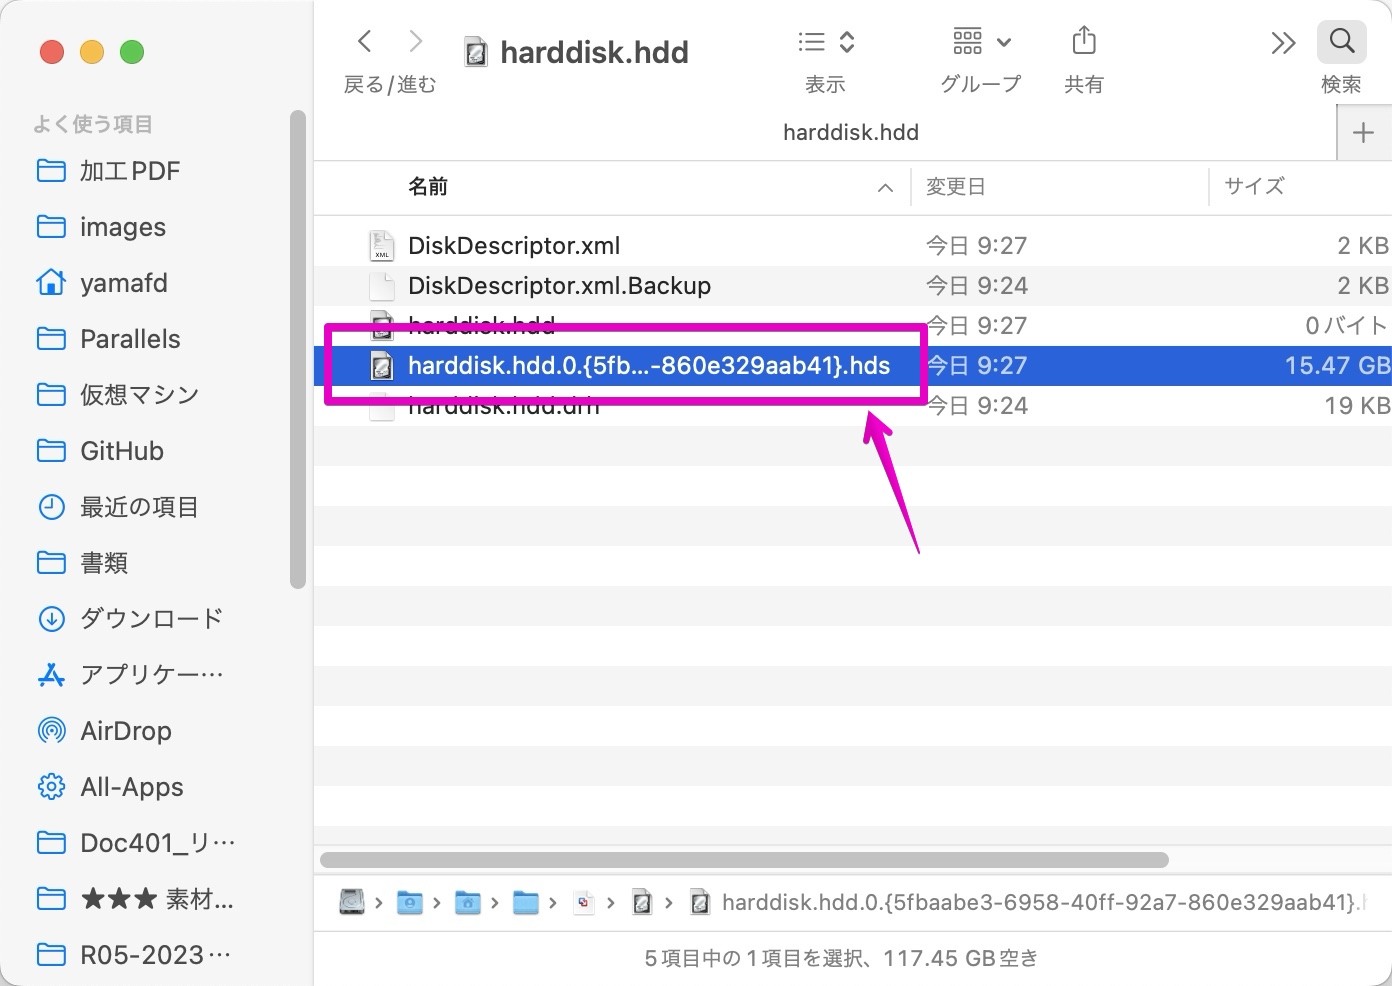
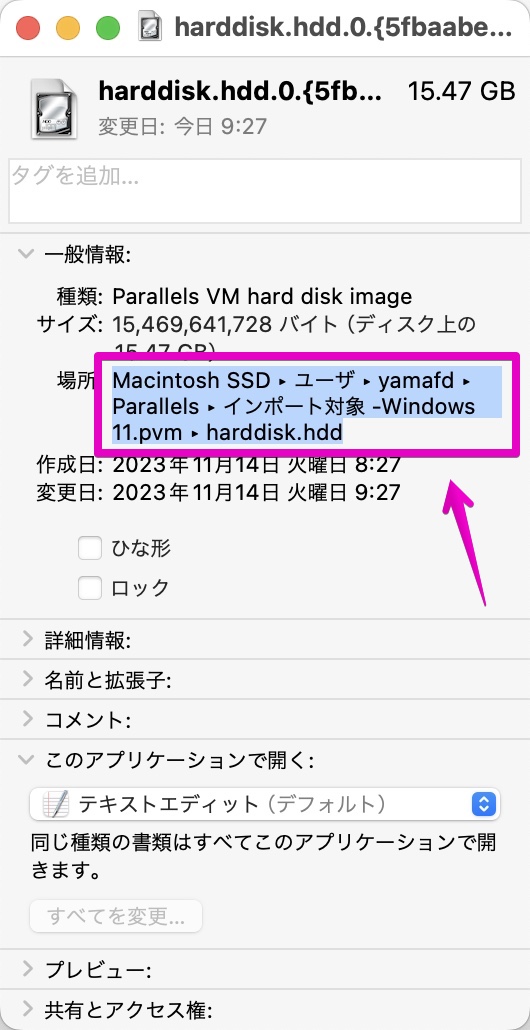
フルパス名は、ファイルの右クリックメニューの「情報を見る」で表示される画面で、「場所」を選択してコピーします。(⌘ command + C)

ファイル名は、Finderで対象ファイルを選択した状態でキーボード⏎ returnキーを押下して全範囲選択した状態で、コピーします。(⌘ command + C)

(6) Parallels仮想マシンをVMware仮想マシンに変換する
▶︎ MacのFinderを前面に表示して、フォルダ「アプリケーション」->「ユーティリティ」の中にある、アプリ「ターミナル」をダブルクリックして起動します。
▶︎ アプリ「ターミナル」が起動したら、次のコマンドを入力します。
qemu-img convert -f parallels (変換元Parallelsファイル) -O vmdk -o compat6 (変換先VMwareファイル)- 変換元Parallelsファイル:前章で調べておいた、フルパス名とファイル名の、拡張子.hdsファイル
- 変換先VMwareファイル:任意で付ける、拡張子.vmdkファイル
ちなみに、このページのサンプルでは以下のコマンドになります。
なお、ファイル名に日本語や半角スペースなどが含まれている場合は、以下のサンプルのように”フルパス名とファイル名”とするとエラーになりません。
qemu-img convert -f parallels "/Users/yamafd/Parallels/インポート対象 -Windows 11.pvm/harddisk.hdd/harddisk.hdd.0.{5fbaabe3-6958-40ff-92a7-860e329aab41}.hds" -O vmdk -o compat6 "/Users/yamafd/Parallels/インポート対象の変換後 -Windows 11.vmdk"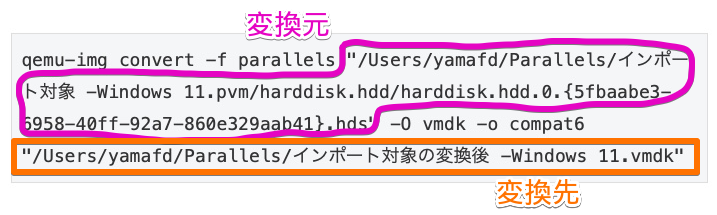
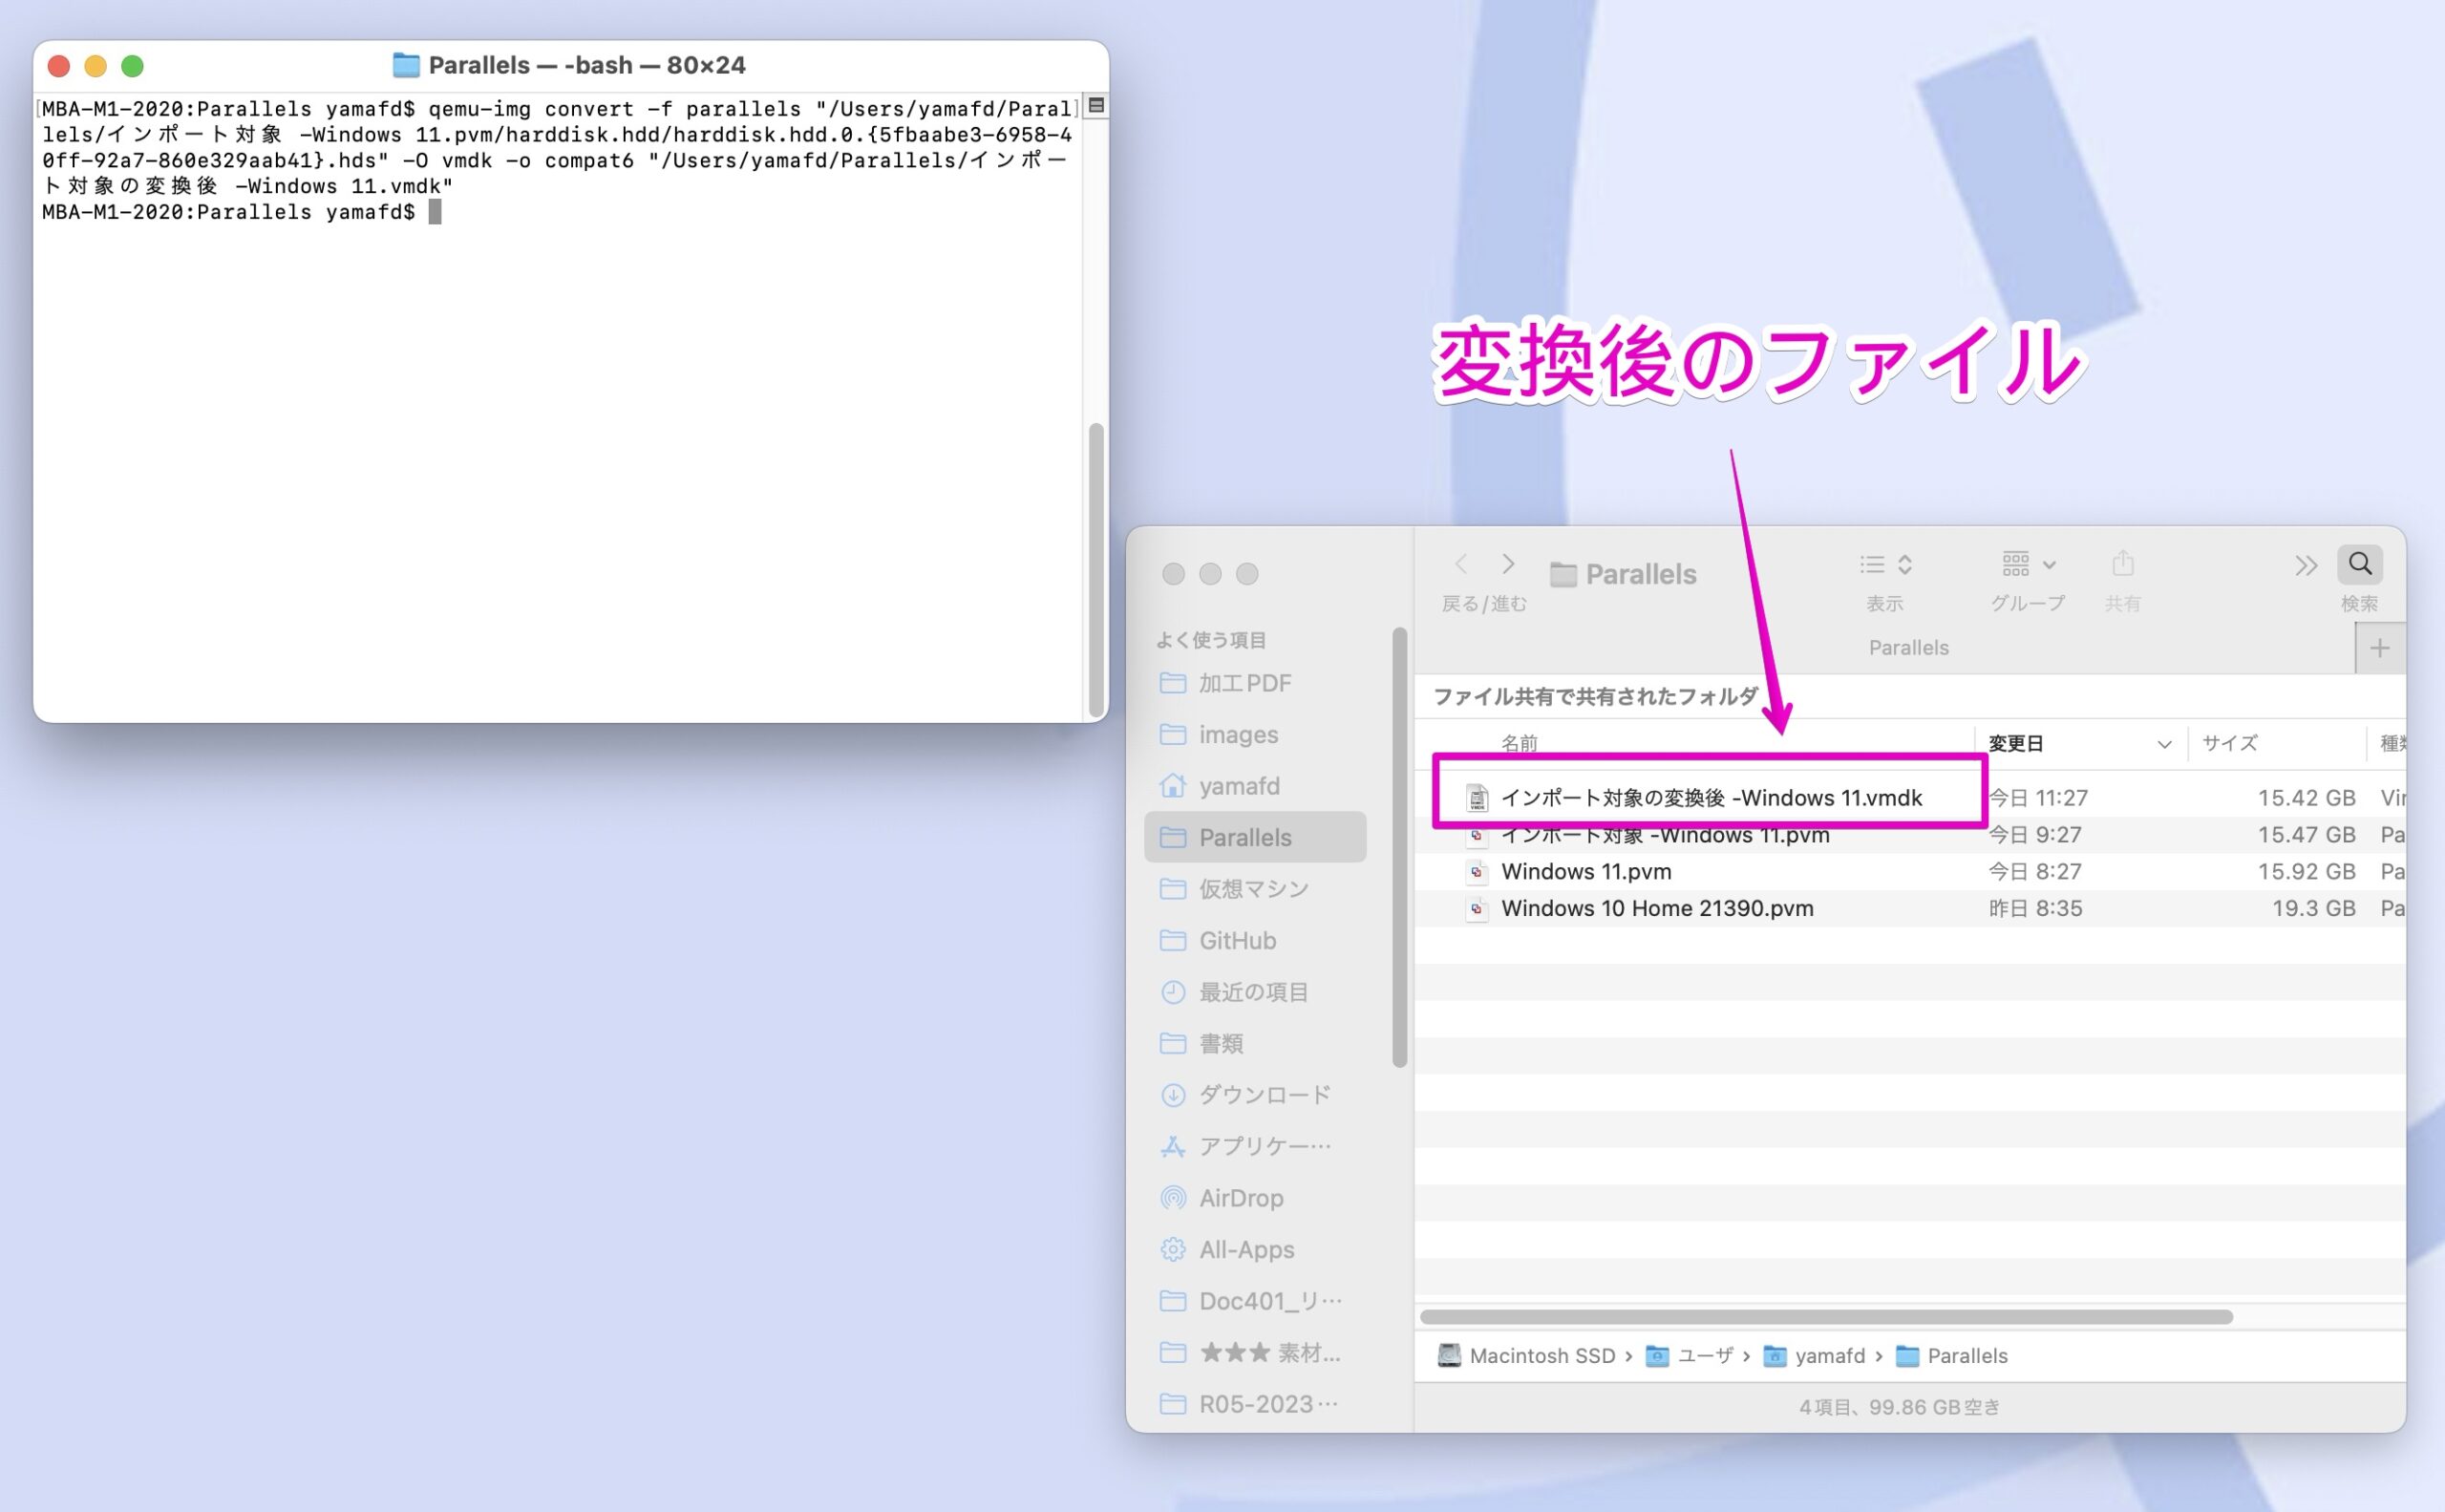
▶︎ コマンドが入力できたら、キーボードの⏎ returnキーを押下して、変換を開始します。

▶︎ 仮想マシンのファイルサイズによりますが、変換には数分かかることもあるので、しばらく待ちます。
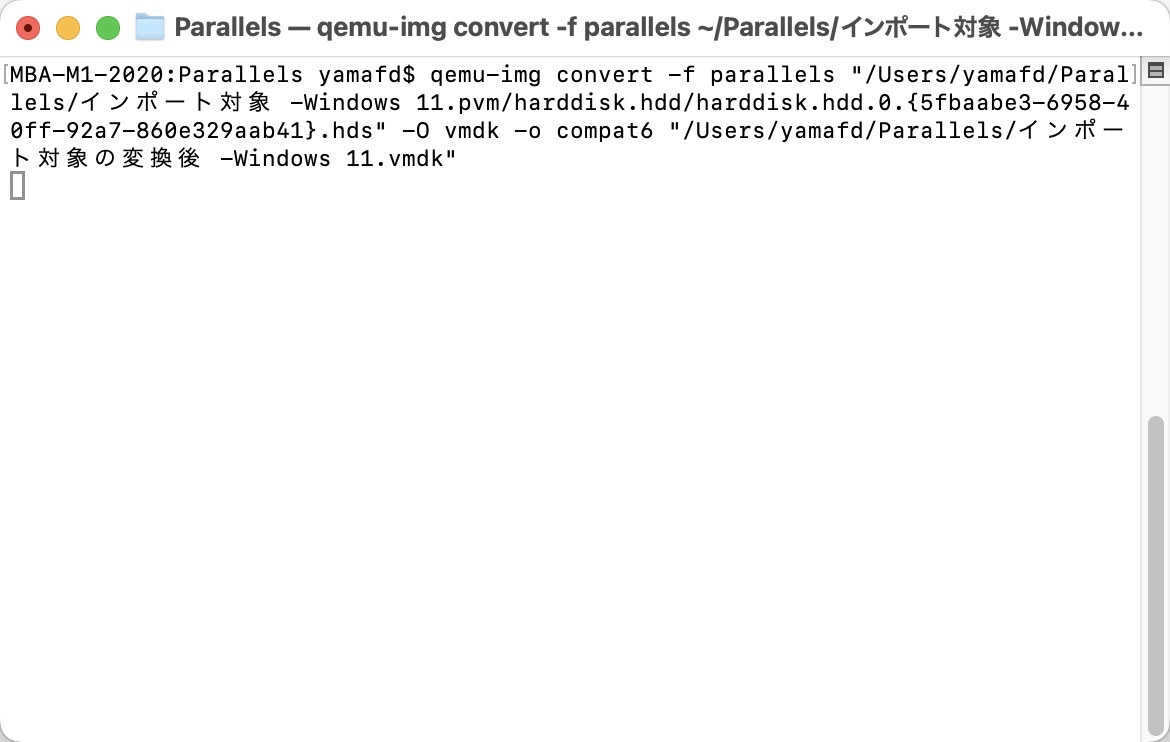
▶︎ 変換が完了すると、コマンドプロンプトが表示されて、Finderに変換後のファイルが表示されます。
ここまでできたら、次の章に進んでください。
(7) VMware Fusionで仮想マシンの設定
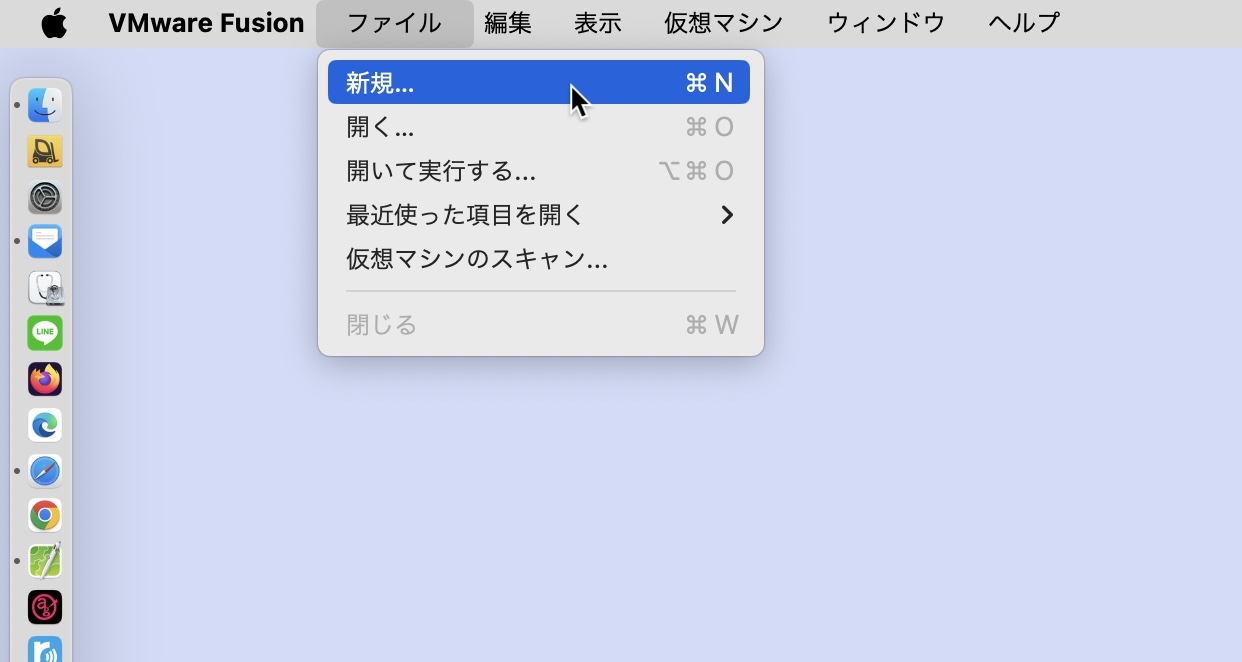
▶︎ VMware Fusionを起動します。
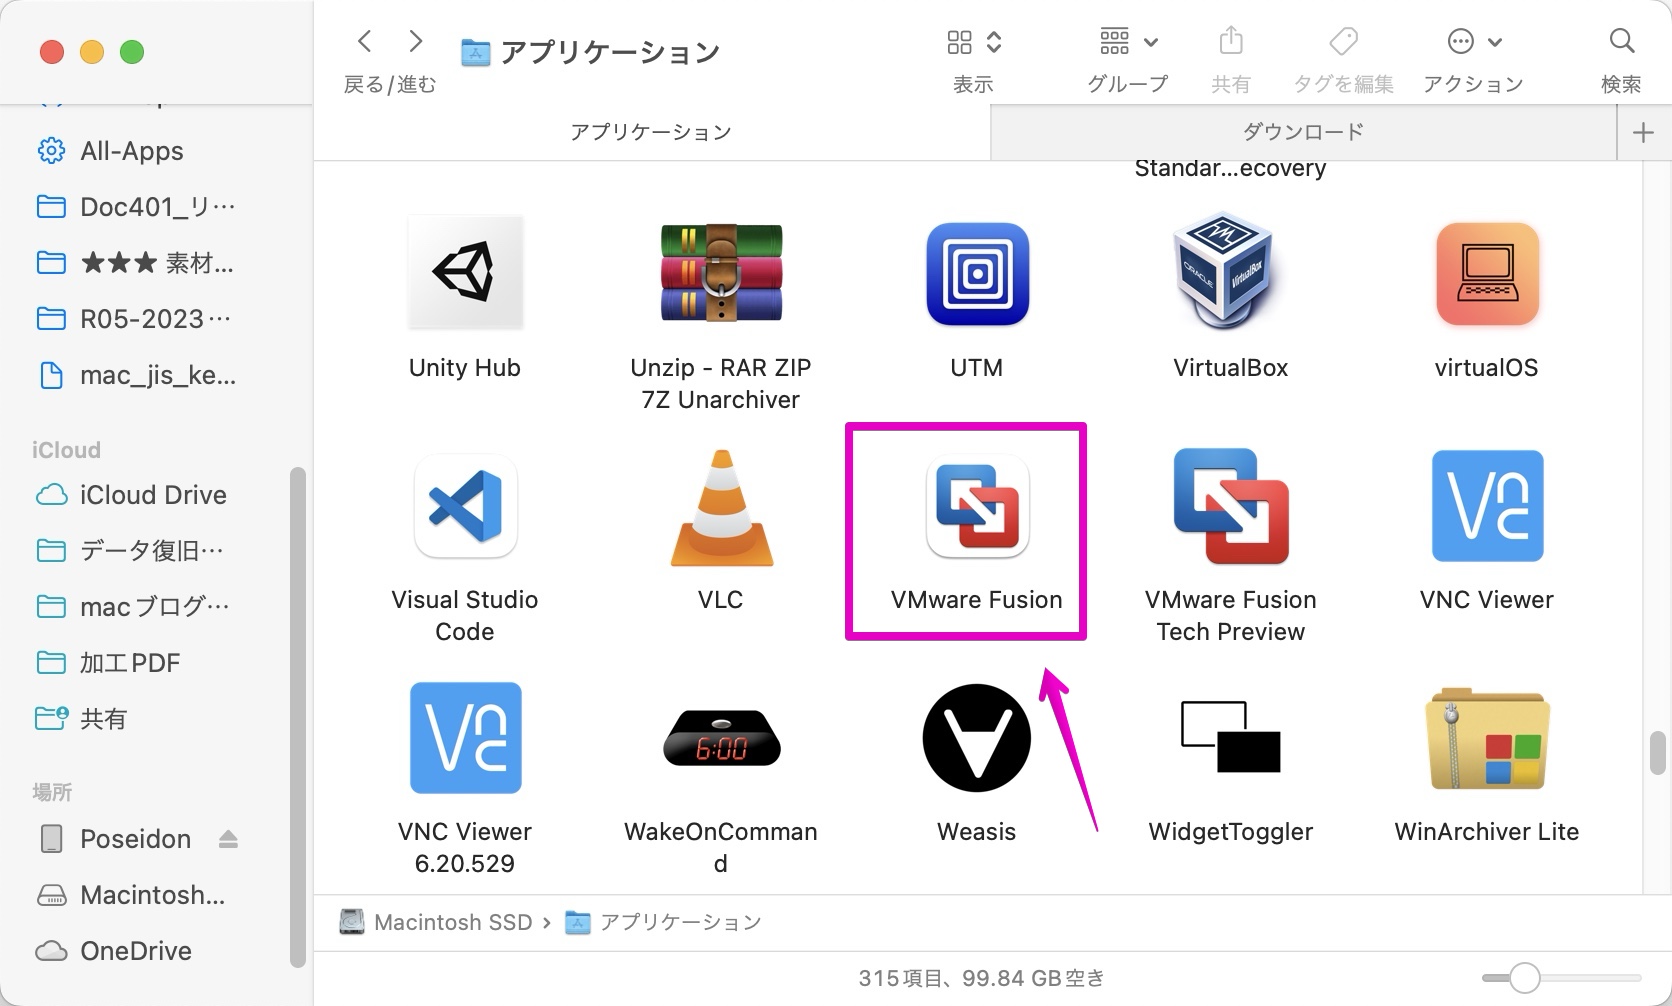
▶︎ VMware Fusionが起動したら、メニューバーから「ファイル」->「新規…」を選択します。
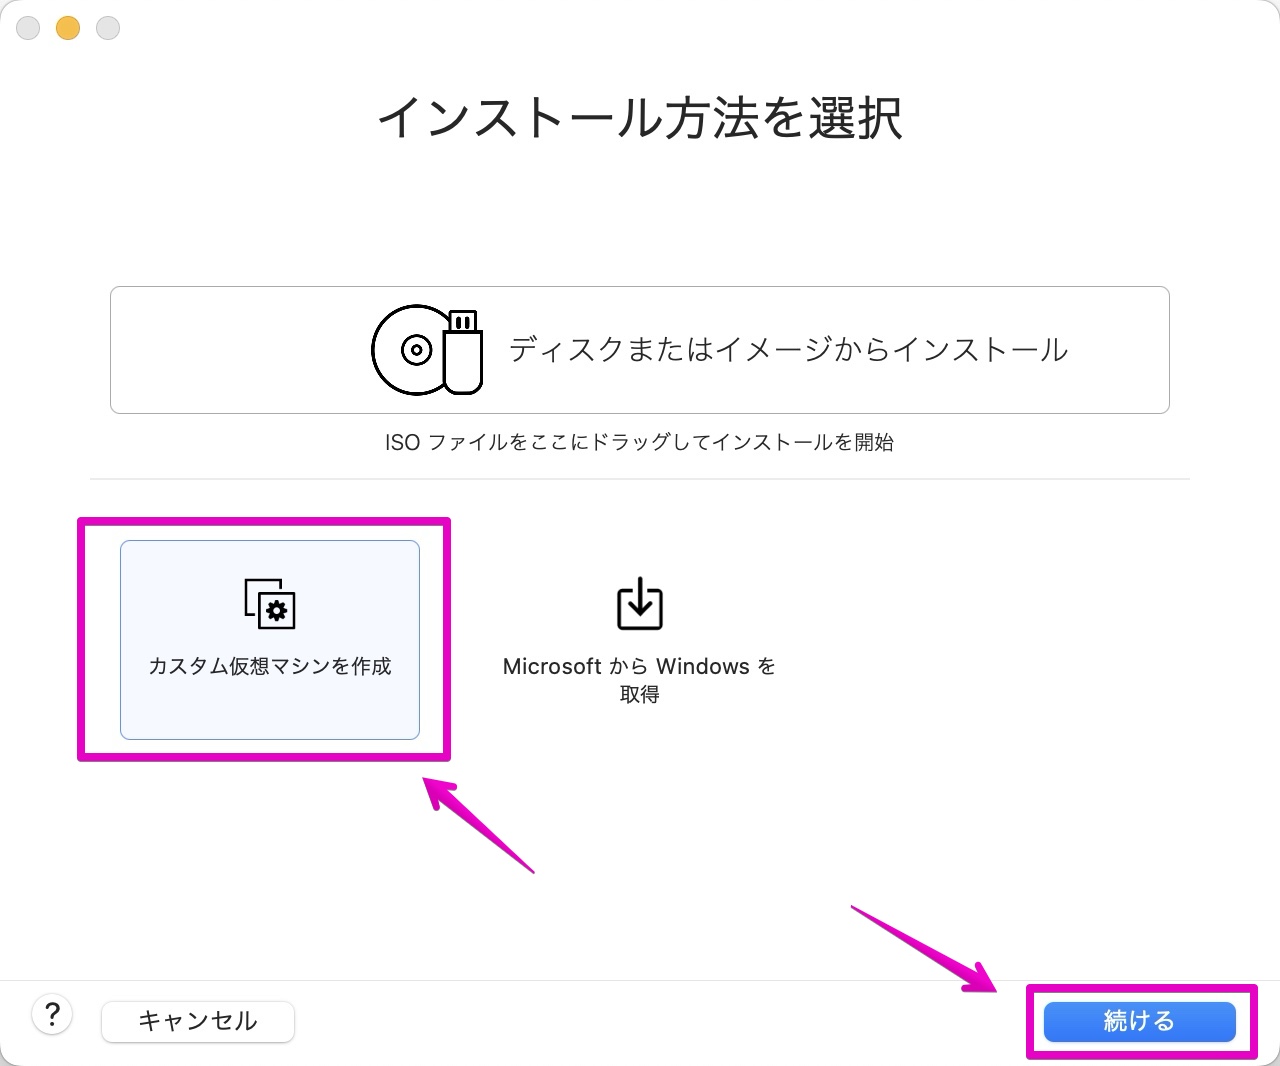
▶︎ 図のように「インストール方法を選択」が表示されたら、アイコン「カスタム仮想マシンを作成」をクリックしてから、ボタン「続ける」をクリックします。
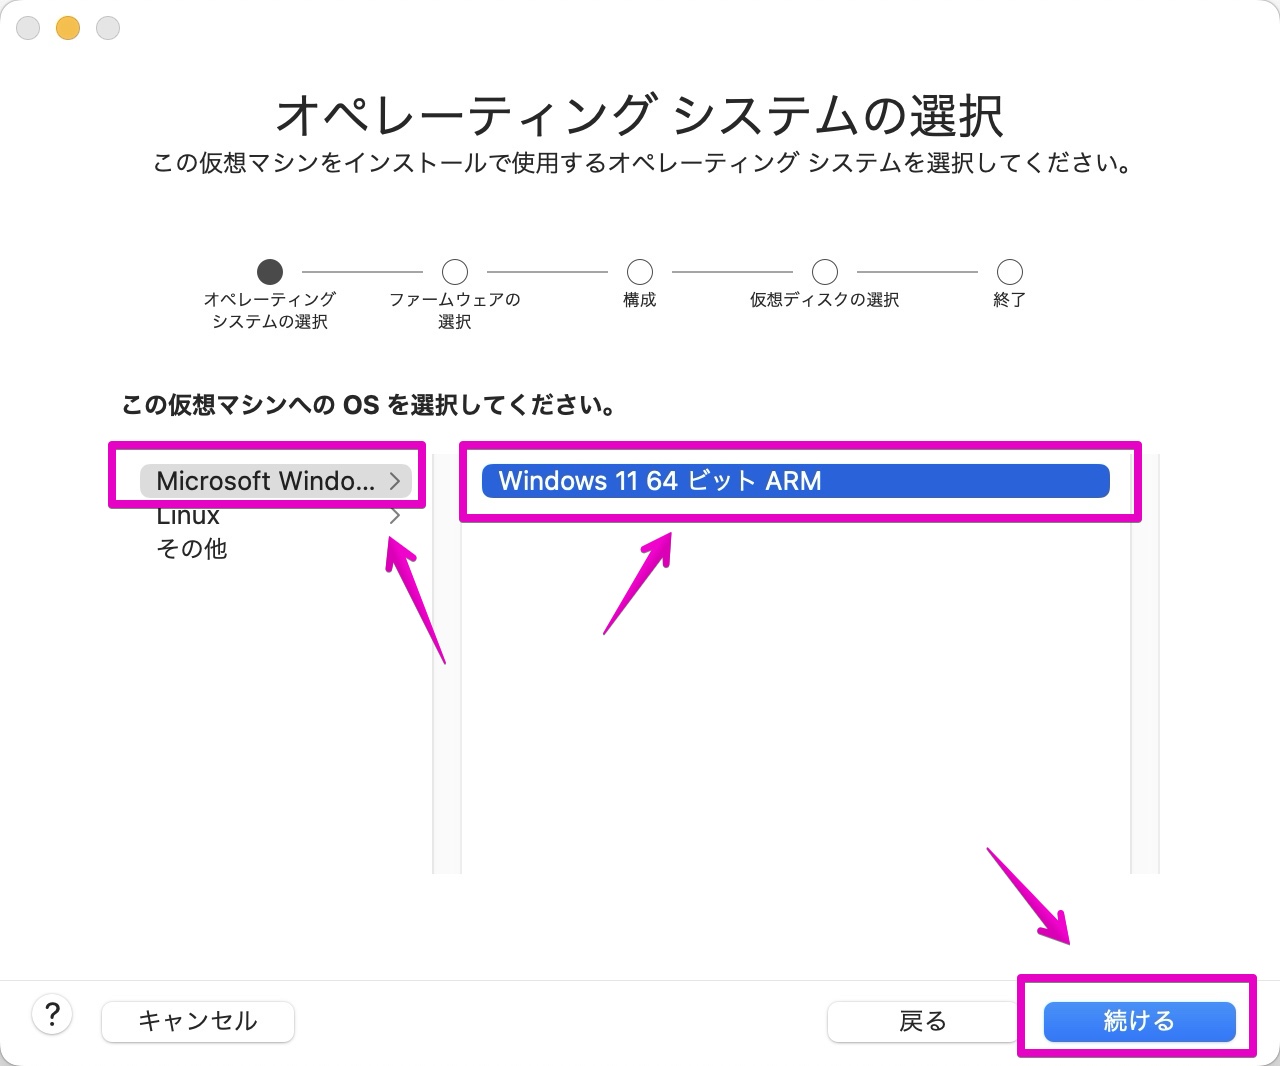
▶︎ 図のように「オペレーティングシステムの選択」が表示されたら、「Microsoft Windows」->「Windows 11 64ビット ARM」を選択してから、ボタン「続ける」をクリックします。
▶︎ 図のように「ファームウェアタイプを選択」が表示されたら、チェック項目「UEFIセキュアブート」にチェックを入れてから、ボタン「続ける」をクリックします。

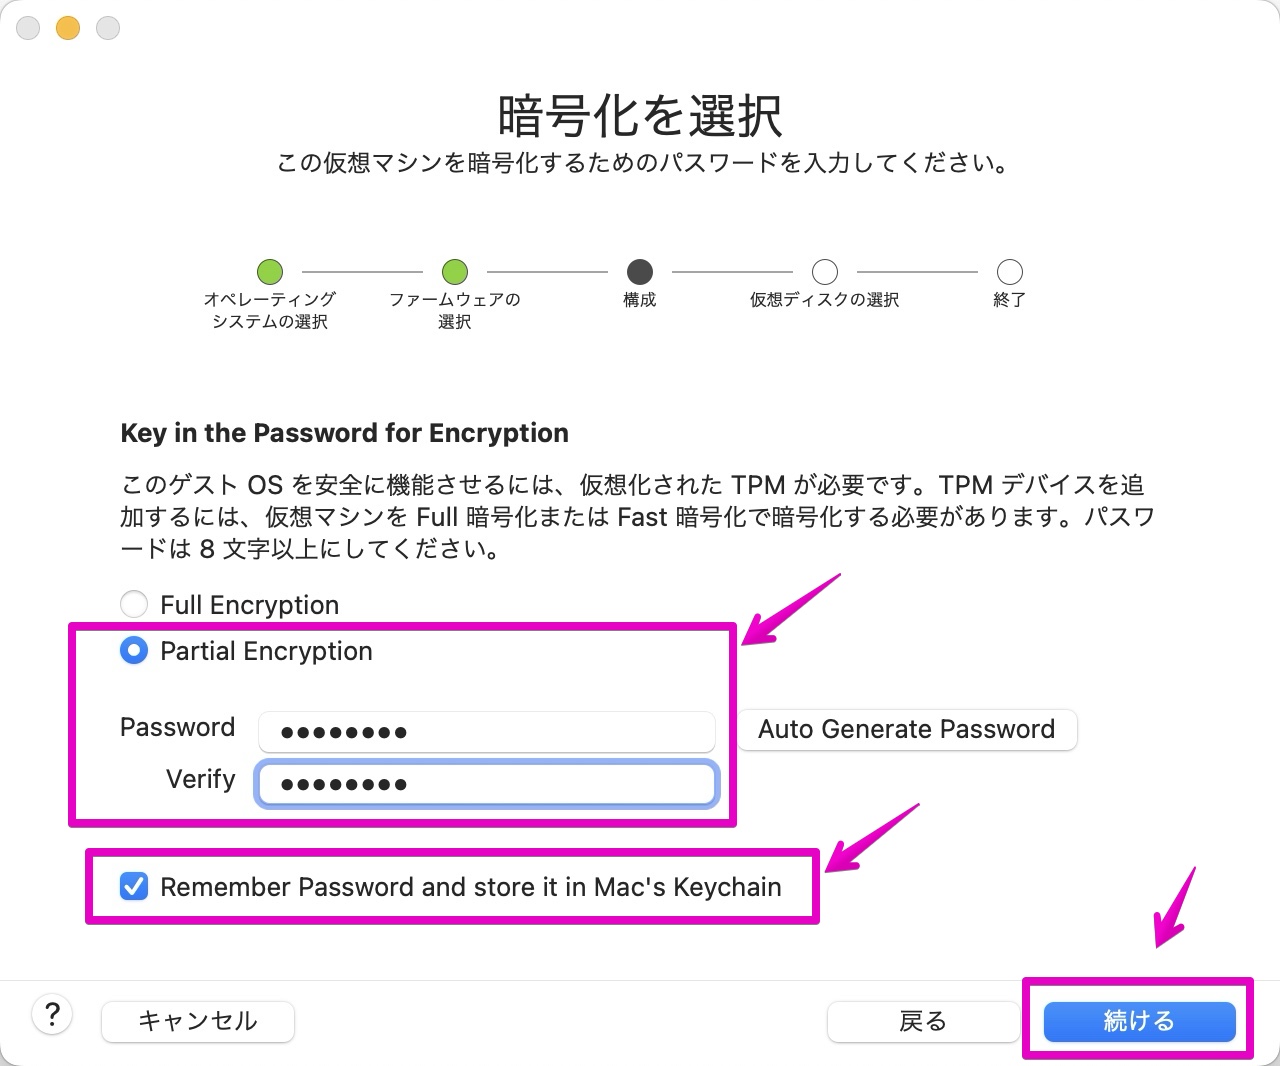
▶︎ 図のように「暗号化を選択」が表示されたら、適当にパスワードを設定して、チェック項目「Remember Password and store in Mac’s Keychain」にチェックを入れてから、ボタン「続ける」をクリックします。
▶︎ ここは注意してください!
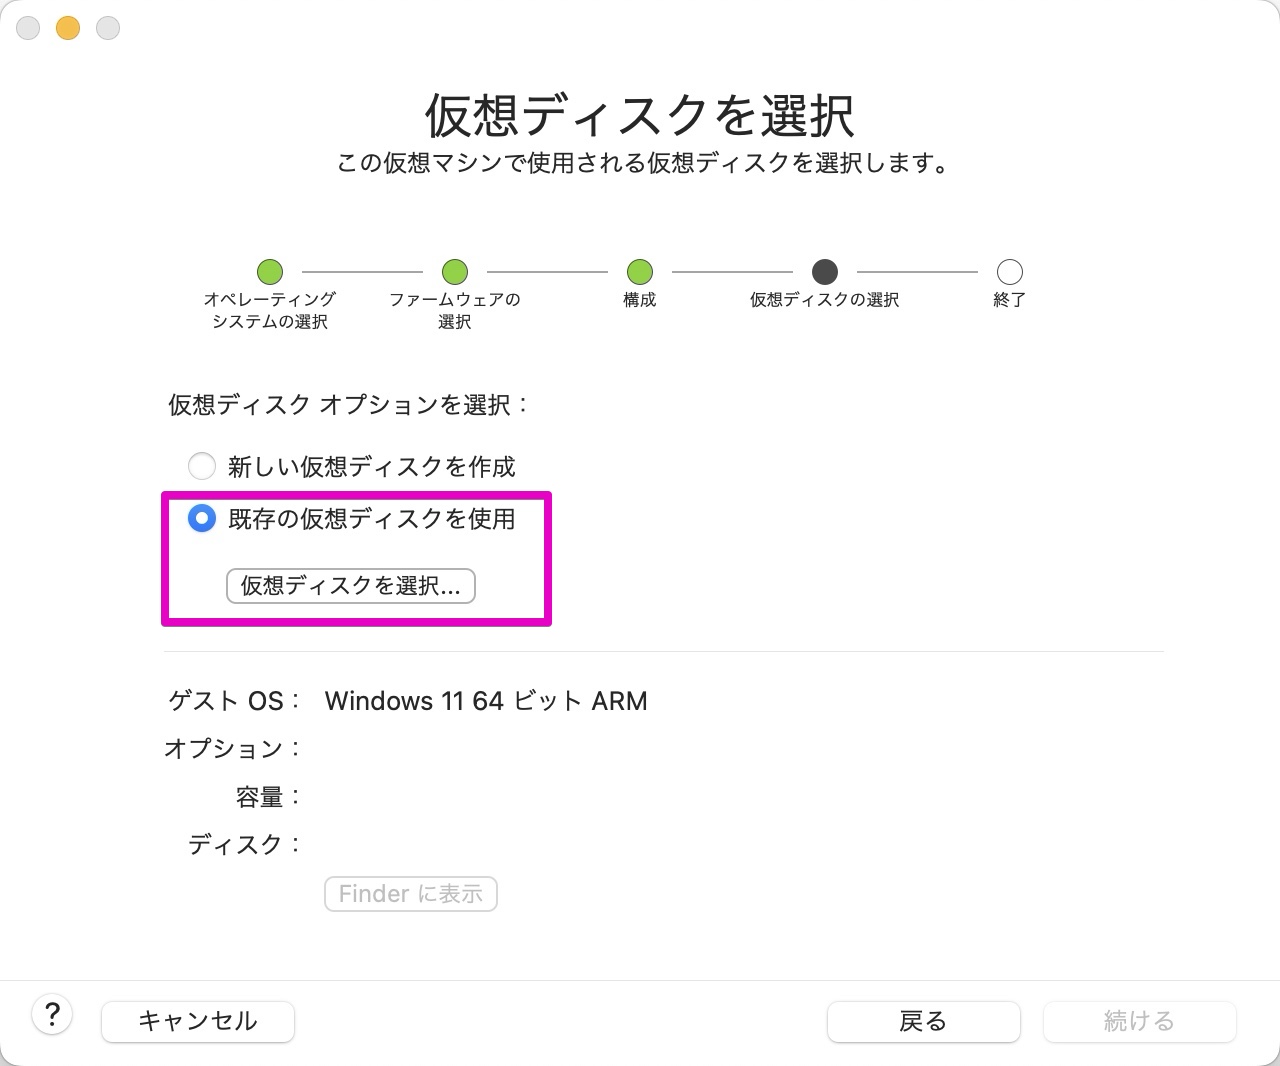
図のように「仮想ディスクを選択」が表示されたら、チェック項目「既存の仮想ディスクを使用」にチェックを入れてから、ボタン「仮想ディスクを選択…」をクリックします。
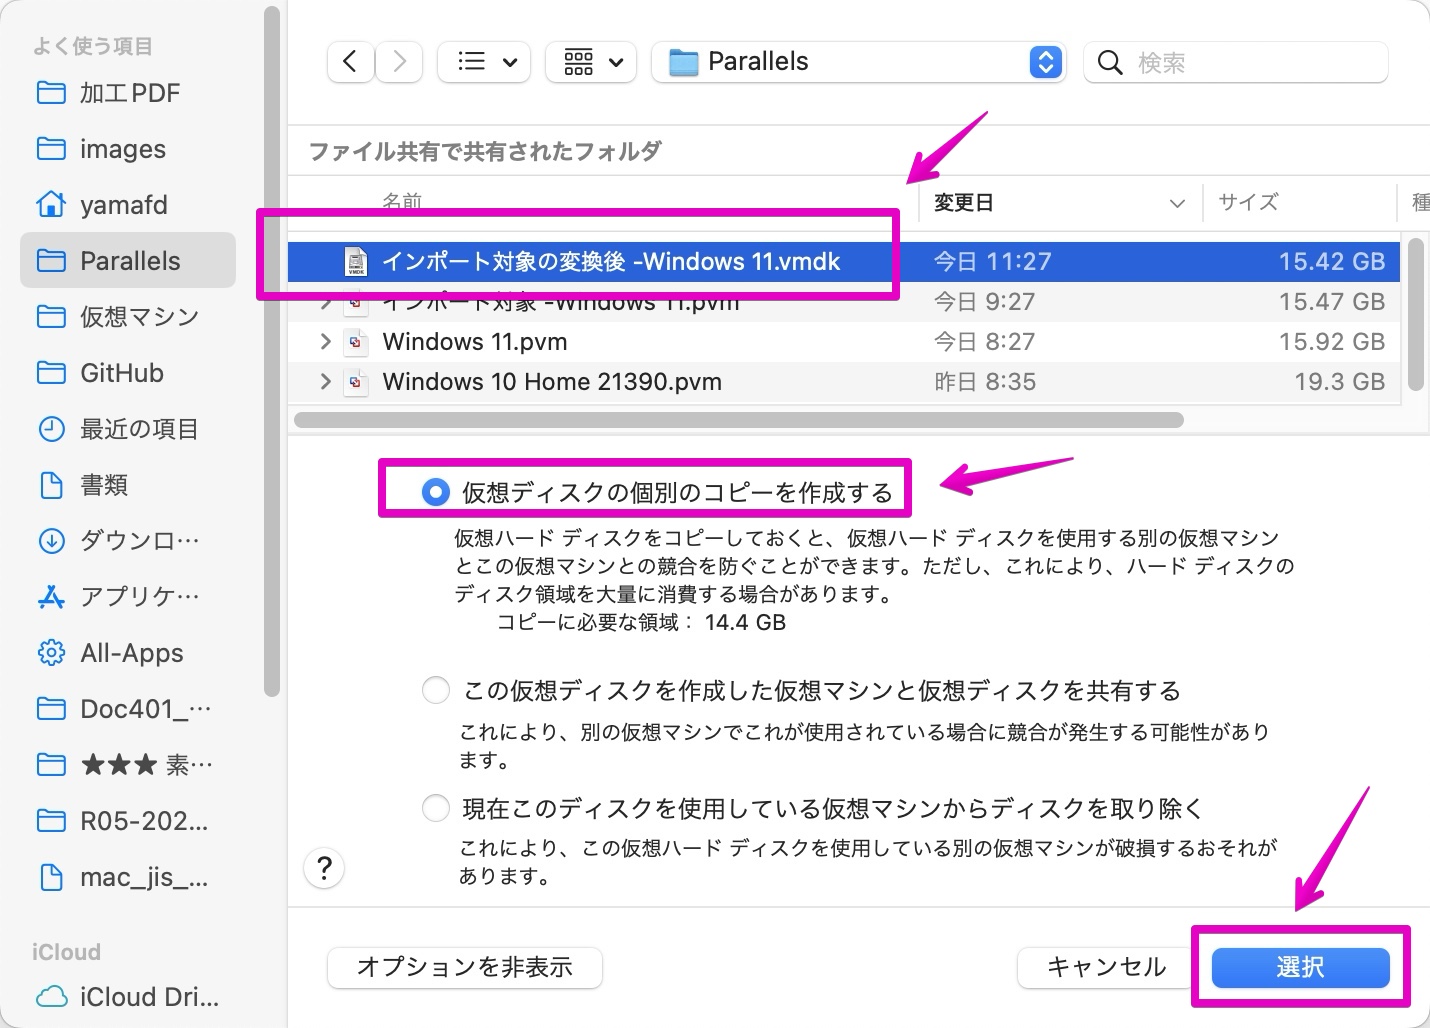
▶︎ 図のようにファイルの選択画面が表示されたら、あらかじめParallelsから変換して作成しておいた、「拡張子.vmdkファイル」を選択してから、チェック項目「仮想ディスクの個別のコピーを作成する」にチェックを入れて、最後にボタン「選択」をクリックします。
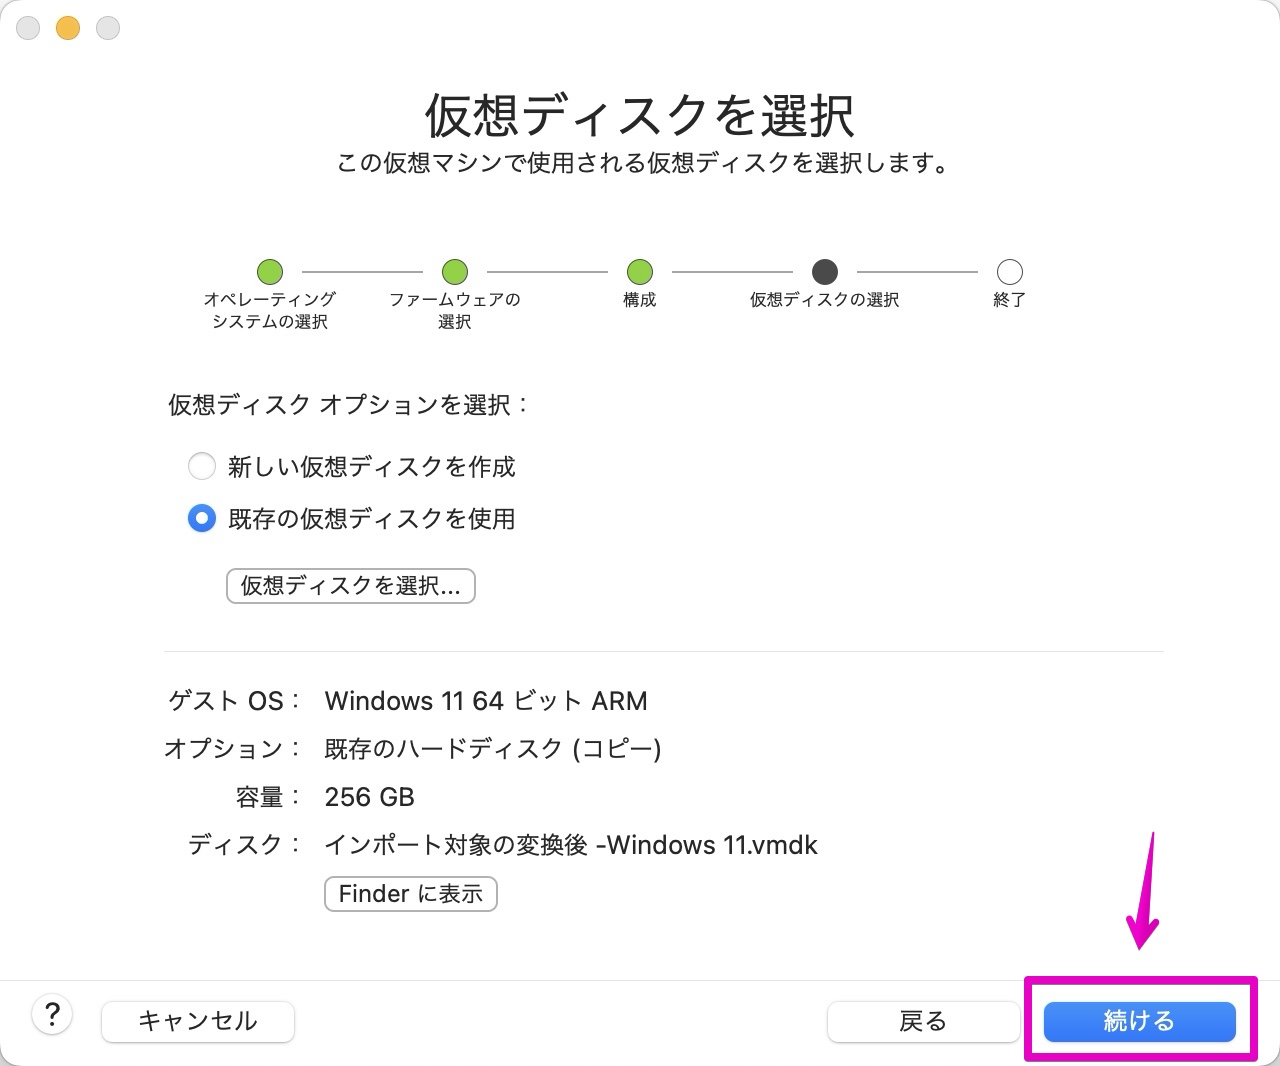
▶︎ 図のように、元の「仮想ディスクを選択」の画面に戻ったら、ボタン「続ける」をクリックします。
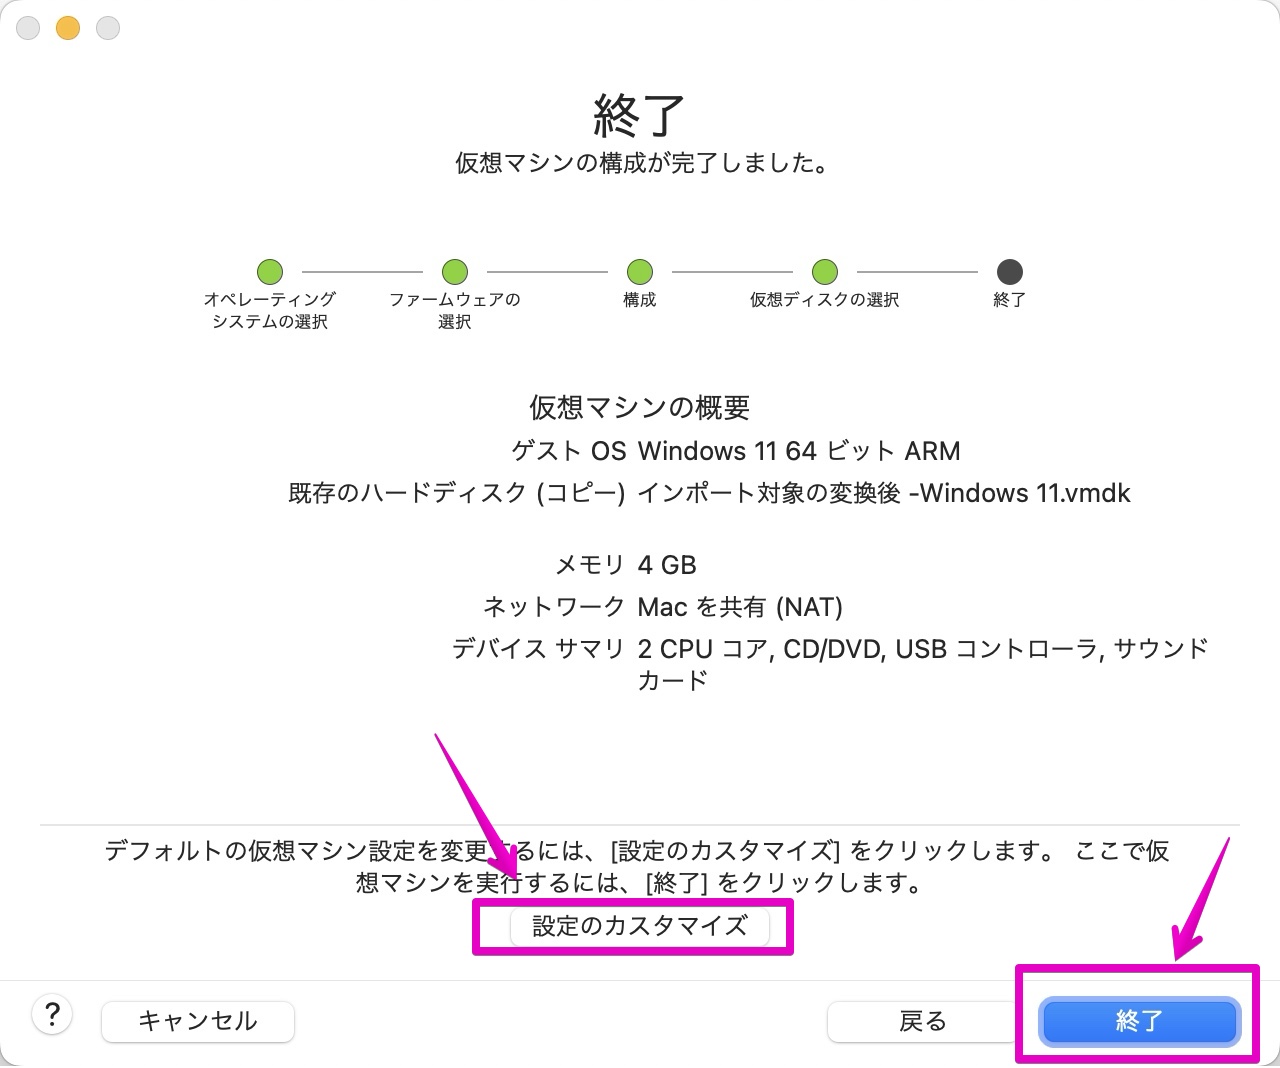
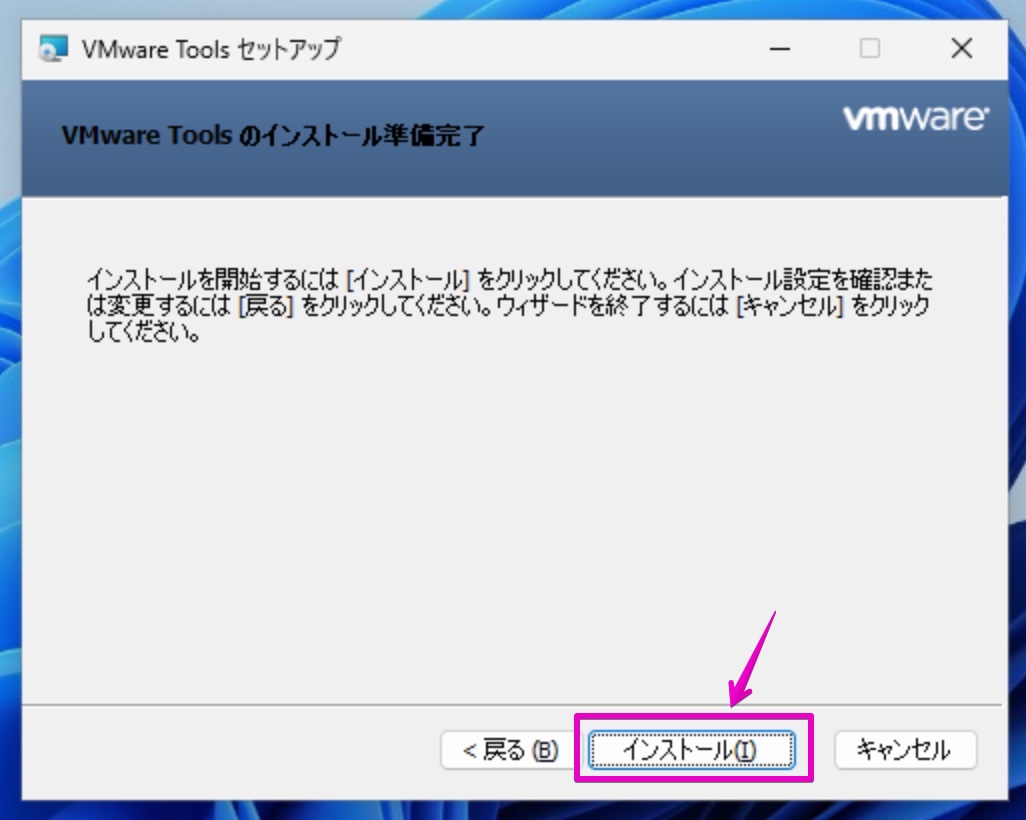
▶︎ 図のように「終了」と表示されたら、必要に応じてボタン「設定のカスタマイズ」をクリックして、CPU数やメモリ量などのカスタマイズを行います。
それから、ボタン「終了」をクリックします。
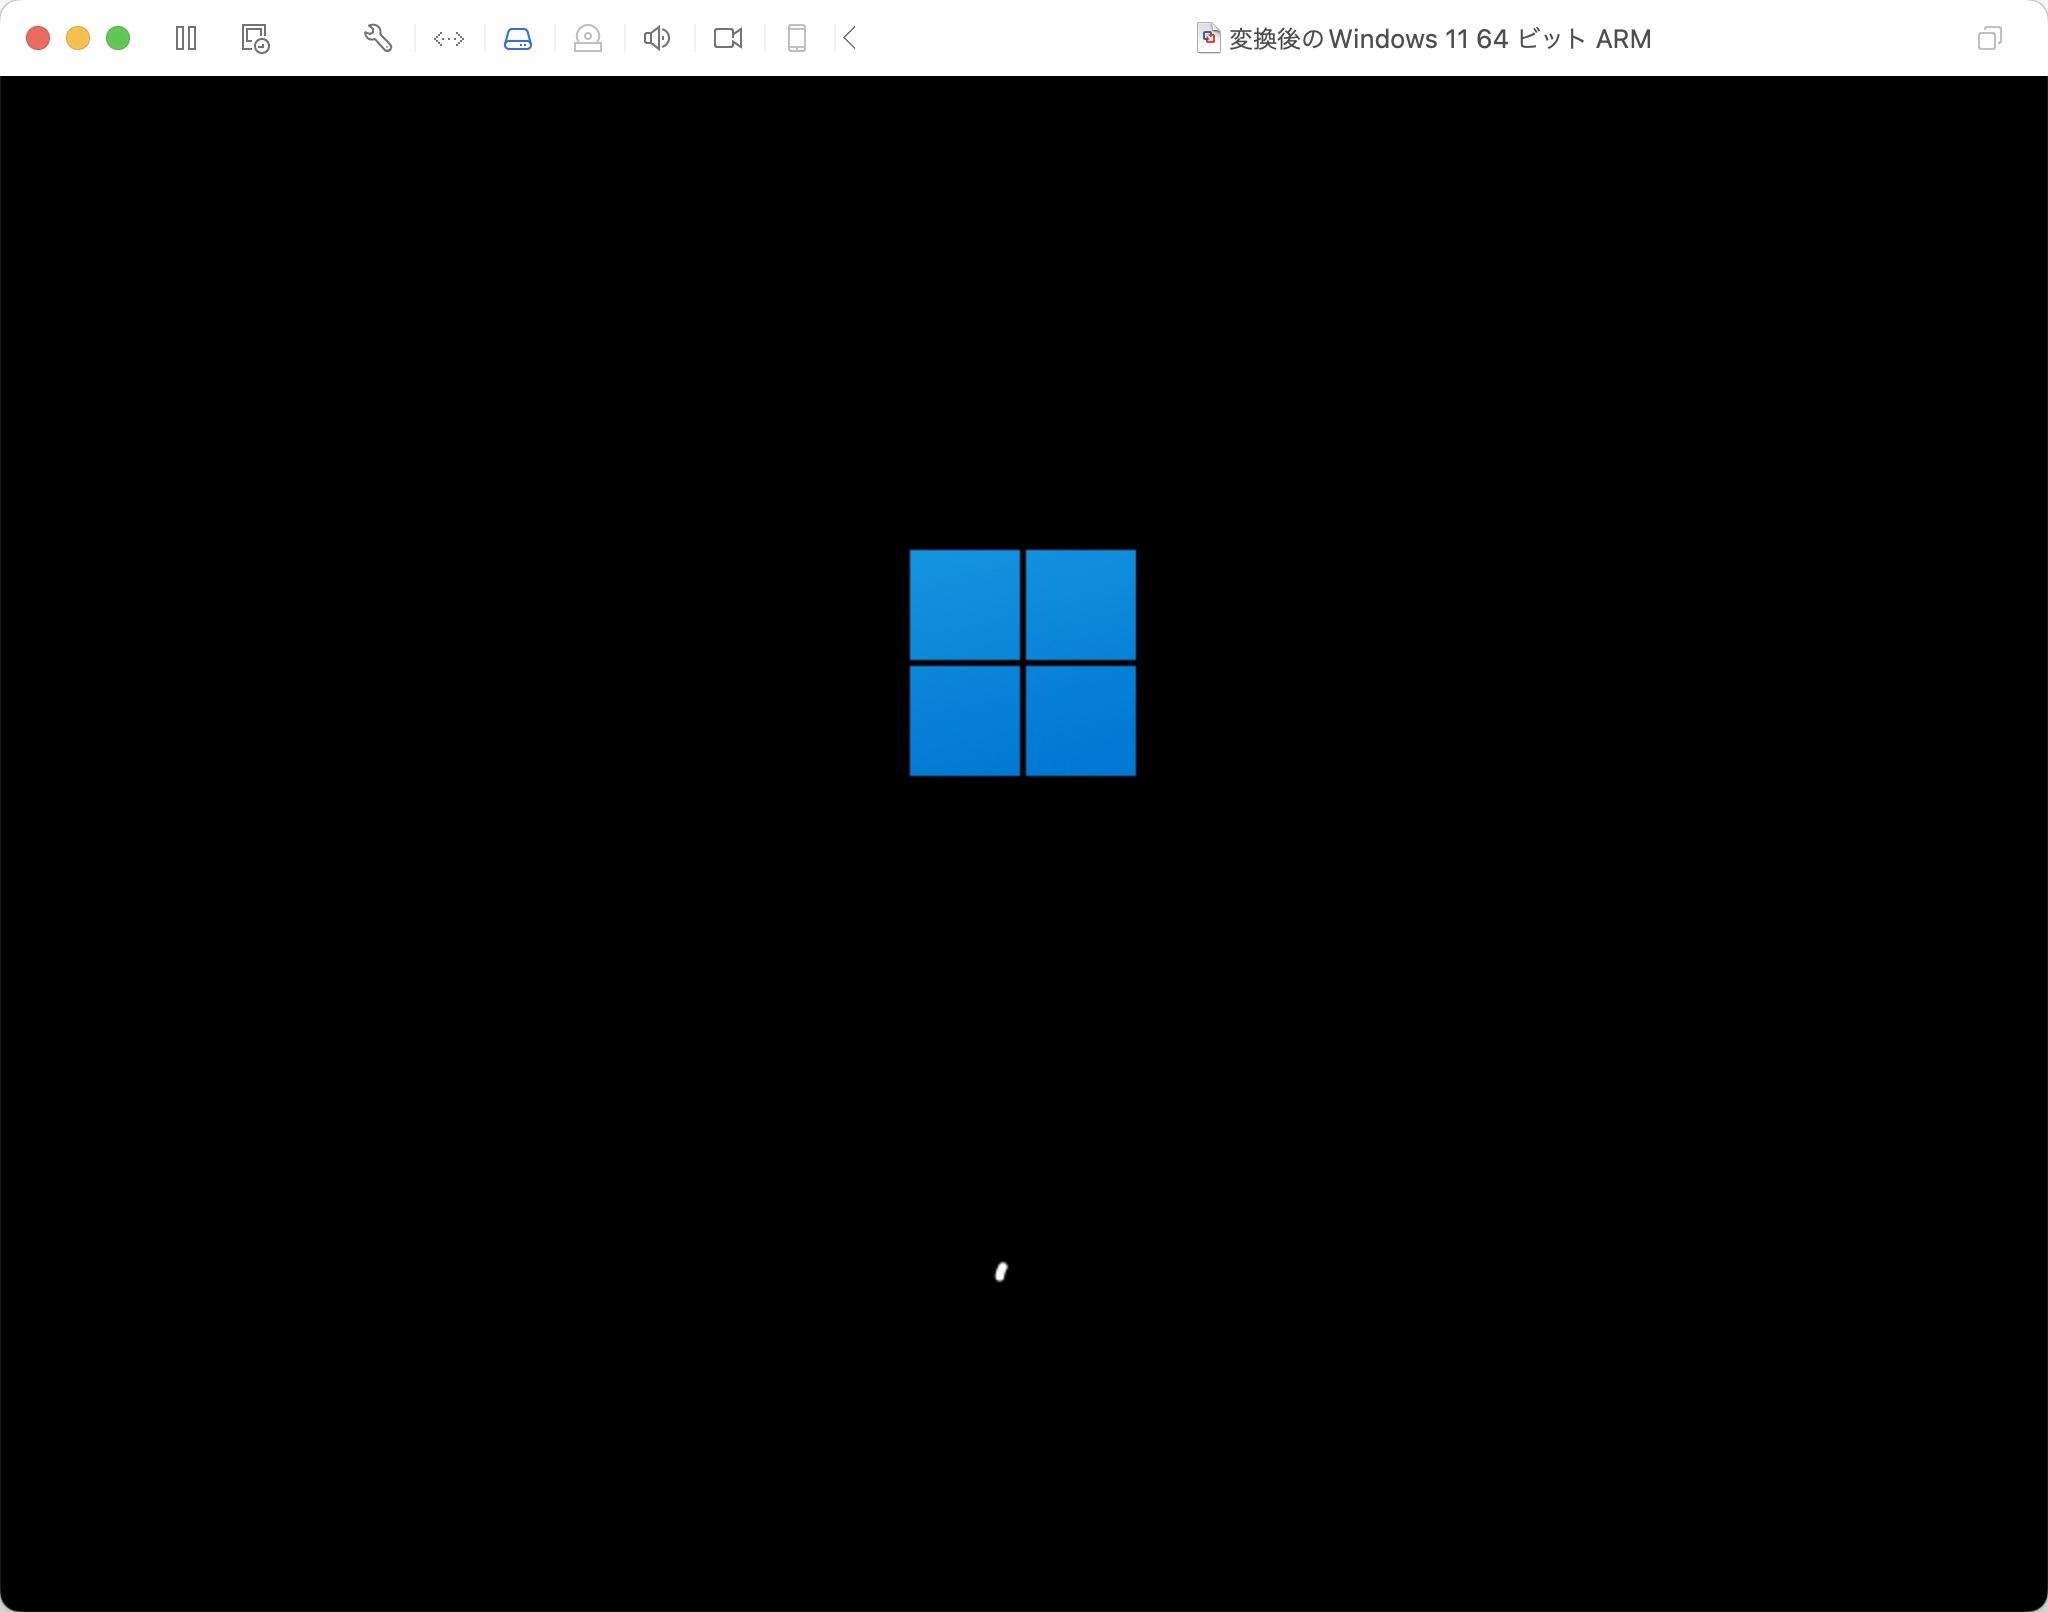
▶︎ 図のように仮想マシンの画面が表示されたら、クリックして起動します。

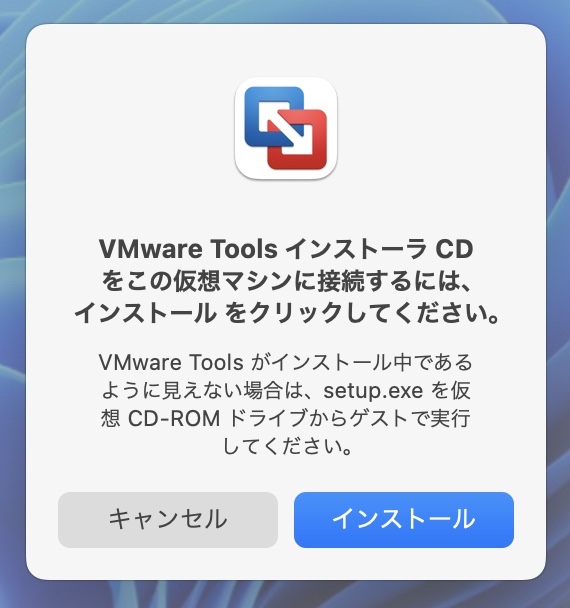
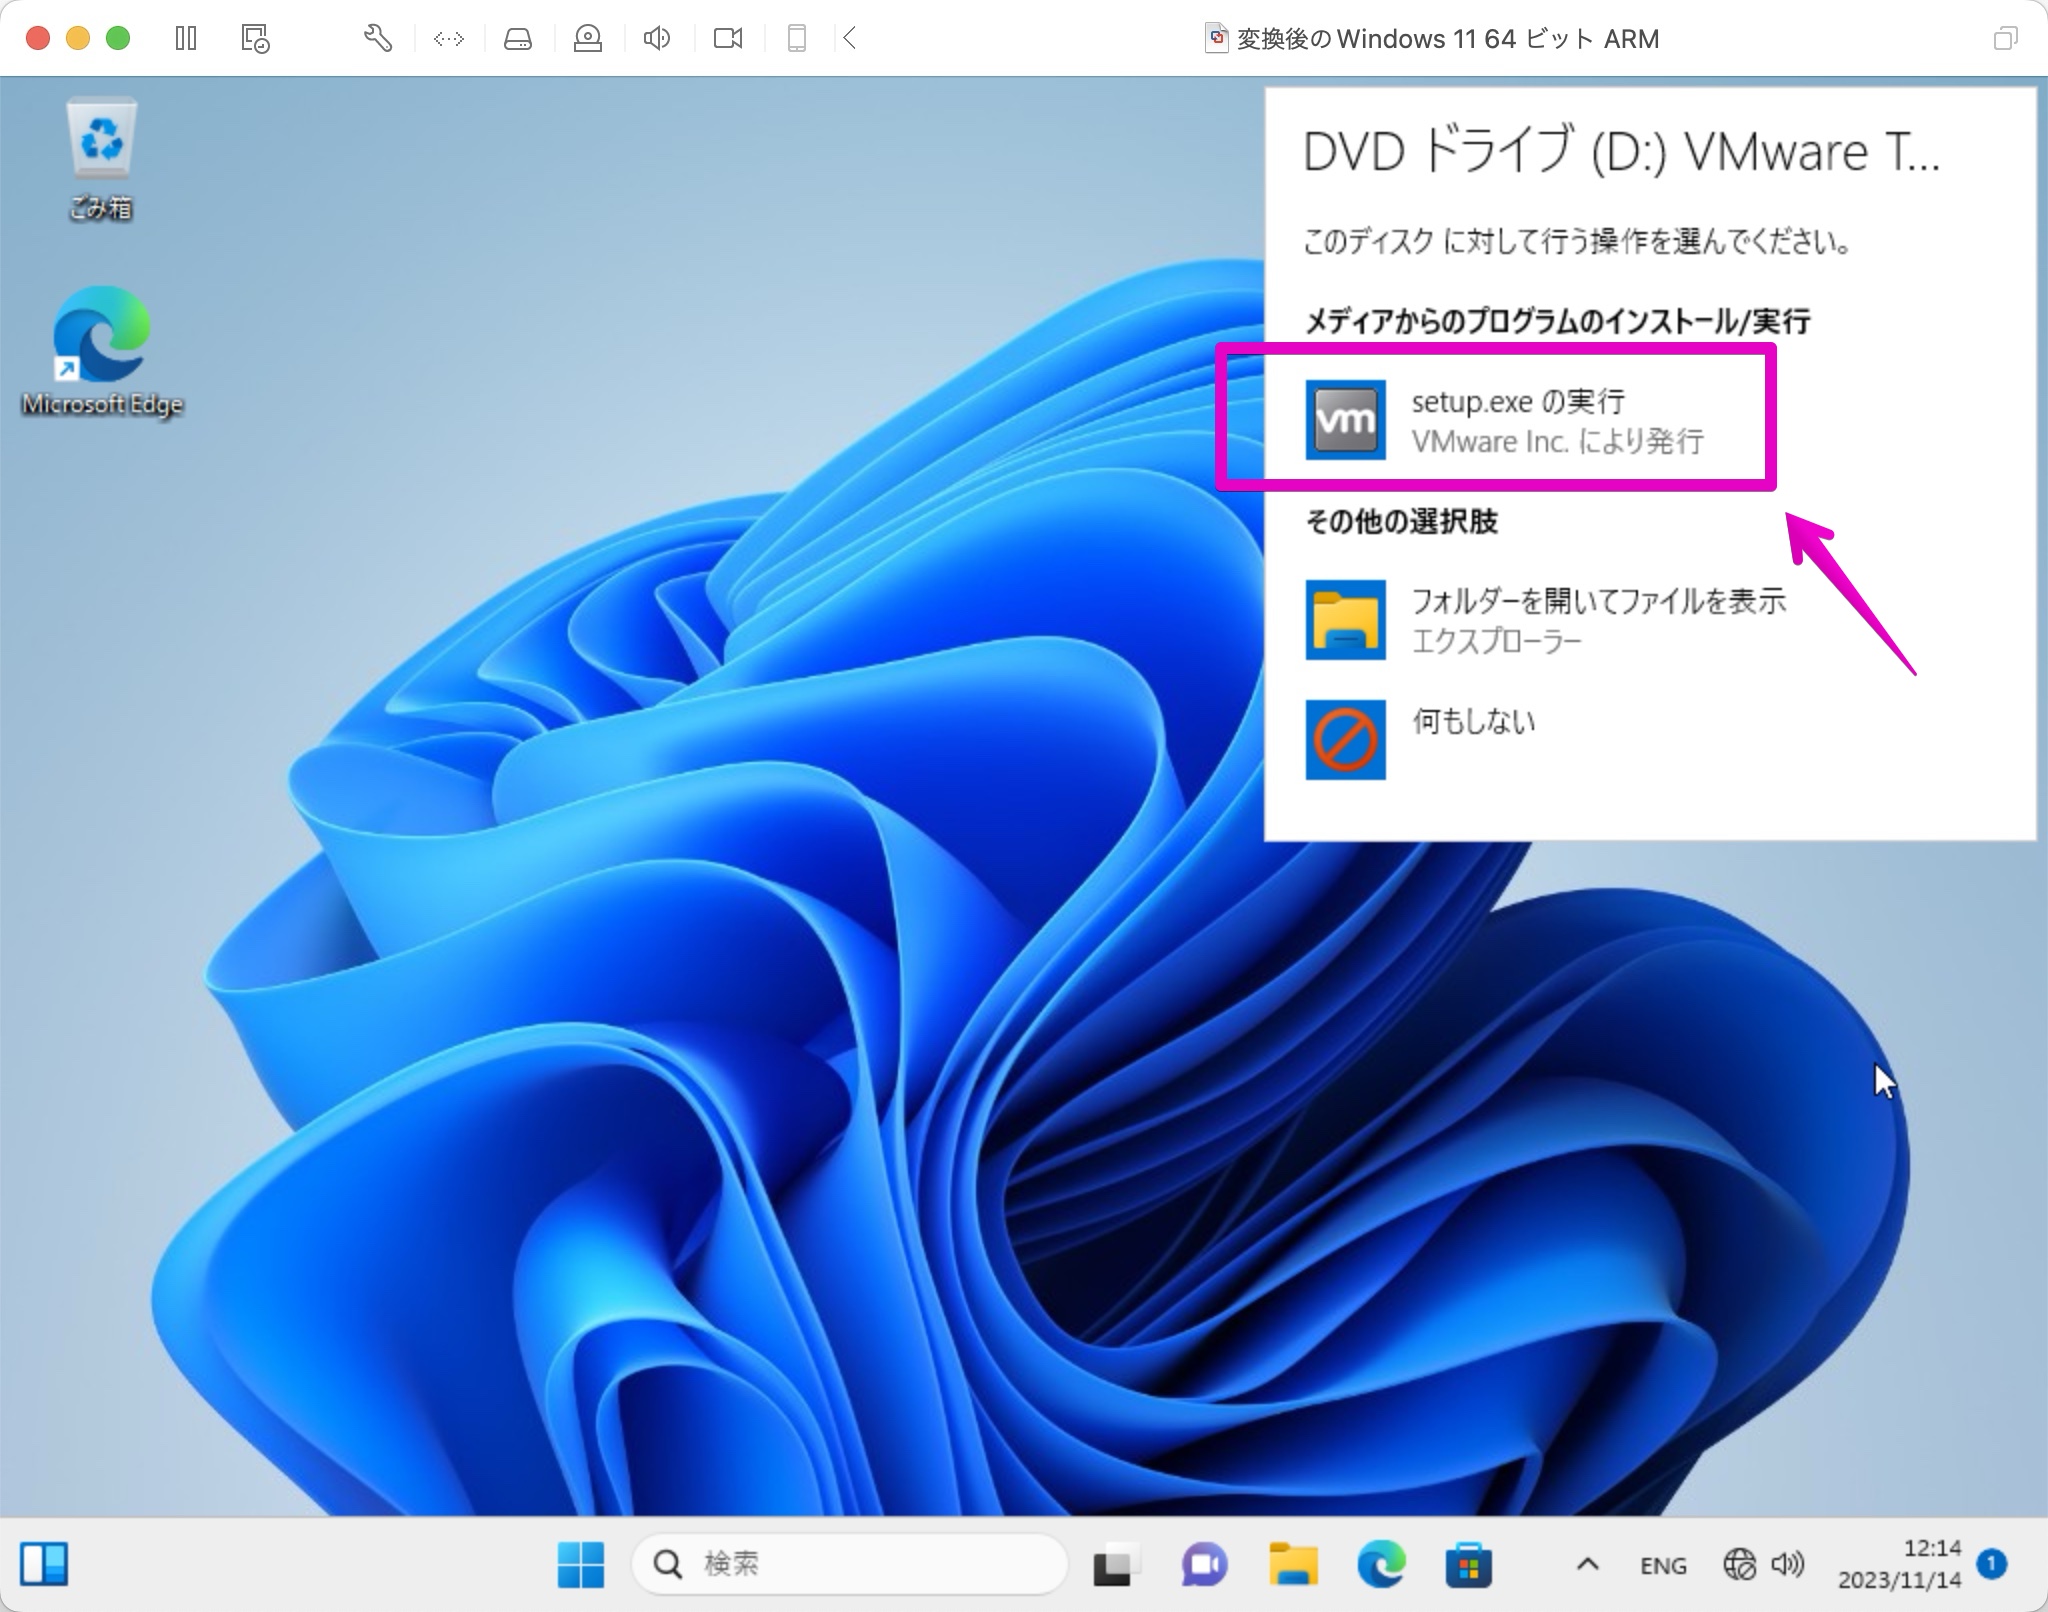
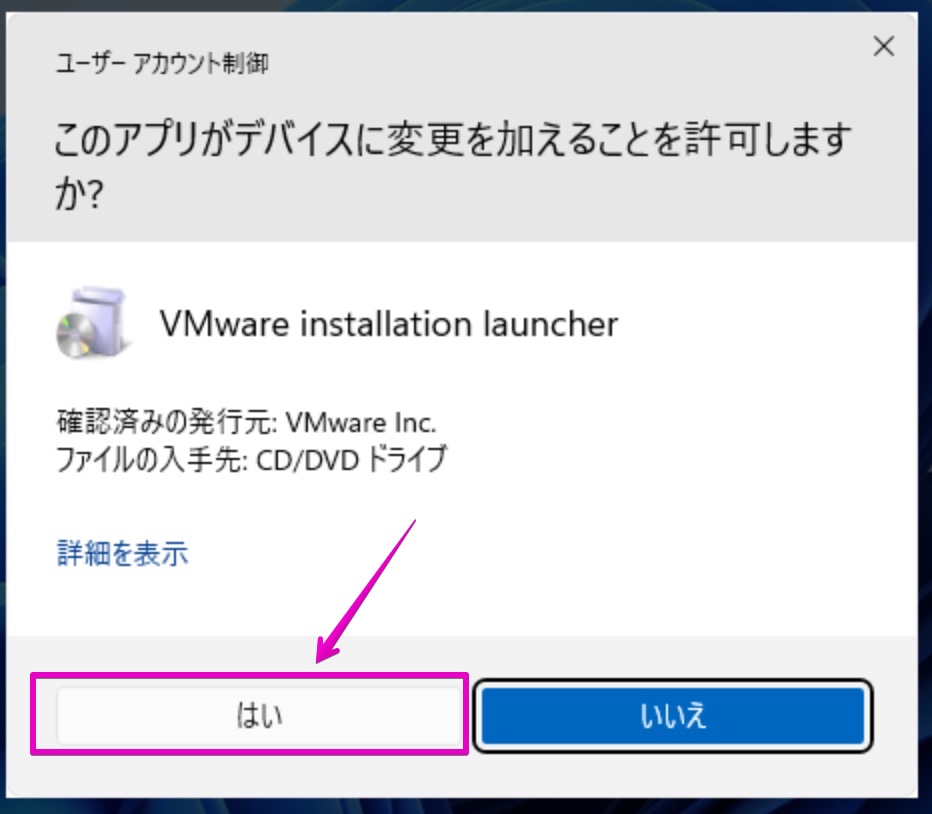
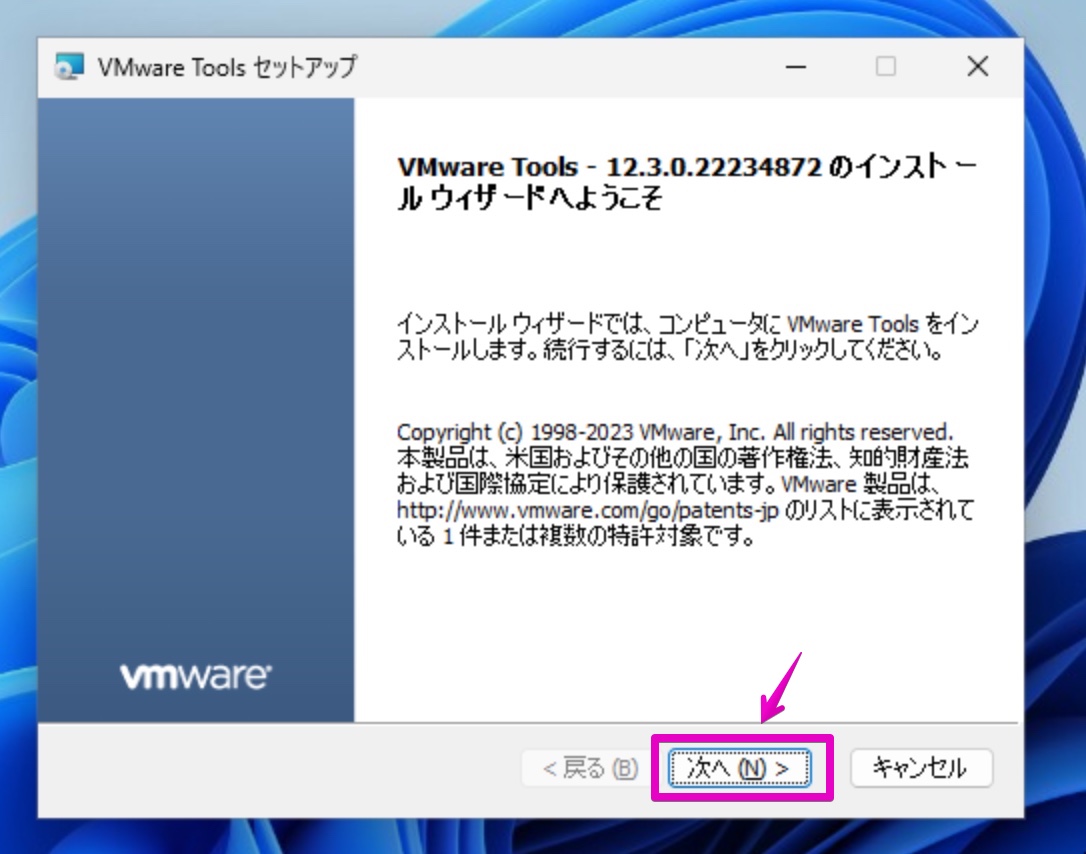
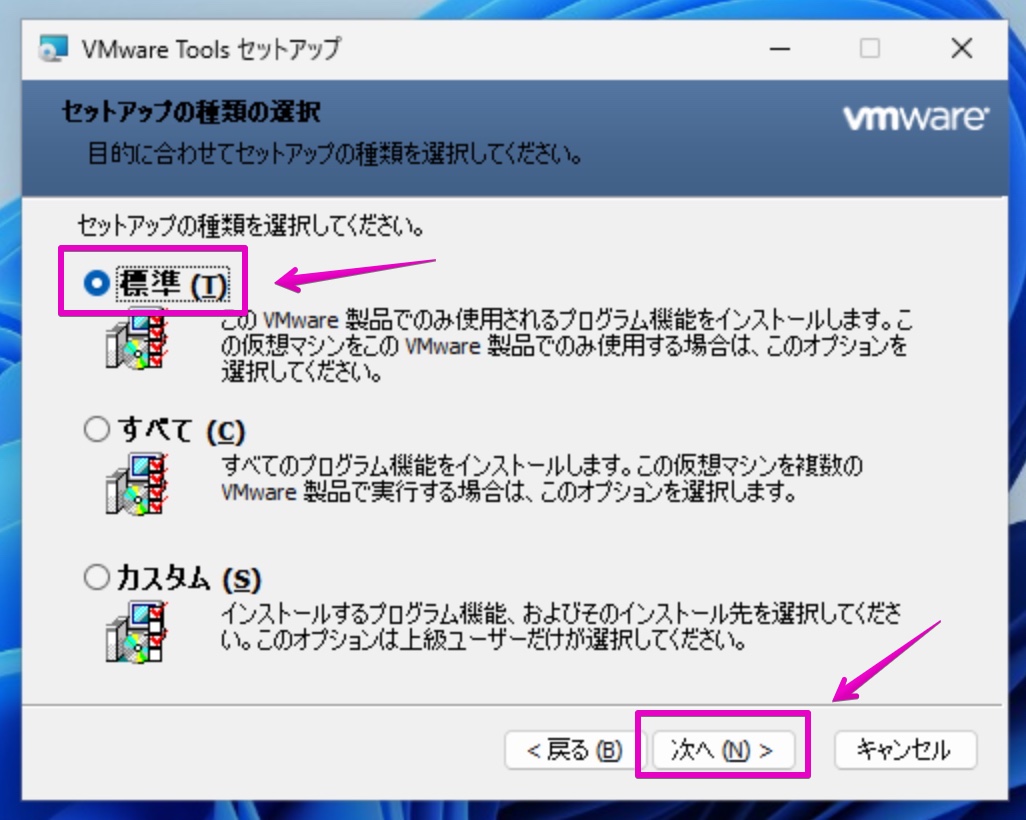
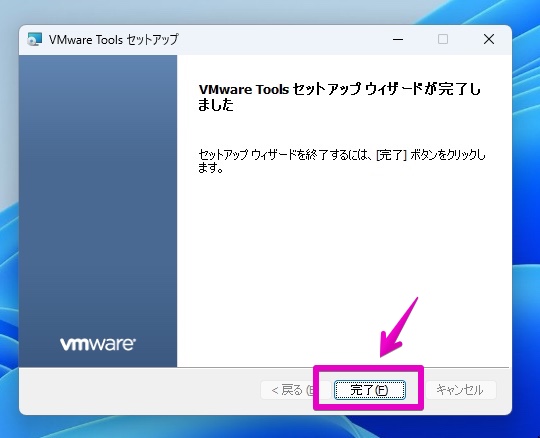
▶︎ 図のように仮想マシンが起動したら、メニューバーから「仮想マシン」->「VMware Toolsの再インストール…」を選択します。

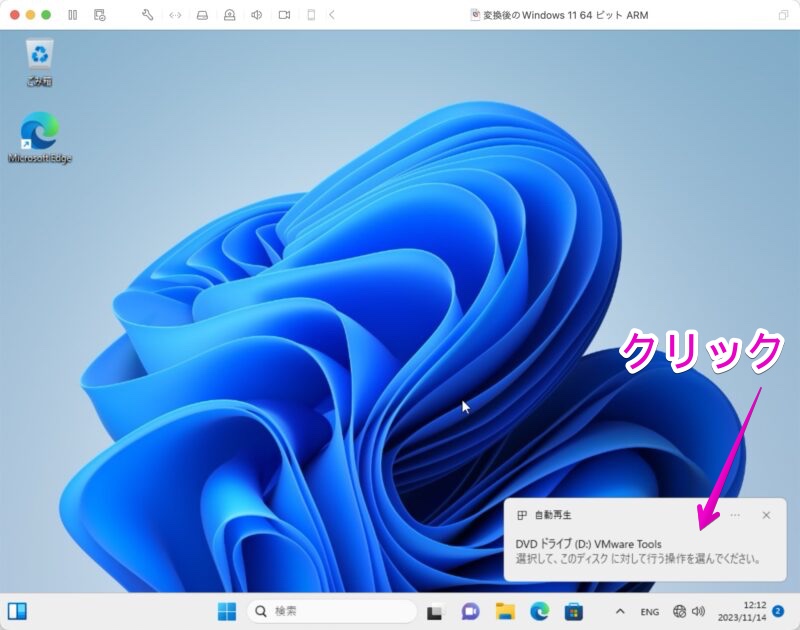
▶︎ この後は、画面の表示に従って、VMware Toolsをインストールするだけなので、スクショだけ載せて説明は省略します。
インストールしたら最後に仮想マシンを再起動してください。

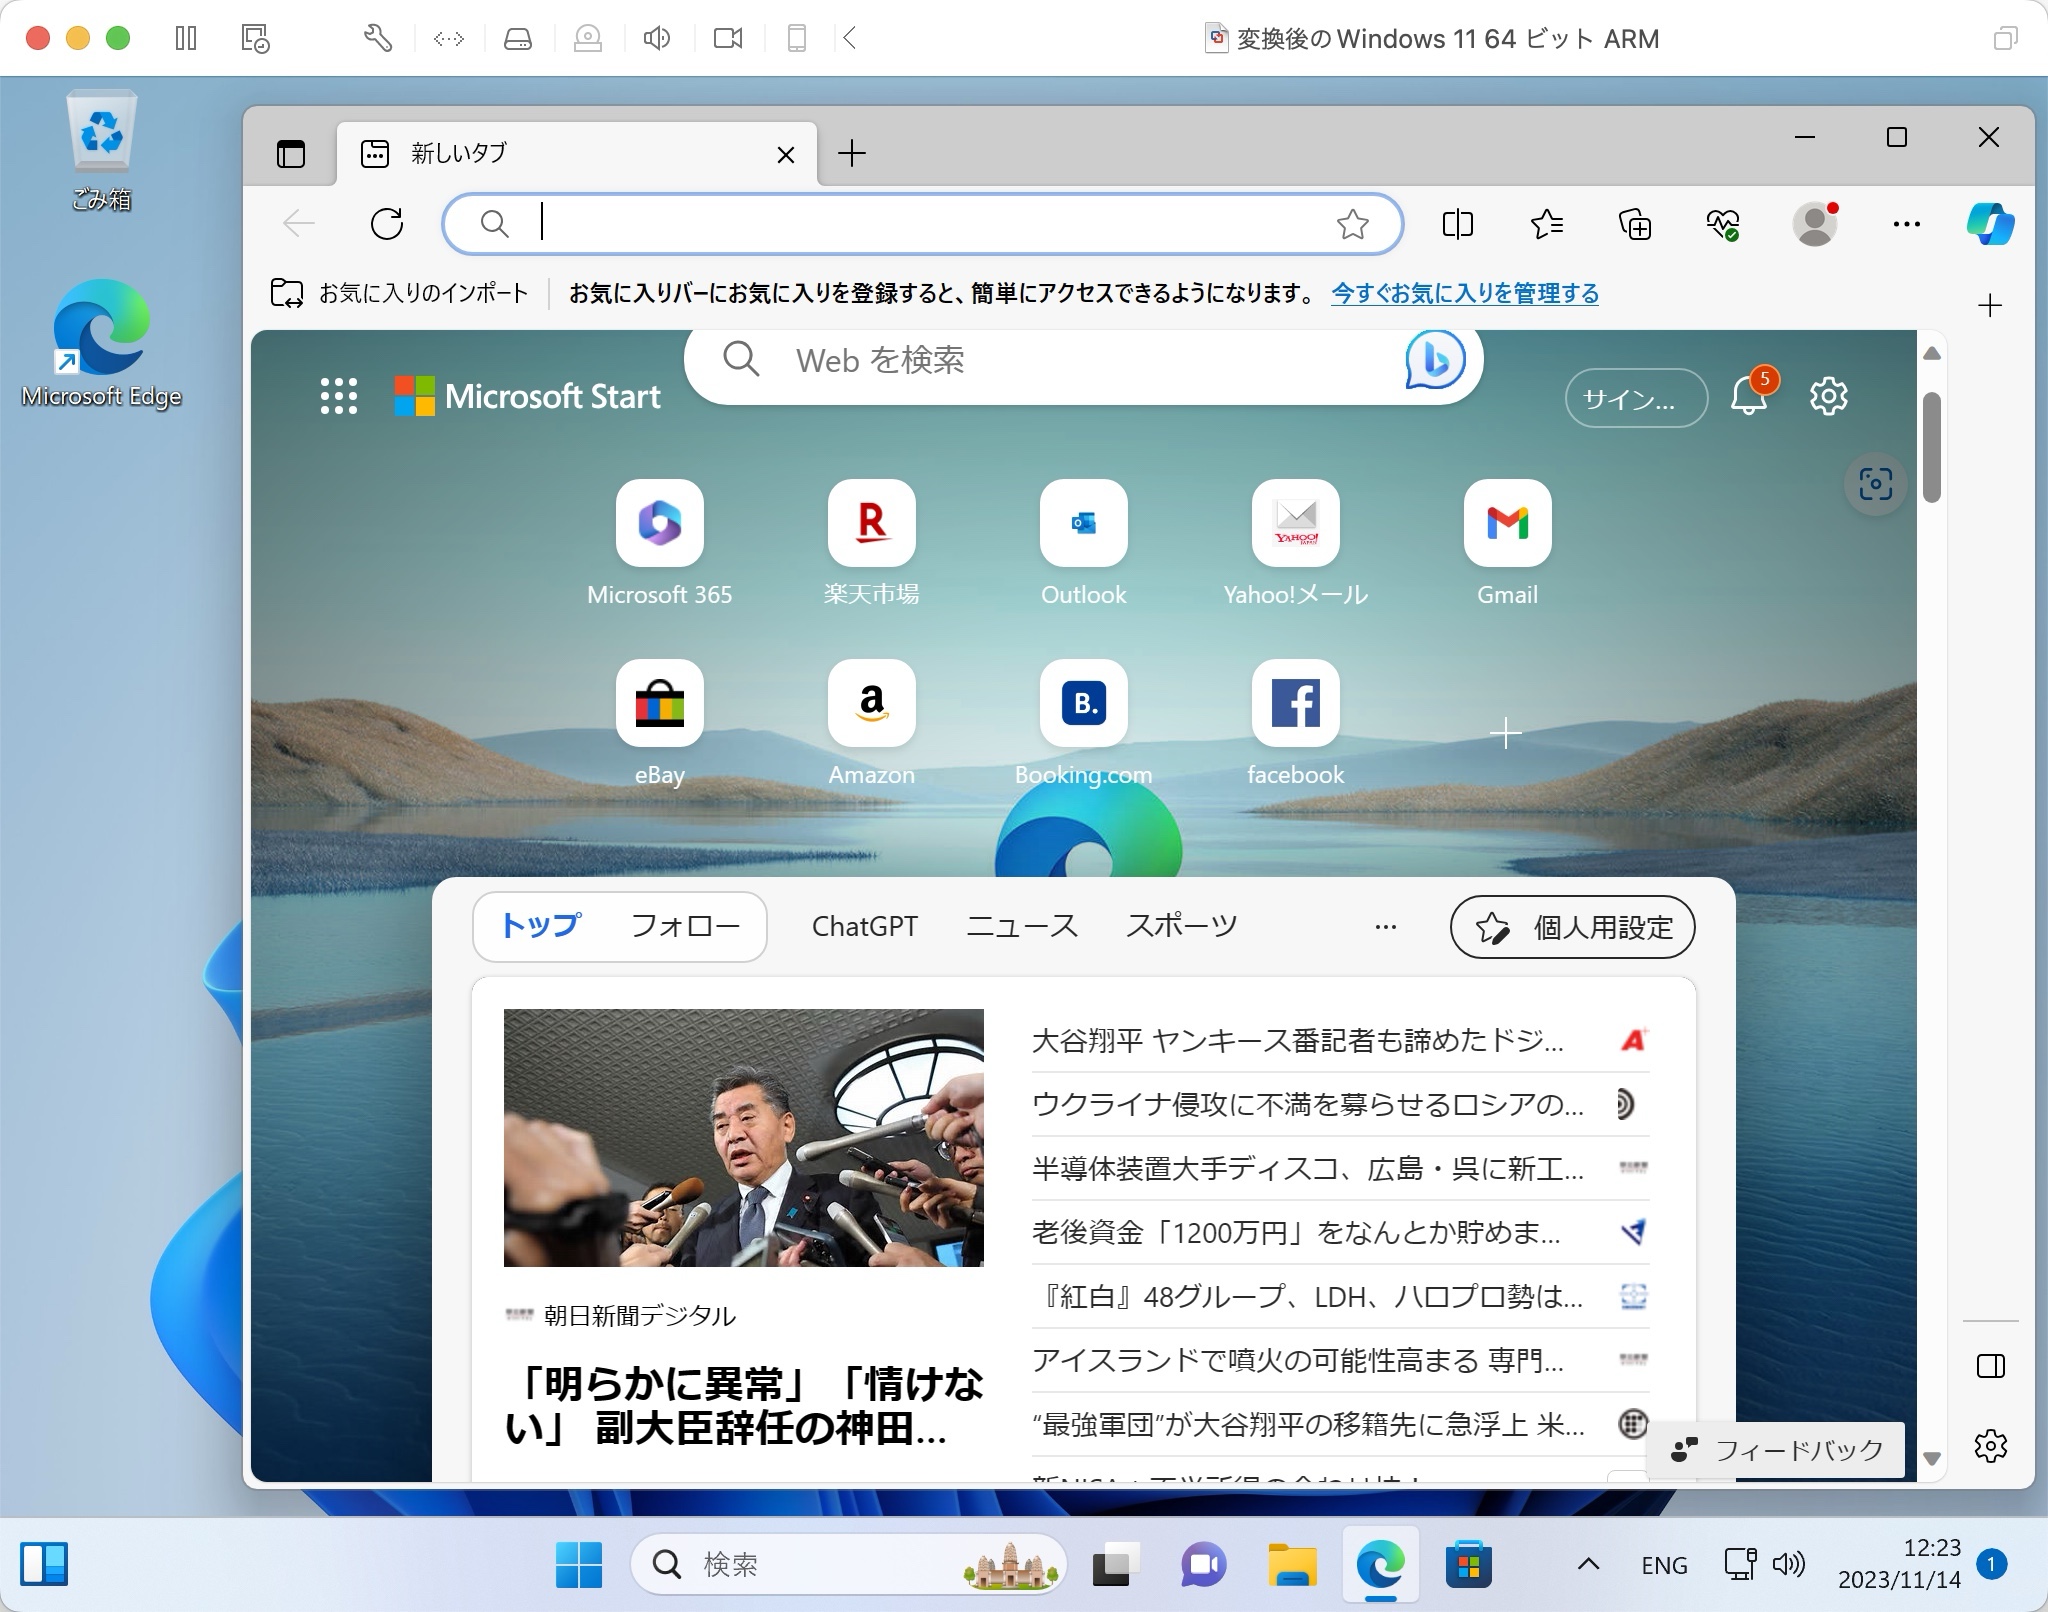
▶︎ 再起動したら、変換作業完了です。
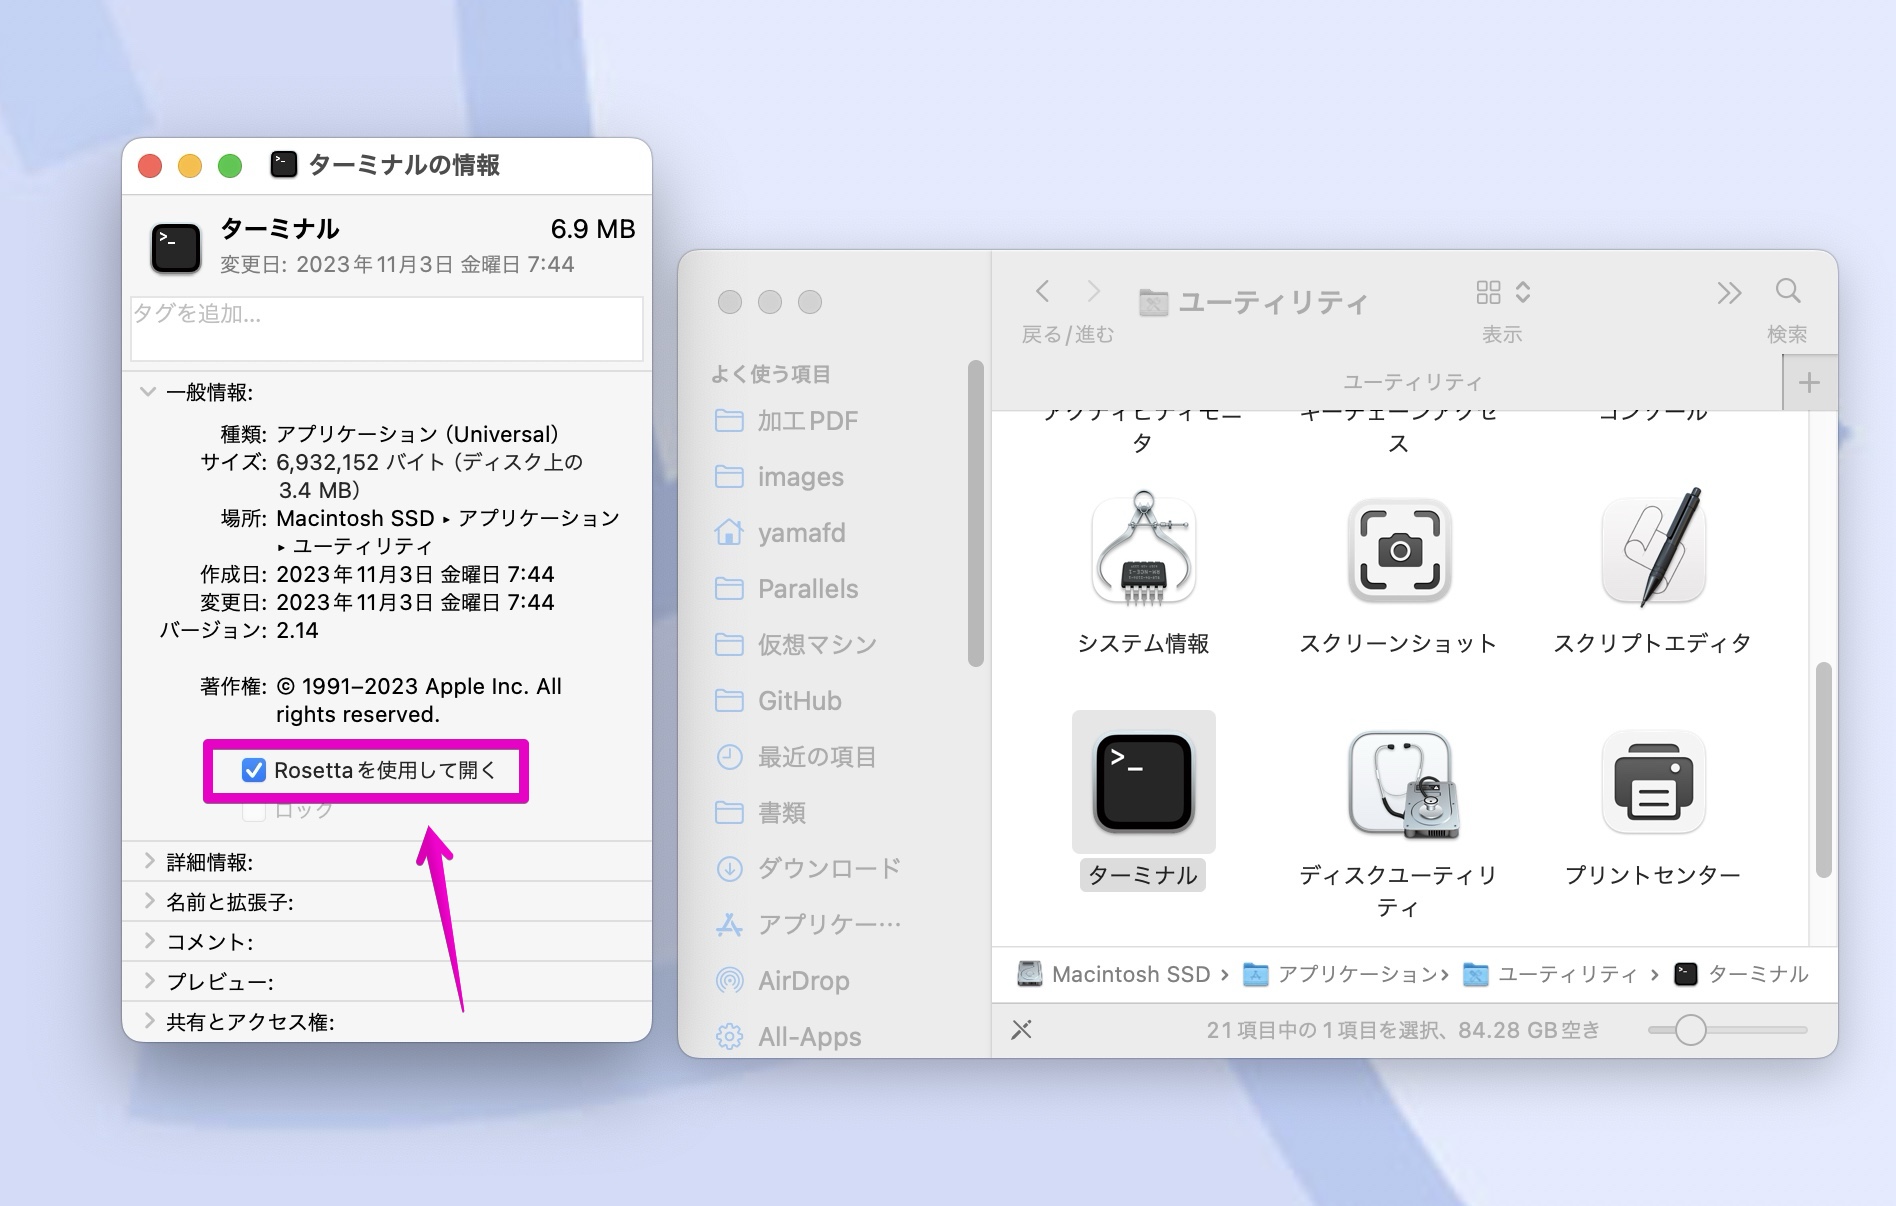
最後に、アプリ「ターミナル」で「Rosettaを使用して開く」にチェックを入れていたのを、チェックを外します。
以上です。お疲れ様でした。
まとめ
AppleシリコンMacで、Parallels Desktopの仮想マシンファイルをVMware Fusionに変換した方法を紹介しました。
当サイトでは、カテゴリ【VMware Fusion】や【MacでWindowsを使う】の記事を多数公開していますで、ご覧ください。
以下は、人気のある記事ランキングです。


コメント
やはり、よほどの理由がない限りは新規にインストールしなおすべきですよね。
その際、WindowsのkeyをMSアカウントに紐づけておくことが大事です。
Windowsキーのアドバイス、ありがとうございます。
兎に角、Homebrewとqemuのインストールが鬼門かなと思います。
ここでエラーが出た時に、ある程度試行錯誤して難しいようなら、新規インストールに切り替えた方が良いと思います。